Computer crashed, forgot to backup? Here’s a solution.

Recently, I totally killed Gustaf Soderstrom’s computer.

It’s a mac mini, and on starup it was totally stuck at the apple  loading screen .

He doesn’t backup his data on the Mac Mini, and he had some homework that he needed off of his hard drive.

I have a USB external enclosure so we could take the hard drive out of his computer and get the data off on another computer, but I didn’t have the correct screwdriver to take out the hard drive.

So here’s how I ended up getting the data off.

You will need:

1. No hardware problems! The reason that your computer is dead MUST BE ONLY SOFTWARE RELATED!

2. The original install disk that came with the computer

3. An external hard drive bigger than the estimated amount of data you have on your dead computer.

Lets get to this.


Step 1. boot from the original install CD

Put in the CD and boot up holding the C key. It will take a while to boot but it will boot from the install CD.

Step 2. Plug in the USB hard drive.

Simple enough. USB, Usb. Congratulations.

Step 3. Open Disk utility

At the screen where it asks you to install, go to Utilities>Disk utility.

Wait for it to load, and trust me, it eventually will. 🙂

Step 4. Copy the data.

You should see both your USB drive and your internal hard drive in the list on the left of disk utility. Select the internal hard drive (the one that actually has a name and is grouped under the physical hard drive) and select from the top “Create new disk image.”

Select for it to be read/write and make sure the encryption is set to none. Above where to select that it probably says root with a little home next to it. Click that dropdown and select your usb hard drive. Then, save the disk image.

Step 5. WAIT

This will take forever. for 65 GB, it took about an hour and a half.

Step 6. Eventually the window will close and you will have no idea that you ever started the disk image copy (it doesn’t even tell you that it’s done or anything).

Step 6. 5: Make sure it worked (optional)

If you have another computer, plug in your USB hard drive and open the disk image. Skip the verification process as it’s wasted time. It should open a window and you should see a Users, Library, Applications, etc. folders. If you see these then congratulations, you’re successful!

If you don’t have another computer, you have to skip this step and hope for the best!

Step 7. Install!

Quit disk utility and the installer will reopen. Go through the simple steps (click continue, click install) and it will install a fresh version of your operating system.

Step 8. Put your data back

Plug in your USB drive and mount that disk image. Replace the applications folder already on the fresh installation with the one from your computer and do the same with your whole home folder (especially the library folder as that contains crucial application support).


Congratulations! You just got your stuck computer reformatted and saved your data!

Thanks gustaf for letting me kill your computer and find out how to fix it again! 🙂

iPod Nano

The iPod nano hasn’t felt much love from me so far. Lets get into the details.

Design

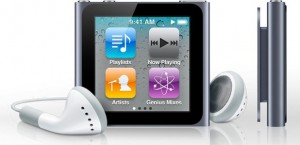
The iPod Nano features a very small and portable design. They tiny little screen has a black bezel that goes across the front of the screen. Apple decided not to totally flatten it out and give it edge to edge glass (which would have been a nice touch, would it have killed you to do that apple?). They turned the screen into one of touch, and makes it very difficult to use if you have sausage fingers. One of my main complaints would be the font size. I have pretty good vision and it hurts my eyes to look at the screen for too long. The iPod Nano has three buttons on it: Volume up, volume down, and lock (Apple is slowly doing away with the hold switch). The iPod Nano has a clip on the back which is an intersting addition. Ads show the nano being clipped onto shirts, bags, pockets, etc. The problem I have with this whole clippy intention is that the way they want you to wear it displays album artwork (or pedometer stats or whatever else for that matter) to everyone around you. I know it’s nice to show off what $1.29 music you were able to afford, but I really don’t need to know what music you are listening to. The nano comes in grey, black, blue, green, yellow, pink, and red.

Interface

The iPod nano has it’s own software which isn’t iOS but has a very similar interface. As you can tell by the picture on the left is has icons and pages and a wallpaper, but it doesn’t have any apps. You can rearrange all of the icons around on the home screen. Instead of having an app for all music, there are different icons on the home screen for songs, artists, playlists, now playing, genres, etc. The interface inside of the apps is like a shrunken down version of that from iOS. One interesting feature would be that the screen is able to rotate to fit whichever way you have the iPod clipped, but to do this you have to put two fingers on the screen and spin them around whichever way you want to have the screen oriented. It’s a bit disappointing that they couldn’t have at least thrown in an accelerometer to take care of this.

Sound Quality

I was personally a little disappointed with the quality of sound on this device. I found it to lack some of the higher ends, and while it still delivers full sound doesn’t pack that higher punch that other iPods do.

Value

The iPod nano goes for $149 for the 8GB version or $17o for the 16GB version. Personally, I think it’s a little bit of a rip off as the iPod shuffle goes for $50, and the nano is a shuffle with an FM tuner and a touchscreen. Personally, I think that this was a bad decision by apple as a touch screen interface on such a small device is very difficult to navigate, and believe it or not there are still people who just want to listen to music but definitely like having a screen and really don’t need 16o GB of storage space.

iPod nano

Teleport

Many people I know have multiple Macs. The most standard multi-mac setup would be one desktop (usually a Mac Mini) and a laptop (Macbook, Pro, or Air). This is usually so that one can have power and still be mobile. But when it comes time to sit down and do some work, it might be useful to have two screens (studies show a dramatic increase in productivity with more screen real estate). But one problem faced is that with multiple computers comes multiple mice/keyboards. Well, if you’re all macs, then there’s a solution.

Teleport is a free and easy way so that you can use one keyboard/mouse and have it span across multiple computers (so you don’t have to move your hands to control a different computer). It’s extremely simple to use.

To get it all working, all you have to do is download teleport. Teleport is a Mac Preference pane (.prefpane) so to configure teleport you open system preferences and click on teleport (under other). Here you can configure settings and arrange the screens. NOTE: Make sure that both Enable Teleport and share this computer are both checked.

In the preference pane you can configure things like pasteboard sync and choose if you want to only switch to the other computer when you are holding a specific key down.

the rest is pretty simple. Just move your mouse across the edge of the screen and it should show up on the screen of the other computer. Whichever computer your mouse is on will be the computer that the keyboard affects. However, the volume keys don’t work across Teleport (neither does multitouch except for scrolling).

Teleport is a great free app that works and does what it should quite nicely. There are some problems when your mouse is on a client computer screen and the client computer loses internet connection. It takes quite a while for your mouse to reappear on your main computer. But the convenience of this application overcomes this setback.

Teleport main site

Teleport direct download

BOINC

BOINC stands for Berkely Open Infrastructure for Network Computing. And I want to appreciate what they are doing with their Distributed Computing platform.


Basically, you download an app to your computer. And when your computer is not in use, all of it’s power (or as much as possible) goes over the internet to berkely so essentially they have a supercomputer of all of these other computers (hence distributed) to go to cure diseases, detect pulsars, and other scientific stuff. It’s an easy way to donate something that could be extremely useful to the cure. The help of the world. So many other scientific things that will get us farther along and allow us to make discoveries of all sorts.

I think that other than being really cool, the BOINC distributed computing platform is an amazing idea. So many people are away from their computers and they leave the potential of power just sitting there. It’s like donating your computer to UC Berkeley for scientific research, but only for the time when you aren’t there.

This is great if you have a LOT of extra computers around you can join this and put those lazy things to work. I read the idea and I just thought to myself. Genius.

Now what’s really cool is that you can actually select which cause you want your power to go to. There are so many categories (all of which support various operating systems) for you to benefit to.

Unfortunately to get it all working it’s pretty simple but can get kinda complicated.

First, click here to download boinc.

Then click here to go see which things you can benefit to. Then find one that has a cause you would like to benefit too. Then, in boinc, click add project. On the page where you found the cause, look at the name in the left-most column.  Find that name in the window of boinc and select it. It will connect to the project then ask you to setup an account and stuff like that. Once you are done with that, boinc will start to download work from the server. One thing you may want to do is open the preferences and select some limits on how much power of your computer it is allowed to use. I made it so that it would only do work after the computer was idle for 1 minute, because I want all of the power of my computer when I’m using it but when I’m not I don’t find a point in letting it sit there useless. I also only allowed it to use 2GB of space on my disk, as I don’t want too much disk space being sucked up by this cause. I also told it to use only 70% of my computer’s processor as I don’t want my computer to overheat either.

I think that this is a great and free way for people to contribute to causes without having to use money. Enjoy 🙂

3as1ly Charg3 Cr3d1t Card5

You are a babysitter.

You are a bartender.

You are a photographer.

You made a bet with a friend over a football game.

All of these require payments. And while yes, you could take cash, sometimes it’s just easier with a credit card, as the money goes straight from their account to your account and you don’t have to deal with any of this green paper stuff.

Usually, you have to have one of those little thingies that they have at supermarkets with a single-purposed computer just for making a bill and accepting a credit card. But now, you can be on your way to accepting credit cards for a very small amount.

The key to this whole task is Square.

Square is completely free and consists of two parts: An app for your iPhone, android, or iPad, and the physical Square card reader.

Amazingly, the square card reader works with all of these. One model for android AND iPhone AND iPad. How you say? This picture should sum pretty much everything up.

So in case you didn’t figure it all out from that picture, basically the square is a little plastic thing that you plug into the headphone jack that has a slot that you can slide a credit card though. In the app, you can select how much you want to charge.

Now after you have put in an amount and swiped the card, you have to sign to authorize it. Of course that would usually be done with first a pen and paper, but now you can with a stylus on one of those thingamajigs in supermarkets. With square, you are supposed to use your finger on the touchscreen, but that can be hard as we are used to having pens. So that’s why in addition to your app and a reader, you need a pogo sketch to go along with it.

That should pretty much explain it.

Now after you are done with all of this swiping and signing and lolly-gagging, its time to print a receipt. I don’t think so. Instead, you can have the receipt emailed to a specified email address. cool, eh?

So wherever you are, at a wedding or the house of a small child, you can always accept credit cards and let people sign and get their receipts without ever seeing a piece of paper.

Square

Pogo Sketch

Jailbroken iOS still isn’t good enough

Okay, so by now you have propable figured out that I am an open source supporter,which is why I’m an android user. But I have gotten the question of why I don’t just use a jailbroken iPhone as that allows open development. Well, kind of.

One of the big things is if some random person creates an app and they don’t want to put it in the android market or it isn’t stable enough to release on the android market, they have to put it on some random location online. With an iPhone, you can’t install a random untrusted application. I mean, even when you’re jailbroken you still have to get your apps from cydia. With android, you can’t do this by default but you can by just checking a single checkbox in a settings pane (applications, to be exact). That’s what makes the difference. That is why I am able to run the beta of swype on my phone. Because I downloaded that app off of the swipe website because it wasn’t ready to be released onto the market and was in closed beta.

Another thing that this means is that if you want to have a closed beta and a few lucky testers, you just can’t with an iPhone. they all need the SDK from apple and that whole thing. With android, all you need is to switch a setting and hit the download button.

Another thing is stability. iOS was NOT made to be jailbroken, and it often reduces stability and speed.I recently jailbroke my iPad and after a few days I reverted because the SpringBoard kept crashing and everything was quite slow. Android is open-source without the loss in stability.

Personally, I think it’s inside is what matters. I mean, I can use a computer with a 0.6Ghz faster processor than the last and I can feel the snapy-ness. No one else I know can. I felt the same way when I started using the iPad. But I support open development of the iPhone, and I think it could have a lot more potential if it was open-source (or at least an open-source option was available for people who care more about it).

Cortex App

No matter what we all browse the web. That’s how you got here in the first place. And one of the most popular things to do while browsing the web is to share different web sites with other people over facebook, twitter, and even tumblr (in this case). And sometimes you will come across an article that you want to save to read a bit later. Cortex lets you do all of those, but extraordinarily quickly.

Cortex is a chrome extension, which gives it cross-platform flexibility along with a super easy installation.

Once you have installed cortex, you need to connect your accounts by clicking on the pretty circle on your menubar then clicking connect accounts.

Connect your accounts here

As you can see, it can link to twitter, facebook, tumblr, and instapaper. Each of them use their own authorization system, and if things aren’t working right then try restarting your browser or waiting a few hours then restarting your browser.

Now, you have to pick your facebook friends. Sadly, you cannot post to your news stream. But you CAN post to other people’s walls, and click pick friends to select which friends you want to be able to share with.

Once you have accounts set up, it is time to start sharing.

To share a webpage it’s pretty simple: click and hold your mouse anywhere on the webpage. You should see something like this show up around your mouse:

Now when this shows up, keep your mouse held down and hover over which service you want to share the page with. Once you are on the letter/section, let go of your mouse and the link to the webpage will be instantly shared.

For facebook however it is a little bit more complicated.

When you hover over the f, another wheel will appear that has the profile pictures of the friends you selected up here.

Now, move your mouse over which friend you want to share it with, and now you can let go.

Although it may sound like it will take a long time, here’s proof otherwise:


I made that video when I was bored. 😛

To get cortexapp, you have to go to cortexapp.com and sign up for the beta then cross your fingers that you get an email back. 🙂

Phone Compatibility matcher

This is a general question to ask. You need to get a new phone, so you ask “which phone should I get?”

And most people these days go for a smartphone. iPhone or Droid are the only choices. By droid, I mean collectiveley the whole droid incredible 2 and x series. That part is up to you.

So here’s how this goes. Print out the first sheet and put a check next to every feature you are sure you would use very frequently and woule be helpful. No matter what, don’t check every option!!

Some of the options have an OR. This means you can only check one of the two.

Once you have filled out the sheet, print the second sheet. Put a check next to each number that you had checked on the first page. Add up the total number of checks for each column and look below to see which column means which score.

Hope this helps you decide whether to get Android or iPhone!

PAGE 1

PAGE 2

P.S. This was inspired by my science teacher Ms. Nabokov who created a similar sheet that determined if you were a tactile, visual, or auditory learner. Good idea!

Mac OS X Lion screws it all up

So if you check out the Mac OS X lion sneak peak, you’ll see what tey are trying to do. They are trying to put the iPad right on to your laptop. But what are they thinking?!

1. It’s a laptop, not a tablet!

iOS was made for touch screens. It’s interface was designed for touch screens. And when you try to put a touch screen system onto an OS without a touchscreen, it doesn’t work too well.

I mean, they even created a home screen with all of your apps that you can swipe through. If you had any idea that you were on a Mac (which by this point you might not) then you would know that you can just open spotlight and type it in faster than you can click the button in your dock then swipe through al of your home screens looking for the correct app….

2. I don’t need full screen apps!!!

They keep saying about how “On iPad, every app is displayed full screen, with no distractions” (<–That’s a direct quote by the way) but everybody hated that. I mean, windows is the world of computers. That is the way that everybody knows and loves when it comes to multitasking. Our computers are made for multitasking, and being able to access everything really fast is quite handy when using a laptop. And if you are in your own little world of a full screen app,you might as well just use a damn iPad! Now this doesn’t mean that there will be no windows at all, but here we are with homescreens and full screen apps in addition. I mean next thing we know, there will be a damn app store for the Mac!

3. I DON’T NEED AN APP STORE

Would you look at that.

Well, I think that this is an OK idea, and it’s cool and all, but I’m just afraid that this is going to lead to the same thing as iOS: Not letting any apps on unless they are approved into the app store. This is the bane of the iPad’s existence. Next thing we know, people are going to start Jailbreaking Macs, and when that happens, hello windows 7.

I think that some of these things might be cool, but they seem way too over the top. And these cool UIs are the only updates here, and I see no under the hood upgrades.

However I am not going to finish without saying that I thought the same negative things about the iPad and I was a *little* unhappy that it didn’t have Mac OS X. But it seems like apple knows what we want before we do. so once it is available in the apple store, I’ll write again about it. 😉

Why I am an android user

Android eats appleI don’t use the iPhone. I use a Droid Incredible (P.S. A Droid Incredible commercial came on the TV JUST as I wrote that sentence. Wow!). But being the apple lover I am, I get asked why I don’t use the iPhone daily. But here’s why.

I believe that computers in general started as a hobby. People could do whatever they wanted to do with their computers. People wrote code and embedded it into chips however they wanted to. The point behind the computer was that people could create electronic devices that could do things that people never imagined.

But to bring this to more than nerds in a garage, it had to be commercialized.

I have no problem with commercialization, but I have a problem with being selfish with your software. Keeping it to yourself for you to have fun with, and not sharing with others. That’s not how my mom taught me to be.

Android is open-source. This means that anyone (even if you are in a garage) can take what google has created and play with it. Mess it up. Make it better. Google is sharing.

Now Apple on the other hand, starts a lawsuit whenever someone uses their software. Psystar, for example. If you’ve never heard of them it’s not a big surprise. Psystar was a manufacturer of PCs that came with OS X preinstalled. And Apple decided to grab it back out of their hands and would you look at that, Psystar is gone.

And it is the exact same story with the iPhone OS. You will never find customized versions of the OS that you can install. You can tweak your current one with a couple of themes but you will never find a customized version of the OS. And if you do, make sure you don’t tell apple.

There are many many many different twists on the Android OS. One of the most popular ones would be Cyanogen, which is Android with some cool tweaks. It can be installed by rooting your phone, downloading an app from the official Android Market, downloading the ROM, and clicking install. Things will flash, files will move, and time will pass. But in the end, your phone is running a completely overhauled android OS. Now google recently got upset with Cyanogen, but the reason was because Cyanogen was including Google’s apps with it (Market, Maps, Navigation, etc.). Now it is disappointing that I can no longer download apps from the Android Marketplace when using Cyanogen, but at least cyanogen is available to download and install at will (without google’s apps, of course). Even though google is now keeping a little for itself, it is still sharing. And I like to see people share.

The new iPod nano and why I don’t like it

So today apple announced a chutzpah of new stuff (as expected) including a new apple tv, a new iPod touch, a new iPod nano, and a new iPod shuffle. I’ll cover those in a later post, but for now I want to talk about the nano.

What apple did with this design really stood out to me, and not in a good way. First of all, they got rid of the buttons and replaced it with this extremely tiny excuse for a touchscreen, and got rid of the camera and curved edges and put a clip on it. So basically, it is an iPod shuffle with a touchscreen. But my big problem is the clip…

So lets say you have it clipped to your shirt like that picture. If you want to change the song you either have to bend your head over to see the screen and look like an idiot or you have to unclip it and attempt to hold the awkwardly shaped thing to change your music. So then why don’t you just put it in your pocket? Why include the clip? The only other function is to show EVERYBODY ELSE IN THE WORLD what music you are listening to at the moment. But to tell you the truth, nobody really cares what you listen to other than you. So that eliminates the clip. And what’s with the form factor of this thing?! It is a square that barely fills the palm of your hand, and it doesn’t look like it would be very fun to try to hold.
Oter than the clip, the other thing is how they tried to make it an iPod touch-like interface with homescreens. But instead of having apps, ou have things like albums, playlists, genres, etc. Why?! This interface might be cool if you wanted to use apps on it, and if you want apps go get yourself an iPod touch. it is 1/3 bigger (and is so much more confortable to hold) and boo hoo, you can’t tell the world what you are listening to. Oh, darn. That’s too bad.

I mean, nobody really cares about your music! It’s nice to know you are currently listening to the black eyed peas (I guess that explains why you, sir microsoft employee, are line dancing in the middle of your stores [traitor using iPods, don’t worry I won’t tell. ;-J ]) but nobody cares at all! It’s just an iPod shuffle with a screen. A smaller, less functional iPod touch. Something along those lines.

If you disagree or have anything more to add, comments are welcome. 🙂

Le Trackpad de Mágico! (Magic Trackpad)

I have no idea why but this has been requested by numerous people.

Along with the launch of the new and improved iMac, Apple released the Magic Trackpad. It’s basically a larger bluetooth MacBook Pro trackpad. Their tagline is “why do notebooks have all the fun?”

I find it useful even tough I already have a MacBook Pro, because when I need gestures like exposé It is right there, not a reach across the desk to get to my MacBook.

Setup

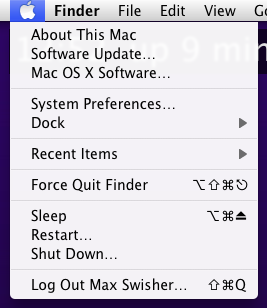
The setup is very simple. First step is to update your software. Do that by going to the apple menu and clicking Software Update. This will then download the drivers for the Magic Trackpad.

Once you have downloaded the update and restarted, press and hold the power button on your trackpad until the green light starts flashing.

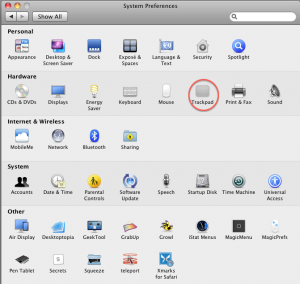
Once that is working, go into System Preferences and click on Trackpad.

Once in the pane, click on Set Up Bluetooth Trackpad in the bottom right corner.

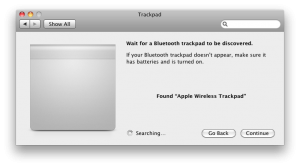
Make sure the light on the trackpad is still blinking (if it isn’t just press the power button once) and you should see a window appear. After a few seconds it should look like this.

Once it looks like that^^^ click continue and your wireless trackpad will be setup! In the pane that follows you can configure a bunch of cool options.

Review

The Magic Trackpad is a good addition or replacement for a mouse. The large surface is convenient because you will rarely have to pick up your finger, however having it so large does make it feel a little bit awkward.

I think that if you are getting (or have) an iMac or other Mac desktop then you may prefer this over the Magic Mouse for it’s multitouch gestures. For MacBook and PacBook Pro users I find this only useful if you are already using an external keyboard and mouse because you can get the gestures right where you need them without reaching out across your desk to get to your MacBook’s Trackpad. It’s aluminum design fits in perfectly with the Wireless Keyboard and is even the exact same height. I’m thinking that apple should create a Magic Keyboard that has a Magic Trackpad on the side of it.

The Magic Trackpad is currently available at your Local Apple store for $69.

[ad code=1]