When I arrived at my first CES, one of the first things that I saw and experienced in depth was the Sphero. They had a medium sized booth, with a little track and some ramps. There were all of these tiny little white balls rolling around on it, and I must say – it looked pretty cool. A chat and a demo later, I saw what it was. It was a little ball that rolled around and was controlled by your iPhone or iPad. That was about it. The people at the booth told me that they would be evolving it and making it into an API for any developer to use, and that the product would be sold eventually for under $100. The prototypes at the stand were functional, but barely. A small drop and they would fall apart. Upon pressing the “boost” button, they would go crazy and lose their bearings. Not to mention that those were all they had with them, so when one broke down beyond repair they were simply down one. It looked promising. The concept was cool, it seemed flexible, it could definitely be something cool. After all, it was just a ball – which left plenty of room for the imagination of customers and developers.
 It’s one year later. I’m back at CES. Upon walking into the convention center, I can see a giant rotating sphere that seems to be a giant model of the sphero. Upon arriving under said banner, I saw something big – much bigger than the year before. The booth was much larger, there were tons of spheros everywhere, and there were video presentations on TV monitors and banners and everything. Much, much, MUCH bigger than last year. It looked like they had really grown. Here they had these balls that were made out of a very solid plastic, had inductive chargers, sphero logos embedded on each one, and none of them were out of control. Heck, they were rolling them down concrete stairs! I checked over and they had really gotten somewhere.
The Concept
As I said before, this thing is a ball. It now has open APIs that any iOS or Android developer can use to integrate the sphero with their apps. The range of applications has grown, and there are apps available that can make the sphero a fake golf ball or even take advantage of the sphero’s accelerometer and gyroscope to use it as a game controller. The range of applications is constantly growing, so buying a sphero isn’t just buying a ball – it’s like buying a phone, who’s functionality will keep growing with more applications and updates.
The Ball
 The Sphero itself doesn’t take up much space. It’s white, hard plastic that has no spaces or anywhere that the plastic snaps together or comes apart. In fact, it doesn’t have a charging port. If one were to look inside of a sphero (which would be very difficult considering that they would need to saw or melt open the outer shell), he would find an array of devices. There’s some motors as well as a main motherboard which contains a compass, accelerometer, gyroscope, bluetooth card, and a bunch of other robotic computing stuff. They would also find the multicolor LED that lights up the ball in any color you want. The sphero contains a standard lithium-ion rechargeable battery, which is charged through an inductive charger. For those of you who don’t know what an inductive charger is, it’s basically a charger that charges a battery through a material without having any physical contacts. These are sometimes found in electric toothbrush chargers, emergency flashlight chargers, and more recently on electronic devices such as the Palm Pre or the duracell powermat. To charge the sphero, just set it in its dock with the heavier part of the sphero on the bottom. Like magic, the sphero will start charging. Cool! To wake the ball up, just shake it. Yup. No switches here, just shake it as if it were a two week old container of orange juice and it will light up and be ready to play. Set it down on the ground, open up your iOS or android device, and start rolling. The sphero connects to your device through bluetooth. A user will notice a tail-like figure on the top of it. This shows the orientation of the sphero relative to the control mechanism in the application. If one picks up the sphero and spins it, she would notice that the mechanism inside would constantly adjust to maintain the set orientation. That’s part of the robotics at work. Overall, the sphero is one intelligent, intuitive ball.
The Interface
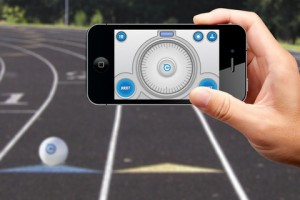 Sphero provides a few apps to demonstrate the basic functionalities of the sphero. The main app, Sphero Drive, simply allows the user to drive the sphero around. Here you won’t find any steering wheels or throttle nonsense – just a circle with a little sphero-shaped control in it. This eliminates the confusion that often comes when you’re driving a device towards you. With a steering wheel, it ends up becoming reversed, but with this interface, it’s not a problem. Put two fingers on the screen and rotate them, and you’ll see a blue dot on the sphero. Point it right towards yourself, then pushing the sphero in the app forward will cause the sphero to roll forward. Pushing it right will make it roll right. It’s as simple as that.
Apps
At the moment, Sphero has been releasing many different apps. One of them is the standard “Sphero Drive” application that I was mentioning up there. Others like Chromo use the sphero as a controller, and one app allows the user to play golf with it. At the moment, there are many different applications being developed and there’s always new ones available. Conclusion The Sphero is available from both Sphero’s website and now many brookstone stores for $130. I will say, that it is not a cheap toy – but think of it as a console, where there’s always new games out that you can buy. If you’re a developer, you can use Sphero’s open API to integrate it into your applications for free. Check out the sphero website for available apps, purchasing the Sphero, and using their free API. http://gosphero.com
P.S. Thank you Sphero for sending me the finished product!
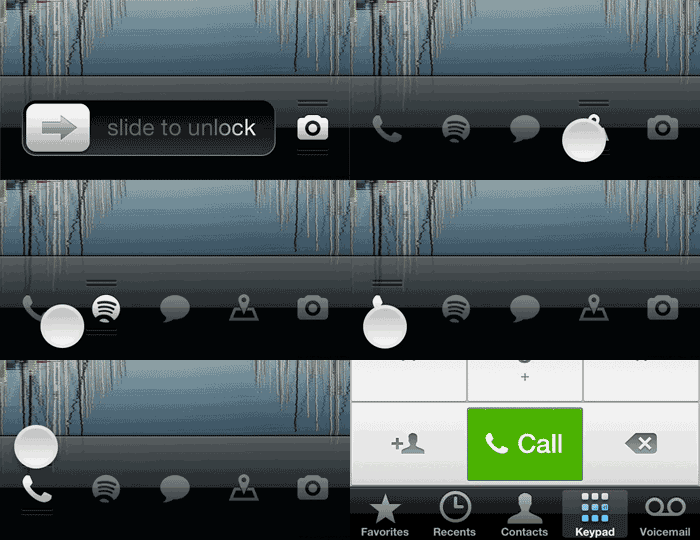 Now put your finger on the little Camera shortcut. You’ll see the “slide to unlock” slider is replaced by all of your shortcuts. Slide your finger over one of them and swipe up to open it.

 Computer screens will get dirty. That’s just how it is. Hyper-salivating friends, sloppy dogs, and fingers all contribute to the inevitable film that will build up on your beloved machine.