Plugable USB 2.0 USB Graphics Adapter

Monitors are an increasingly popular thing. They increase productivity, allow more room for multitasking, and prices are rapidly decreasing.

The poweruser knows:

I can buy a computer with a graphics card with multiple ports on it so I can plug in multiple monitors.

But I hear:

I am going to buy a large bulky computer that i$ really expen$ive $o I can plug in multiple monitors.

So what about the people who get a laptop, and use an external monitor with it, but want more?

That would be me.

There’s only one monitor port on my computer, which was already taken.

So for my third monitor, I used an old Mac Mini that I had lying around.

But the problem with this is that it was a totally different computer, so all of the logins were different, I had to use a network based mouse and keyboard sharing system, it was just terrible. And worst of all, all of the files on each of the computers were different. So when I wanted to open a document on my third screen that was on my first computer’s hard drive, it wasn’t possible without moving around the file first.

Alas, there is now a solution. And the title of this post says it all.

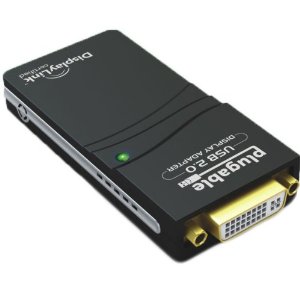
The Plugable USB UGA (Usb Graphics Adapter I’m pretty sure) works just like it should.

In the box

  • Plugable UGA
  • DVI to HDMI Adapter
  • DVI to VGA Adapter
  • Mini USB cable

Setup

Lucky for you, setup is fairly easy.

Before you do anything else, you need to go to the displaylink site and download the Mac drivers. Luckily, there is only one option for a driver, so you don’t have to make that half-minded decision on which one will actually do the trick.

After you have installed the driver and restarted your computer, you can start plugging things in.

As expected, use the mini USB cable to plug the UGA (the biggest piece) into your USB port. Then, plug in your monitor cable, using any adapters if necessary. If your monitor is DVI, then you won’t need any adapters and you can plug your cable straight into the UGA.

If your monitor is VGA, then you can just add the DVI to VGA adapter on top of the UGA, then plug your monitor into that.

Voila, it should start working. Your screens should turn blue and another wallpaper should appear on your USB Monitor.

For further configuration, just go into your System Preferences, click Displays, and click Arrangement. You can arrange your monitors so that they are extended displays and you can move your windows across all of them.

Speed and Usage

As stated in the owner’s manual, when there is nothing happening on the screen, the device itself is refreshing the display. This means that your computer isn’t working to refresh the display.

You can tell that only the device is refreshing when the green light on the UGA itself is solid. When it is flashing it usually means that something is moving on the screen. This means that your CPU is working to move every pixel over to the USB monitor. Because of this, you probably don’t want to run too heavy graphics on the display, as you will most likely overload your CPU.

Besides the CPU load, the speed isn’t perfect. It’s a tiny bit laggy, but not enough to be too concerned about. It works perfectly fine for things like facebook, browsing, spreadsheets, word processing, all that usual stuff. However, don’t try to use it for anything that involves games, videos, or a ton of pixels being constantly rendered.

However, you can’t be too disappointed. It’s not enough lag to make you not want to use it anymore (and I’m very sensitive about my lag, so that’s really saying something). Anyways, it’s going over USB 2.0 for god’s sake! It’s running a whole monitor off of two connectors (there’s four connectors in a USB port, 2 for data 2 for power).

One other thing I noticed was that the device got quite a bit hot when running. I don’t know if it was out of it’s operating range, but it was still quite a bit warm. It worried me a little bit, but it doesn’t seem to lower in performance even when warm, so I don’t think this should be too much of a concern.

And if you want more monitors, this isn’t just the end. You can have up to 6 of these connected to your computer at once (hopefully your CPU can handle it), which means that if you have a laptop with a monitor port built in (which would make two screens), then you can have up to eight screens running off of nothing but a laptop! (You can plug the UGAs into a hub, as you probably don’t have six USB ports on your computer.)

Conclusion

If you want more monitors but don’t have the graphic cards, this is the best way to do it. The resolution and color renders perfectly, and even though it uses some CPU when rendering, it works perfectly for spreadsheets, word processing, and other basic tasks. What it doesn’t work for is heavy graphics rendering, such as video and gaming. Use a directly connected display for those.

These are compatible with windows and linux in addition to mac, so you mac haters are in luck.

They are for sale on amazon for $65, and you can find that here.

INSTALLING ROMS ON YOUR DROID INCREDIBLE: FULL GUIDE

1. Background check and root

If you haven’t yet, click here to read the guide on rooting your droid incredible.

2. Find some ROMs

The first thing you need to install a ROM would be the ROM itself (go figure).

If you have a droid incredible, I highly recommend downloading the fusion ROM from this post. Fusion is an extremely well-done and compatible ROM based off of CyanogenMod7 (another ROM), so you’ll get the dimension-opening power of 2.3.2 gingerbread.

If you don’t want this ROM, you can always do a google search. Not too hard, eh?

2. Download the ROMs

With the example I’m using (fusion), there are two ROMs. It includes first the base gingerbread ROM, but on top of that it also has a ROM for the Android Market, Gmail, YouTube, and Maps applications, as they do not come by default on the Android base operating system.

For now, I am only going to discuss installing the base, but for other ROMs it is sometimes the same situation with the two seperate ROMs. So later on I’ll discuss installing the gapps (dev talk for Google Apps).

There are two ways you can get the ROM to your device.

The first one involves your computer. Download the ZIP file(s) onto your desktop, then plug in your phone and move the zip(s) onto the root of your SD card.

The second way requires an app called Root Explorer (I discussed it in the guide to rooting). On the phone itself, use the web browser to download the ZIP file(s). Then, open up root explorer and navigate to the downloads folder (probably on your sdcard). Then, tap and hold the zip and select move. Navigate to the root of the sd card and tap paste. (Do this with the second ROM if you have one).

3. BACK UP!

This is an extremely important step to this, because if you forget to backup then you will never be able to restore your phone to the condition it was in when you rooted. That means that the HTC sense operating system that came on your phone will be GONE.

So, you’ll need to boot into recovery and backup.

Turn off your phone and turn it back on while holding the down volume button. It will boot into HBOOT, a diagnostics screen. Once it is done checking for update images on the SDcard, use the volume and power buttons to navigate to and select RECOVERY in the menu that you see.

It will show the HTC booting screen, but then boot into recovery (with very small fonts, I might add).

In this screen, scroll down and select backups (you can now use the optical trackball to do this). Then, select create a backup (or something like that).

It might take a while, but eventually a backup should be made of all of your stuff on your phone. So we shall now proceed to the next step.

Install the ROMS

Now is the fun part.

Boot back into the recovery screen by holding the down key and the power button at the same time.

Then, hit Wipe Data/Factory Reset.

This will wipe all of the data off of the phone.

WAIT WAIT WAIT! I STILL WANT MY BACKUPS!

Calm your caps lock keys, wiping the data from the phone doesn’t wipe out the sd card, which is where the backups are.

Now, select install zip from SD card.

Select choose zip from SD card

then, select the zip that you either downloaded or transferred over.

Then, select the yes, and magically, the ROM will install.

Wait a while, and it should be installed and working!

Upon first boot it will take a very long time to load. It has to configure everything and get it working. But every time you reboot the device the reboot time should be less and less until it is less than 30 seconds.

Anything else?

You might have downloaded 2 zip files to your SD card which you downloaded from the site that gives out the ROMs. This is probably because one of them is a Google Apps zip.

Make sure that before you move the two zips on to the sd card, you name them so you can tell which one is the base OS and which is the Gapps. (if you have no idea what I’m talking about, you need to click here and read up on your background info.) Make sure that first you install the Base OS zip, then, after it’s done, select Install zip from sdcard once again and select the gapps zip. Make sure that you don’t hit wipe data/factory reset, because what that will do is wipe out the base OS so you only have gapps and nothing to run it on. Not too functional if I may say so myself.

Where to find these ROMs?

As I said, the best ROM for the Droid Incredible at the moment is the Fusion ROM.

But there’s other ROMS too.

One of the most popular is CyanogenMod. They’ve been releasing ROMs with upgraded features since the dawn of time (or android).

However, after a little mixup with google, they are no longer allowed to have Gapps on their OS. So you’ll have an android phone with…. no android market. Or gmail. Or youtube. Have fun!

One of the easiest ways to find ROMS for your droid incredible is to just google it.

If you google Droid Incredible ROMs, a large amount of different websites will show up. If you are too lazy, here’s a direct link to that google search for ya. You’re welcome.

ROOTING YOUR DROID INCREDIBLE: FULL GUIDE

1. Background Check

Please click here and read up all about what it means to root and install ROMs, then do step 2.

2. YOU NEED AN SD CARD!

Make sure you have an SD card in your phone. If you don’t then all hell will break loose and the universe will be sucked into an unknown dimension beyond the horizon of scientific knowledge. Or something along those lines.

3. Enable USB Debugging

On your Droid Incredible’s home screen, tap menu, select Applications, tap developer, and check the box that says USB Debugging.

4. Download unrEVOked

unrEVOked is the limera1n for all HTC android phones (hence the capital EVO in the middle).

Click here and select which operating system you own. The download will begin.

5. Plug in your device and root

The time has now come.

Plug in your Incredible to your computer over USB. You should see a notification that says USB Debugging is enabled.

Also, pull down the notification bar and select the USB connection (not the debugging, the other one). Then, select to have your phone as a Mass Storage Device or something like that (My phone has been screwed over so much that I no longer have the stock htc operating system installed, so I can only be so specific to my knowledge).

You should see TWO drives mounted on your computer, one for the internal phone storage and one for your SDcard.

Then, hit the reflash button and take cover.

Time will pass into another dimension beyond the human eye’s comprehension of life itself. Portals will contradict all possibilities of universal independence. Our very existence will tremble at the rip in the fabric of space and time.

Oh, and you’re device will be rooted. ๐Ÿ™‚

6. Did it work?

After you’re device is rooted it *should* be able to boot into ANOTHER DIMENSION IN SPACE AND TIME…. wait…. into the standard 2.2 htc sense froyo you had before you rooted.

However, if you look in your applications drawer, you should see a new app called Superuser.

Congratulations, you’re rooted!

7. Get root apps

Now, you can run applications that require root access.

A few of my favorites:

Wireless Tether

If you’re on the road and want internet on your computer or iPad, then you’ll have to fork an extra $20 a month to verizon and suffer a 2GB limit.

But not if you have Wireless tether!

With Wireless Tether, you can create an encrypted wireless network with access control and everything, and the bandwidth limit is only that of your phone’s data plan.

You can find Wireless Tether by searching in the android market.

Root Explorer

If you keep getting warnings telling you that your SD card is full, then you’ll love Root Explorer. You can browse your android’s files, and even delete, rename, or move things around from both the SD card and the internal storage. You can delete those huge downloaded zip files, or all of the pictures you don’t want from the DCIM folder. Handy! This is available in the Android Market as well.

screenshot

If you ever do any kind of posting to a blog about android stuff, this application is a MUST. You can easily take a full resolution screenshot by just shaking the device. Then, you can plug it into your computer and transfer the screenshots off of your SD card.

8. Got ROMs?

One of the most amazing parts of having a rooted android phone is that you can install other operating systems. Want gingerbread? HTC hasn’t even released the update. But now that you’re rooted, you can install other operating systems without htc’s permission.

Here’s a full guide on how to install ROMs.

Better alternative to OMGB-6! HELLO FUSION!

OMGB-6 is great. It’s a simple, well made Gingerbread build for the droid incredible that worked really well.

But it had a couple problems.

First of all, it didn’t support google voice.

Also, many apps didn’t work. Twitter didn’t work, and the app I am doing testing for didn’t even work. Also, the version of the market was outdated.

Well, if you want a fuller and better and more supported phone, then say hello to the fusion rom.

Fusion is built on CM7, and has a base of 2.3.2. This gingerbread is tasting FRESH.

It boasts a newer version of the android market, FULL app support, and it also supports google voice.

If you don’t know how to install ROMS, then you have a bit of reading to do.

First, click here to learn what all of this means and do your background reading.

Then, do steps 1-4 on this page.

Downloads

BASE

GAPPS

Installation

Put both of those on your SD Card.

Then, reboot into recovery and BACK IT UP. BACK IT UP. BACK IT UP… STEADY….. BACK IT UP…. STOP! Don’t do this with ROM manager. Why, I don’t know. But apparently bad things happen and black wholes open into other dimensions when you use the ROM manager to install this. O.o

Once you’ve backed up hit Wipe data/factory reset in the recovery.

Done?

Ok.

Now, hit “install zip from sd card”, select “choose zip from sd card”.

And in the list that appears, select fusionbase.zip.

Then hit yes out of the large groups of nos.

(tic toc tic toc)

Done yet?

No?

Ok…

(tictoctictoctictoc)

Done now?

Good.

Now, go through the same screens, but when you select the zip select the gapps zip and install it.

While that’s installing, I’ll explain why there are two separate zips for this ROM.

Android is a base operating system. It doesn’t include the android market. It doesn’t include gmail. It just includes the base operating system.

So the base zip is the 2.3.2 base operating system without the android market or gmail or anything like that.

So you could just install the base and nothing else. But I don’t think you would be too happy when you can’t download any apps.

Done yet?

Ok good.

Now, select “Wipe cache partition.”

Done?

That didn’t take long.

Now, hit reboot, and wait a LONG time. It will probably be 5 minutes or so of the flashing android logo before it actually boots.

But once it does, you’re in business! Enjoy the new market, full app support, and using your Google Voice account, all without sacrificing the magnificent dimension-opening speed (and bragging rights) of Gingerbread 2.3.2.

Rooting, Recovery, and ROMs: What it’s all about.


So you’ve got an android phone.

And you can use the stock operating system with all of the manufacturer’s skinning and apps and versions and keyboard and everything.

Congratulations.

But if you are feeling a bit ballsy, then you can really take your phone to a true mobile computing level.

Here’s the steps to this.

  • Root
  • Install a recovery
  • Find ROMS
  • Make backups
  • Install ROMS
  • Use Wireless Tether

Lets explain what all of this is.

Rooting

Rooting means that you can create a way for apps to get superuser access. This is handy for getting to wifi, modifying files, or installing ROMs.

Recovery

For the Recovery, that will usually be installed when you root the phone. The recovery is where you can make and recover backups of the phone, install ROMs, and a slew of other stuff that might come in handy (but could also kill your phone).

Backup

Once you have the recovery installed (you can’t have the recovery without the root FYI) then the first thing you need to do is make a backup of your phone.

This is pretty easy. Just boot into Recovery (just hold down volume on boot and select recovery when given the option), Select backups, and select make a backup now. Your screen will flash many random things, and no matter how long it takes, don’t force shut it down or take out the battery. It will almost always finish.

ROMs

Once you have a backup of your normal operating system, you can go crazy with other ROMs.

ROM stands for Read Only Memory. In android poweruser terms, it is an operating system that can be installed on the phone using the recovery mode.

You can find many roms on the internet all over the place. XDA-developers is a great place to get ROMs. Sometimes a ROM will even be for the next Android version that htc hasn’t released yet.

When you download a ROM, it will come as an easy to handle zip file. And from here it’s simple.

Plug in your phone to your computer and mount it as a disk drive/USB Mass Storage. Then, just click and drag the ROM from your computer onto the root of the SD card. Eject and unplug the phone, then reboot into recovery.

Select install zip from sdcard and select the name of the file that you moved over. Then, choose the yes among the long list of nos to confirm you really want to install it and whabam, you will be installing a new operating system.

Then, reboot your phone, and you will be with your brand new OS that you yourself downloaded from the internet and installed on your phone.

Unfortunately, this process is different for every android phone. Sometimes there is a one-click root. Sometimes you have to use a command line application to open a port on the phone and install the root like that. But once you have gotten the phone rooted, installing zips is a piece of cake.

Wireless Tether

Aside from installing ROMs, another thing you can do is install and use apps that usually wouldn’t be possible if you weren’t rooted.

The one example I am going to use here is called Wireless Tether. And basically, it’s just that.

You can make your phone into a wi-fi hotspot with no hassle, just using verizon’s mobile hotspot plan. But that will cost you an extra $20 a month and you have a 5 GB limit before you start getting overage fees. Ouch.

With Wireless tether, you can connect unlimited devices, the data comes out of your data plan for your phone, and that also means there’s no overage fees.

Once you are rooted, just search for Wireless Tether in the android market and you will be able to install it on your phone and use it. You can change the SSID of the WiFi network, and you can even enable encryption and a password on your network. In addition, it allows you to use access control, where you can disable a device’s access to the network. Very handy sometimes.

Do it yourself

So that is the whole concept of rooting, recovery, and roms. You can find roms for things using google: Just do a search for “[your phone] 2.3 ROMS” or “[your phone] Cyanogenmod” and you should have plenty of luck. If you want to find out how to root your phone, just do a google search for “[your phone] root” and that should turn up some helpful results.

If you have a rooted droid incredible, click here to learn about the stable and functional gingerbread rom by WeDoDroid.

Hanging restore after Jailbreak fix

Here’s the storyline.

You jailbreak your iPad.

Then, you find an app called Wi-Fi sync, where you can sync your iPad over Wi-Fi with your computer. This includes both an app from Cydia on your iPad AND it requires an app on your PC/Mac.

Then, you want to undo the jailbreak.

So you go into iTunes and click the Restore button.

It restores for the most part, but then, it hangs at the very end.


Uhoh.

Now your iPad is in recovery mode, and you can’t restore it.

Well, as you might have thought, you need to uninstall Wi-Fi Sync!

Just download the file HERE (mac only) and run the uninstaller. After you uninstall, the restore should go perfectly.

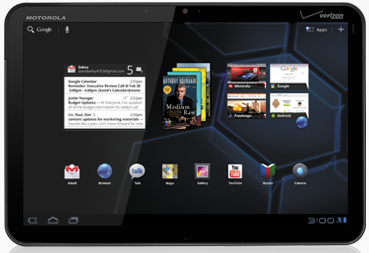
Motorola Xoom Tablet: First Impressions

While at the Launch Conference, I got to play with Robert Scoble’s Motorola Xoom. Here’s what I thought.

Software:

Honeycomb was quite a bit mesmerizing. It looked beautiful on that tablet’s screen, and it’s 3D rendering capabilities showed on the home screen. The speed was pretty good, and the browser seemed extremely nice and smooth to use. The software side of this tablet really shined in speed and smoothness of effects, and this tablet would have been terrible with anything but honeycomb.

Also, remember when BumpTop was bought by Google?

Well, turns out they used some of their 3D stuff in Honeycomb. Good to see such an awesome piece of software go to a good cause!

Hardware

Lets start off with this: I hated the widescreen layout. I prefer to use my iPad in horizontal mode because when reading you can see a lot more, therefore you don’t have to scroll as much, and the Xoom sideways resulted in a very overwhelming layout that was like a widescreen monitor turned sideways.

I HATED the location of the power button. It’s in a very odd place in the back. Someone had to literally show me where the power button was. If you can’t immediately turn it on without any doubt of the power button location, you know that there’s a problem with your product.

The two cameras? Absolutely terrible. They don’t even have an auto focus, or a focus at all. I would never even attempt to take a picture with this thing.

Conclusion

Overall, it’s a nice product, but the screen annoyed me, the power button takes getting used to, and the cameras aren’t even worth having. They are worse than nothing, because you get to see what it would be like to have a camera on a tablet, but a terrible implementation of it.

And for $800? Don’t think so.


iPad 2 Launch Comparable to the 3GS Launch

Apple held an event all about the iPad 2 today, and let’s just say I wasn’t happy.

First of all, I can easily compare it to the difference between the iPhone 3G and the iPhone 3GS. Yes, I was really that disappointed.

Here’s the list of new features:

  • Front facing camera
  • Rear facing camera
  • Dual Core A5 Processor
  • 9x faster graphics
  • 8.8mm thin (a third thinner than it’s predecessor)
  • 1.3 Pounds instead of 1.5
  • A white version that will actually ship
  • A handy cover that folds into a stand. The cover had more innovation than the new iPad.

Other than that, it’s your same ol’ iPad. Same size, same screen, same apps.

The cover is really cool though. It has magnets that latch and align to the side, and when you close the cover the iPad turns off and when you open it the iPad turns on. This interested me substantially more than the iPad itself.

If you remember how bummed everyone was after the 3Gs, I am having that same feeling right now, but at least I have a case to be excited about.

Custom URL Shortener

Hey there!

You all probably see bit.ly all over the place. Twitter, facebook, websites, etc. Well in case you don’t know, it’s a URL shortener. What it does is takes a long URL like http://goodmorninggeek.com/archives/11567 and makes a link that goes from bit.ly/xF4y7 and redirects to the long one. This means that you can reduce the amount of characters you have in your URL, so there’s more room for text when you are limited to a certain amount of characters.

Well, I have created one of my own.

It’s called gdmnggk.me. So when you hit that retweet button up there, it includes the link gdmnggk.me/XXXXX instead of goodmorninggeek.com/archives/etc. or bit.ly/XXXX.