Magic Trackpad Getting Jumpy? Here’s a Weird Fix

As you may know, Lion recently came out. Lion relies heavily on multi-touch gestures to be taken full advantage of. So I decided to break out the magic trackpad and try it out.

I’ve had many problems with the magic trackpad recently, mostly with it jumping around the screen a lot – I would touch it, and suddenly it would be on the other side of the screen. This time was no exception.

So why does my trackpad keep doing this? I’ve replaced the batteries, cleaned it off, and even tried someone else’s.

After a bit of research, I finally found the problem:

Time Machine.

I don’t know why, but after I read this I noticed that Time Machine was backing up. Hmm…. I stopped the backup and Voilla, the trackpad is back to its normal, behaving self.

This is going to get in the way, considering that Time Machine likes to back up every hour; make sure you keep an extra USB mouse on hand just in case.

To tell you the truth, I have absolutely NO idea why Time machine causes a problem with the trackpad. Time Machine connects over WiFi, and the Trackpad connects over Bluetooth. They’re totally seperate antennaes – why are they interfering with each other?

Although there is no explanation to this solution, it’s still a solution. So remember – if your trackpad is acting up, check to see if Time Machine is backing up. (HEY THAT RHYMES!)

Disappearing Disk Space?! 10 Step Fix

Today, I left my Mac alone for a few hours. When I come back, I am confronted with messages telling me that I don’t have enough disk space left.

A quick check of my available disk space using Finder reveals that I only have 200mb of free space left on my 115GB SDD.

Wait, WHAT?! I left my computer and it had 50 GB free. How can 49.5GB just magically appear on my hard drive?!

I couldn’t even DOWNLOAD that much during the time I was gone.

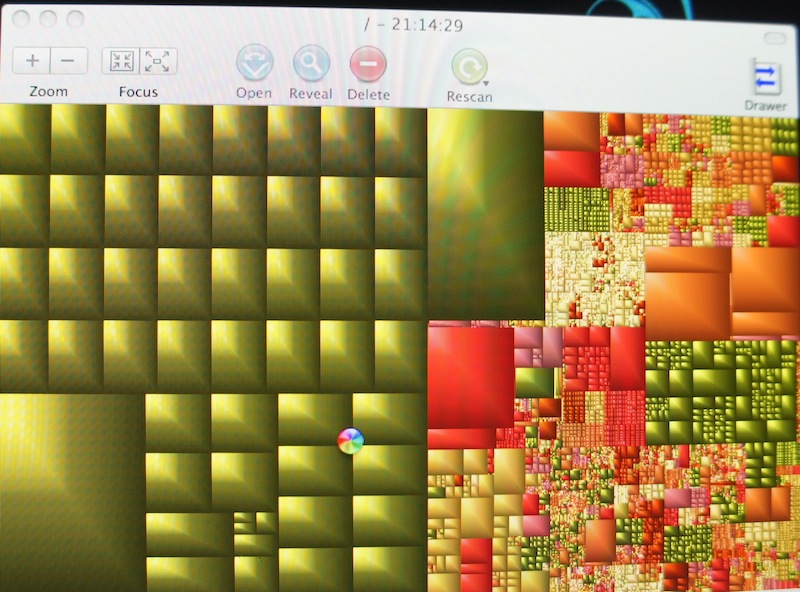
So I decided to find out what was taking up so much space using a wonderful free application called GrandPerspective (review here, what a wonderful app if I may say so myself) and decided to try and find out what was taking up so much space. Here’s what the result looked like:

WHOW THERE! What is all that green that’s taking up half of my hard drive?

A quick hover reveals that these are “swap” files that live in a hidden folder that’s reserved for system use.

Swap files are spaces where application memory/files is held. It’s like a less random access version of RAM. And somehow, my computer had 50GB of it.

Here’s the fix:

  1. Shut down your computer. If necessary, just hold down the power button and force shut it down.
  2. Hold down the shift key.
  3. Press the power button while still holding the shift key.
  4. When the apple logo appears on screen, lift your finger from the shift key.
  5. A loading bar will now appear. Wait a while and it will eventually show the login screen. It will let you know that you are booted into safe mode.
  6. Don’t log in!
  7. press the Back button on the login window, then press Shut Down.
  8. Press the power button without pressing any keys.
  9. Wait for the computer to boot.
  10. Enjoy your spacious computer!

There ya go! It’s a simple fix for a near catastrophic problem.

To prevent this from happening, restart your computer every couple of days. That was probably my problem, as I haven’t restarted in about a week. Oops!

When you restart, you don’t need to do the safe boot, as it will still clear a large amount of the swap files and cache. This is more proof that it’s a good idea to restart now and then, preferrably daily!

A reboot a day keeps the swap files away!

Fix: ClockwordMod won’t boot after update

***UPDATE: Go into Android Market and update the ROM manager to the latest version. It will fix this problem so you can update straight from 3.0.0.5 to 3.0.0.8.

So I recently went to backup using the ROM Manager on my phone. It notified me that there was a new version of ClockworkMod, and I was currently on 3.0.0.5, and should update to 3.0.0.8. So I update, and when I reboot into recovery nothing happens. It stays frozen at the HTC Incredible boot screen.

Luckily, you can still boot into Android.

Here’s the fix.

Go into ROM Manager and flash 3.0.0.6, one version up.

After it flashes, boot into the recovery and select “Clear cache partition.”

Then, reboot into Android. Open ROM Manager, and flash 3.0.0.7.

Boot into recovery, clear cache, reboot, and continue doing this until you are finally at 3.0.0.8. It should boot into recovery just fine. Enjoy!

Hanging restore after Jailbreak fix

Here’s the storyline.

You jailbreak your iPad.

Then, you find an app called Wi-Fi sync, where you can sync your iPad over Wi-Fi with your computer. This includes both an app from Cydia on your iPad AND it requires an app on your PC/Mac.

Then, you want to undo the jailbreak.

So you go into iTunes and click the Restore button.

It restores for the most part, but then, it hangs at the very end.


Uhoh.

Now your iPad is in recovery mode, and you can’t restore it.

Well, as you might have thought, you need to uninstall Wi-Fi Sync!

Just download the file HERE (mac only) and run the uninstaller. After you uninstall, the restore should go perfectly.

Computer crashed, forgot to backup? Here’s a solution.

Recently, I totally killed Gustaf Soderstrom’s computer.

It’s a mac mini, and on starup it was totally stuck at the apple  loading screen .

He doesn’t backup his data on the Mac Mini, and he had some homework that he needed off of his hard drive.

I have a USB external enclosure so we could take the hard drive out of his computer and get the data off on another computer, but I didn’t have the correct screwdriver to take out the hard drive.

So here’s how I ended up getting the data off.

You will need:

1. No hardware problems! The reason that your computer is dead MUST BE ONLY SOFTWARE RELATED!

2. The original install disk that came with the computer

3. An external hard drive bigger than the estimated amount of data you have on your dead computer.

Lets get to this.


Step 1. boot from the original install CD

Put in the CD and boot up holding the C key. It will take a while to boot but it will boot from the install CD.

Step 2. Plug in the USB hard drive.

Simple enough. USB, Usb. Congratulations.

Step 3. Open Disk utility

At the screen where it asks you to install, go to Utilities>Disk utility.

Wait for it to load, and trust me, it eventually will. 🙂

Step 4. Copy the data.

You should see both your USB drive and your internal hard drive in the list on the left of disk utility. Select the internal hard drive (the one that actually has a name and is grouped under the physical hard drive) and select from the top “Create new disk image.”

Select for it to be read/write and make sure the encryption is set to none. Above where to select that it probably says root with a little home next to it. Click that dropdown and select your usb hard drive. Then, save the disk image.

Step 5. WAIT

This will take forever. for 65 GB, it took about an hour and a half.

Step 6. Eventually the window will close and you will have no idea that you ever started the disk image copy (it doesn’t even tell you that it’s done or anything).

Step 6. 5: Make sure it worked (optional)

If you have another computer, plug in your USB hard drive and open the disk image. Skip the verification process as it’s wasted time. It should open a window and you should see a Users, Library, Applications, etc. folders. If you see these then congratulations, you’re successful!

If you don’t have another computer, you have to skip this step and hope for the best!

Step 7. Install!

Quit disk utility and the installer will reopen. Go through the simple steps (click continue, click install) and it will install a fresh version of your operating system.

Step 8. Put your data back

Plug in your USB drive and mount that disk image. Replace the applications folder already on the fresh installation with the one from your computer and do the same with your whole home folder (especially the library folder as that contains crucial application support).


Congratulations! You just got your stuck computer reformatted and saved your data!

Thanks gustaf for letting me kill your computer and find out how to fix it again! 🙂