How-To: Root the Galaxy Nexus LTE

I just got my hands on this beautiful Galaxy Nexus. I love it so far, and a full review is in the making.

But in the meantime, I figured I might as well show you how to root it.

So here you go.

(FYI: This how-to only applies to mac)

1. Download the files

First, download this file: Android root tools


Unzip it and put the folder on your desktop.

Now we can get started!

1. Unlock your Bootloader

Unfortunately, this is necessary with the LTE version of the galaxy nexus. It can be a little bit risky at times and is said to void your warrantee, but you can always undo this part.

First, plug in your Galaxy Nexus to your Mac and hold down the power button to turn the phone off.

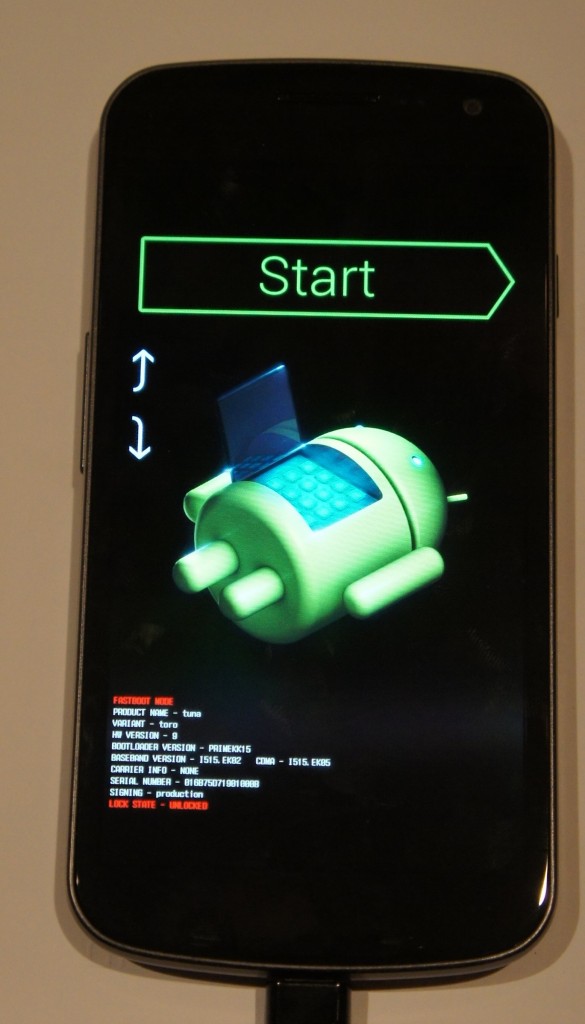
Now, hold down both the up and down volume buttons at the same time and hold down the power button. You should be greeted with a screen that looks like this (if not, shutdown and try again):

If you’re having a lot of trouble with this, here’s a video that I made showing you how:

Open up Terminal.app and type the following:

./~/Desktop/androidsdk/platform-tools/fastboot-mac oem unlock

You should see a prompt on your Nexus’ screen asking if you want to unlock the bootloader. Press the volume up key followed by the power key. You’re done!

Once you’re back at the android-open-thing screen, hit the power button to start the phone.

Now, it should boot up and start cycling through the boot animation. It may do this for a good ten minutes – whatever you do, DO NOT PULL THE BATTERY! (I learned this the hard way).

Eventually your Nexus will boot up, and you’ll be safe and sound in your little Ice Cream Igloo.

2. Root

Now it’s time to ROOT!

Put your phone back into fastboot mode plugged into your computer.

Open up Terminal and type this:

chmod +x ~/Desktop/androidsdk/r2-galaxynexus-superboot/install-superboot-mac.sh (hit enter)

./~/Desktop/androidsdk/r2-galaxynexus-superboot/install-superboot-mac.sh (hit enter)

That should be it! Your phone should start up.

It may hang on the Google logo for a while – If this happens, wait about 10 minutes and pull and replace the battery. Turn it on and it should cycle through the boot animation for a few minutes.

Once your phone boots up, you’ll be completely rooted! Enjoy!


CyanogenMod 7

Of all of the ROMs floating around out there, Cyanogen is by far the most established custom after-market ROM available.

CyanogenMod 6 brought froyo features to 2.1, and was later updated to 2.2 It was then very similar to a basic 2.2 ROM, so it became outdated. But CyanogenMod 7 brought us a loaf of gingerbread this time around. This has put it much higher up.

In addition to the new faster and cleaner base operating system, CyanogenMod brought some new interesting features to the table.

Lockscreen Gestures

The name says it all. On the lockscreen, you are able to perform gestures that will do different actions, including enabling the flashlight, unlocking the phone, opening a shortcut, or opening an application.

DSPManager

I have really found no use for this quite yet, but others might. It allows you to modify your sound outputs. You can modify headset, speaker, and bluetooth separately, and in each pane you get options for a bass booster, and you also get a nice equalizer that is quite easy to modify. I don’t exactly know why you might need this, but I guess some audiophiles on a higher degree than me might appreciate it.

Themes Support

The operating system comes with a built in theme chooser and three themes. You can download new themes online on many different forum sites (such as xda-developers) and easily install them. One package includes the theming for the WHOLE operating system, including home screen, highlights, menubar tweaks, etc.

Incognito Mode

This feature is rarely used, but I guess could come in handy. Identical to the incognito mode in Google Chrome, this will prevent your phone from saving cookies, history, cache, or anything.

Installation

Installing this ROM was fairly simple, however it doesn’t come with Google Apps built in.

First, go to http://cyanogenmod.com and select your phone, then download the ZIP for your phone and put it on your SD card. Open up ROM Manager and select “Install zip from SD card.” Select the zip of CyanogenMod, then check the box that says “Wipe Data” and the box that says “Backup current ROM.” Continue with your installation and you will be greeted with CyanogenMod. You may notice, however, that there is no Market, YouTube, Gmail, etc. To install those, download the zip for your phone here and then flash it. To do this, transfer the Gapps zip onto your SD card and boot into recovery by booting while holding the down volume button. In the menu that comes up, select Recovery, and wait for it to boot. In the next menu, select “Install ROM from SD card,” select the Gapps ROM, and let it install. Then, reboot your phone, and you will be greeting with a Gapps enhanced CyanogenMod. Enjoy!

[For more info on installing ROMs and rooting, read my full guide here.]

Fix: ClockwordMod won’t boot after update

***UPDATE: Go into Android Market and update the ROM manager to the latest version. It will fix this problem so you can update straight from 3.0.0.5 to 3.0.0.8.

So I recently went to backup using the ROM Manager on my phone. It notified me that there was a new version of ClockworkMod, and I was currently on 3.0.0.5, and should update to 3.0.0.8. So I update, and when I reboot into recovery nothing happens. It stays frozen at the HTC Incredible boot screen.

Luckily, you can still boot into Android.

Here’s the fix.

Go into ROM Manager and flash 3.0.0.6, one version up.

After it flashes, boot into the recovery and select “Clear cache partition.”

Then, reboot into Android. Open ROM Manager, and flash 3.0.0.7.

Boot into recovery, clear cache, reboot, and continue doing this until you are finally at 3.0.0.8. It should boot into recovery just fine. Enjoy!

Better alternative to OMGB-6! HELLO FUSION!

OMGB-6 is great. It’s a simple, well made Gingerbread build for the droid incredible that worked really well.

But it had a couple problems.

First of all, it didn’t support google voice.

Also, many apps didn’t work. Twitter didn’t work, and the app I am doing testing for didn’t even work. Also, the version of the market was outdated.

Well, if you want a fuller and better and more supported phone, then say hello to the fusion rom.

Fusion is built on CM7, and has a base of 2.3.2. This gingerbread is tasting FRESH.

It boasts a newer version of the android market, FULL app support, and it also supports google voice.

If you don’t know how to install ROMS, then you have a bit of reading to do.

First, click here to learn what all of this means and do your background reading.

Then, do steps 1-4 on this page.

Downloads

BASE

GAPPS

Installation

Put both of those on your SD Card.

Then, reboot into recovery and BACK IT UP. BACK IT UP. BACK IT UP… STEADY….. BACK IT UP…. STOP! Don’t do this with ROM manager. Why, I don’t know. But apparently bad things happen and black wholes open into other dimensions when you use the ROM manager to install this. O.o

Once you’ve backed up hit Wipe data/factory reset in the recovery.

Done?

Ok.

Now, hit “install zip from sd card”, select “choose zip from sd card”.

And in the list that appears, select fusionbase.zip.

Then hit yes out of the large groups of nos.

(tic toc tic toc)

Done yet?

No?

Ok…

(tictoctictoctictoc)

Done now?

Good.

Now, go through the same screens, but when you select the zip select the gapps zip and install it.

While that’s installing, I’ll explain why there are two separate zips for this ROM.

Android is a base operating system. It doesn’t include the android market. It doesn’t include gmail. It just includes the base operating system.

So the base zip is the 2.3.2 base operating system without the android market or gmail or anything like that.

So you could just install the base and nothing else. But I don’t think you would be too happy when you can’t download any apps.

Done yet?

Ok good.

Now, select “Wipe cache partition.”

Done?

That didn’t take long.

Now, hit reboot, and wait a LONG time. It will probably be 5 minutes or so of the flashing android logo before it actually boots.

But once it does, you’re in business! Enjoy the new market, full app support, and using your Google Voice account, all without sacrificing the magnificent dimension-opening speed (and bragging rights) of Gingerbread 2.3.2.

Rooting, Recovery, and ROMs: What it’s all about.


So you’ve got an android phone.

And you can use the stock operating system with all of the manufacturer’s skinning and apps and versions and keyboard and everything.

Congratulations.

But if you are feeling a bit ballsy, then you can really take your phone to a true mobile computing level.

Here’s the steps to this.

  • Root
  • Install a recovery
  • Find ROMS
  • Make backups
  • Install ROMS
  • Use Wireless Tether

Lets explain what all of this is.

Rooting

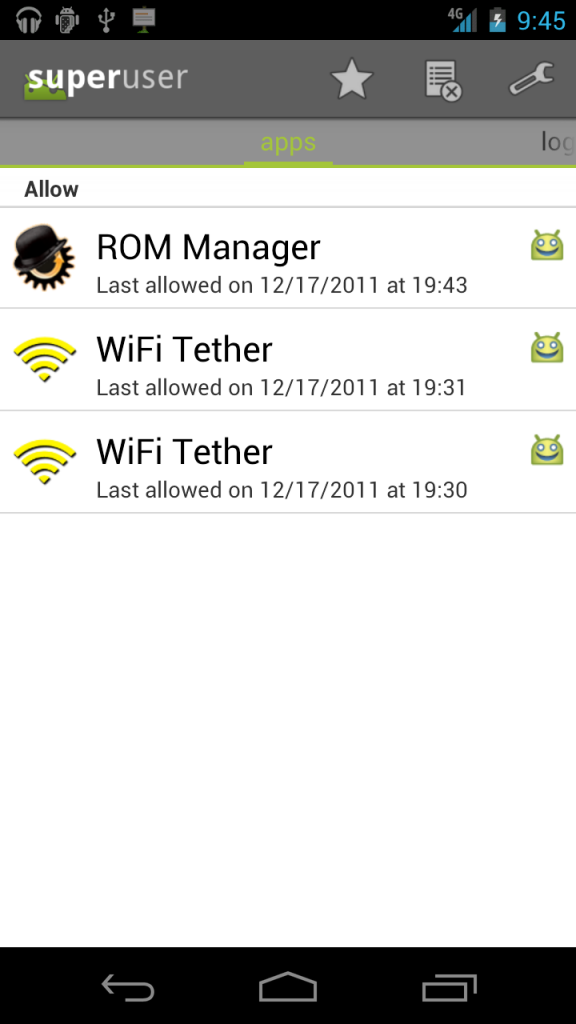
Rooting means that you can create a way for apps to get superuser access. This is handy for getting to wifi, modifying files, or installing ROMs.

Recovery

For the Recovery, that will usually be installed when you root the phone. The recovery is where you can make and recover backups of the phone, install ROMs, and a slew of other stuff that might come in handy (but could also kill your phone).

Backup

Once you have the recovery installed (you can’t have the recovery without the root FYI) then the first thing you need to do is make a backup of your phone.

This is pretty easy. Just boot into Recovery (just hold down volume on boot and select recovery when given the option), Select backups, and select make a backup now. Your screen will flash many random things, and no matter how long it takes, don’t force shut it down or take out the battery. It will almost always finish.

ROMs

Once you have a backup of your normal operating system, you can go crazy with other ROMs.

ROM stands for Read Only Memory. In android poweruser terms, it is an operating system that can be installed on the phone using the recovery mode.

You can find many roms on the internet all over the place. XDA-developers is a great place to get ROMs. Sometimes a ROM will even be for the next Android version that htc hasn’t released yet.

When you download a ROM, it will come as an easy to handle zip file. And from here it’s simple.

Plug in your phone to your computer and mount it as a disk drive/USB Mass Storage. Then, just click and drag the ROM from your computer onto the root of the SD card. Eject and unplug the phone, then reboot into recovery.

Select install zip from sdcard and select the name of the file that you moved over. Then, choose the yes among the long list of nos to confirm you really want to install it and whabam, you will be installing a new operating system.

Then, reboot your phone, and you will be with your brand new OS that you yourself downloaded from the internet and installed on your phone.

Unfortunately, this process is different for every android phone. Sometimes there is a one-click root. Sometimes you have to use a command line application to open a port on the phone and install the root like that. But once you have gotten the phone rooted, installing zips is a piece of cake.

Wireless Tether

Aside from installing ROMs, another thing you can do is install and use apps that usually wouldn’t be possible if you weren’t rooted.

The one example I am going to use here is called Wireless Tether. And basically, it’s just that.

You can make your phone into a wi-fi hotspot with no hassle, just using verizon’s mobile hotspot plan. But that will cost you an extra $20 a month and you have a 5 GB limit before you start getting overage fees. Ouch.

With Wireless tether, you can connect unlimited devices, the data comes out of your data plan for your phone, and that also means there’s no overage fees.

Once you are rooted, just search for Wireless Tether in the android market and you will be able to install it on your phone and use it. You can change the SSID of the WiFi network, and you can even enable encryption and a password on your network. In addition, it allows you to use access control, where you can disable a device’s access to the network. Very handy sometimes.

Do it yourself

So that is the whole concept of rooting, recovery, and roms. You can find roms for things using google: Just do a search for “[your phone] 2.3 ROMS” or “[your phone] Cyanogenmod” and you should have plenty of luck. If you want to find out how to root your phone, just do a google search for “[your phone] root” and that should turn up some helpful results.

If you have a rooted droid incredible, click here to learn about the stable and functional gingerbread rom by WeDoDroid.