Axis: App Shortcuts on your Lockscreen!

App Shortcuts from your Homescreen!

App Shortcuts from your Homescreen!

One of the cool features of the iPhone is the camera button on the lock screen. The camera is just a swipe away from the lockscreen, meaning you won’t miss anything while fumbling for your Camera app.

Well, here’s a jailbroken tweak that will allow you to add more shortcuts to your homescreen just like the Camera shortcut for any app you so desire.

The app is called Axis, and it is available from Cydia for $0.99. This means that you need a jailbroken device.

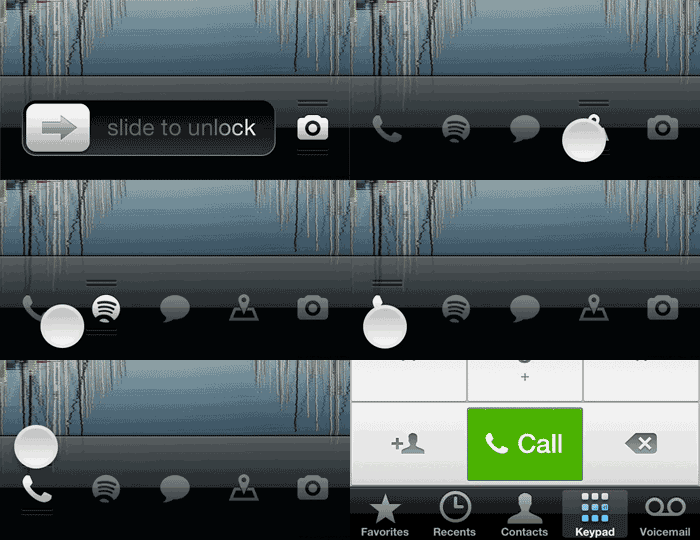
Once installed, open the Settings app and find the Axis settings pane. Change around which shortcuts you want to do what, and the next time you unlock your iPhone you’ll notice that… it looks the exact same. What?

thing3Now put your finger on the little Camera shortcut. You’ll see the “slide to unlock” slider is replaced by all of your shortcuts. Slide your finger over one of them and swipe up to open it.

And don’t worry about your passcode – Axis will request your passcode before you open up an app.

Personally, I like to have my Phone, Messages, Spotify, and Google Maps at my fingertips. You can play around with the Axis settings and customize the shortcuts to any app of your desire. Enjoy!

Thank Goodness: Evasi0n Brings iOS 6.1 Jailbreak to All iOS Devices

Finally, the iOS haxing community has come through. Ever since the release of iOS 6, there has been no jailbreak available for any device past an A4 processor. Not any more! The Evad3rs Dev Team has brought us a Jailbreak for any iDevice running any version of iOS 6. This includes

-iPhone 5
-iPhone 4S
-iPhone 4
-iPhone 3Gs
-iPad with A6X chip (4th gen)
-iPad 3
-iPad 2
-iPad mini
-iPod touch 5
-iPod touch 4

The jailbreak is beautifully straight-forward and available for Windows, Mac, and Linux for an always beautiful $0. 

Read more and download here.

KillBackground: Kill All iOS Background Apps at Once

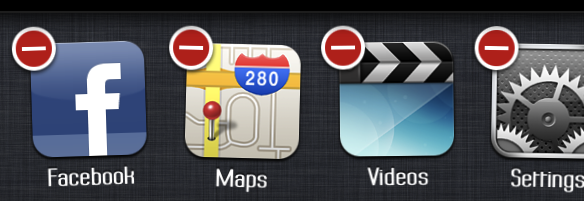
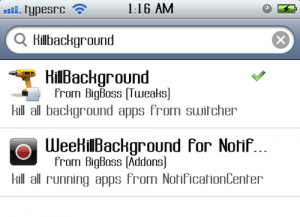
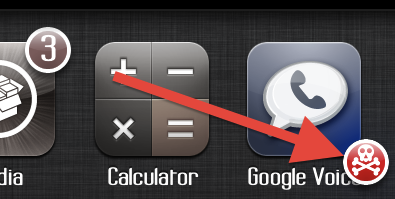
One of the most prized new features of iOS 4 and on was the ability to run many apps at the same time and switch between them easily. One of the little issues with this is that when you close an application, it stays running in the background. Normally this wouldn’t be a problem. But contrary to popular belief, background apps take up a ton of battery life! By the end of the day, you could have every single one of your apps running in the background of your iPhone! Of course you can double-click the home button, tap and hold one of the app icons for a second, then hit the red circle in the top left. Then hit it again for the next app. And again. And again. And again. You’ll have to tap once for every single app that’s open. Done yet? Well, if you happen to be jailbroken, here’s a little tweak from Cydia that will help you. Open Cydia and search for KillBackground. Install the free package by Mathieu Bdard and respring your device. When your phone comes back, you won’t immediately be able to tell that anything is different. But open up a few apps, then double-tap the home button. Tap and hold one of the apps for 1 second, and voilà! You’ll see a little red crossbones icon in the bottom left. One tap and all of your apps are killed! You can also open up your settings app and select KillBackground to configure some different options. Enjoy!

How-to: Hack the Apple Smart Sign

My friend Amit and I set all of the Smart Signs to GMG!

If you were recently at an Apple Store, you may have noticed their new “Smart Signs.” These are iPads that have information about the Apple product you’re looking at, however these iPads are locked in the smart sign mode. The iPad’s physical buttons are embedded into the plastic stand, and the home button has been disabled.

Sources say that there is a “secret gesture” that gets the iPads out of this mode, but after a ton of online research and asking many different Apple store employees, I still couldn’t figure it out.

So I went the easier way – I had to figure out a way to push the buttons.

I pushed as hard as I could on the edge of the iPad’s bezel, and this activated the lock button in the top right and locked the iPad. The plastic of the stand pushed against the button, so I wouldn’t be damaging any of the inside contents.

After I successfully locked the smart sign, I turned it back on and I was greeted with the lock screen. However, after unlocking the iPad I was returned to the same Smart Sign mode. Darn.

So instead of just locking it, this time I held down the bezel and got the “Slide to Power Off” slider. I swiped across, let it shut down, then held down the bezel to reboot it. (Check out the video at the end of the post for more detailed instructions.)

Tada! The iPad booted into its normal mode, and I was able to open the default applications and such. Unfortunately, the Home button is still disabled – so if you open an app, you won’t be able to get out of it without rebooting the iPad.

While we were at it, my friend/helper Amit decided to help me out and assisted me in setting every smart sign in the Apple Store to Good Morning Geek. Because the home button was disabled, the customers either had to browse my site or scroll up and find the URL bar. Also, the screens are set to never turn off – also handy!

By the time we were done, an Apple Store employee came up to us and nicely said “Would you guys please stop messing around with the smart signs?”

In the end, it was really fun. I tried to jailbreak it with jailbreakme.com, but that site is blocked – :(.

So if you’re ever in an Apple Store and want to either a. Annoy the employees or b. Show your friends a cool trick, this is a pretty fun and easy hack.

I hope to eventually find out the actual gesture, and after trying everything I could possibly think of, it must be fairly complicated.

Integrate Google Voice into Built-in Apps

So, you’ve been using Google Voice for a while now. Everyone is switched to your new number, and everything works fine. But there’s one drawback: to send messages, you need to open the Google Voice app. Unfortunately, that google voice app is kinda buggy. Then, you have to hide the messages app so you don’t accidentally send messages with it instead of Google Voice.

However, if you’ve jailbroken, there’s a plugin that will allow you to integrate Google Voice into the Messages app.

To download it, Open cydia and search for SMS GV Extension. Install the first result.

You’ll get a trial, but it’s a good idea to get a license as a couple of times a day it will remind you asking you to buy a license. Purchase isn’t as simple as it should be, but you can read the detailed purchase method by clicking here.

Aside from the purchase of a license, setup is unfortunately not as simple as it should be.

Open Settings>SMS GV Extension. Here, put in your Google credentials and turn the send box to on.

That was easy.

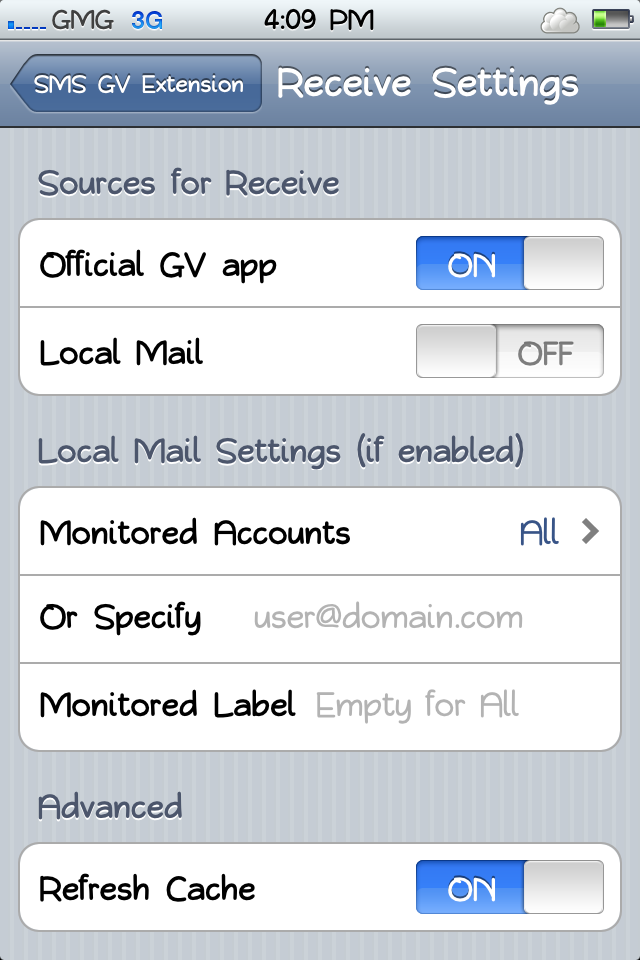
For receiving, you’ll actually have to have the official app installed and working – so don’t go uninstalling just yet!

Go into Receive settings and turn on Official GV App.

You should now be able to send and receive texts through the Messages app. Functionality wasn’t too reliable, but after a little while it started working 99% of the time.

Okay, now you have Messages working. But you still want to get rid of the darned Google Voice app!

Instead of moving it to a folder somewhere secret, you can actually use a free app from Cydia to hide it.

The app is called SBsettings. It’s primary use is that you can swipe across the status bar (the bar with the time and battery at the top) and toggle WiFi, 3G, and more. But it can also hide apps.

To download it, just search SBsettings in Cydia and install the first result.

Once that’s installed, swipe across your menubar and click “more.” Here, scroll down and find “Hidden Apps.” Scroll down in the list and turn off Google Voice. You’ll never know it was there!

So now you’ve gotten messages done. But what about phone?

It’s actually much easier to get the phone to work.

Search in Cydia for GV Phone Extension. It’s made by the same creator as the Messages integrator, and it’s also the same registration and price.

Go into Settings>GV Phone Extension and enter your credentials.

That’s all the setup that’s needed!

That’s how to get Google Voice totally integrated into your phone. Your original phone number will still work, but you won’t be able to tell what the difference is between them!

If you have the Verizon iPhone 4, I would usually direct you to my post on easy jailbreaking. However, JailbreakMe.com is back! To jailbreak, just go to jailbreakme.com and you’re set from there. Easy!

The Google voice app is a bit buggy, but you no longer have to suffer. Enjoy! 🙂

How-to: Change fonts in iOS

Almost everyone is very used to the default iPhone font – Helvetica. It’s plain, simple, and easy to read.

People are usually just fine with Helvetica – but if you’re jailbroken, it might be a nice unique touch to change your font. And because text shows up EVERYWHERE in iOS, you’ll always get to enjoy your font change.

To change the font(s) on your iPhone, you’ll need an app called BytaFont from Cydia. Just open up Cydia, go to search, and type BytaFont and install it – no additional repos needed ;). If you have a Verizon iPhone 4, click here to read my post about 2 step jailbreaking.

After you’ve downloaded BytaFont, you can tap “Browse Fonts” to get a few options for browsing: Staff picks, most recent, most downloaded, most appreciated, alphabetical, and by category. Unfortunately it’s as hard to navigate as it sounds. The fonts under most appreciated are nearly impossible to read, and looking through a huge list of fonts (where all you see is the title of the font in Helvetica) doesn’t help me determine which font I’m looking for.

There are tons of fonts that are available for you to use (all for free, of course) from BytaFont. Some of them are basic, like Tin Birdhouse. Some of them are complex, like Halo 3 (which I simply just can’t read).

I decided that I liked the Ubuntu font. It’s clear and still easy to read, but it’s still different from boring helvetica. Here’s how it looks in a few situations on iOS.

Free WiFi Tethering with iPhone

You may have read my post on tethering with Android.

However, I did switch over to iPhone!

Now, you can tether using the iPhone by paying AT&T or Verizon, and you’ll get a portable hotspot.

But that’s extremely expensive!

Here’s an easier way: MiWi.

MiWi is an application available from Cydia (you need to be jailbroken, if you have a Verizon iPhone 4 click here) for $20. That may sound expensive, but it’s much cheaper than spending $20 each month! If you have read elsewhere about the Sinful repo, you can get it for free, but that’s cheating the developer out of what he has earned, so I don’t encourage it.

Installation

If you know how to get apps from Cydia, skip this paragraph. If you don’t, continue reading. To get MiWi, open the Cydia app from your homescreen, wait for all of the data to “reload,” and click search. Type in MiWi, and tap the result. Then, click “Install” in the top right corner, followed by “Confirm.” Let it install, and then click the big black button at the bottom. MiWi will now be on your homescreen.

Use

MiWi is an extremely simple app.

Upon opening it, you will be greeted with three tethering possibilities: USB, Bluetooth, and WiFi.

Bluetooth is advertised to use mainly with iDevices, however I don’t like bluetooth tethering as it is unreliable compared to USB and WiFi tethering.

USB Tethering only works with Laptops, and I had a terrible experience with it. Although it may boast a faster connection, you need to get it connected in the first place. That’s where I had my problems.

So that leaves WiFi. And let me just say, getting WiFi to work is painlessly easy.

You can easily setup a WiFi Password, change your SSID (network name), and even control which computers are on the network. Even better, you will get a notification bar at the top of your screen that tells you how much has been downloaded and uploaded. Handy!

The speed isn’t too shabby either! I was able to crank 1.0MB/s down, which isn’t too bad. It works great for email and basic web browsing, but I wouldn’t try to stream video over it.

Conclusion

MiWi works great for WiFi tethering. But I wouldn’t recommend it for USB or Bluetooth, as they are far less reliable.

MobileNotifier

As Zach Orr mentioned in a post about iOS 5 Notifications, MobileNotifier is pretty nice until iOS 5 comes out. Here’s a more in depth review.

The Basics

MobileNotifier has three main features. In-app notifications, Lockscreen Notifications, and Switcher Notifications.

In-app Notifications

Nothing’s more annoying than having a big blue block-up when you’re trying to navigate an app. If it’s playing a game or replying to an email, having a big blue window that blocks everything else is quite obnoxious. Mobilenotifier solves that issue in an extremely elegant way.

Instead of that annoying blue box, you’ll get a little notification at the top of your window with the icon and name of the app the notification is from.

Unobtrusive notifications

The left button saves it for later. The right opens the appropriate app.


When you tap on the notification, it will tell you the notification text then give you the option to go to the app right now or just ignore it. Or, you can not interact with it at all and the strip will disappear after a little while.

Lockscreen Notifications

Normally in iOS the lockscreen notifications suck just as much as the in-app notifications. It gives you a blue window with a cute little list of notifications. MobileNofifier gives you a list that you can scroll through of all of your notifications. Much nicer than the normal iOS notifications! Unfortunately, you can’t select the notifications  to open the appropriate app. But it’s still much nicer than usual!

This list is scrollable!


Switcher Notifications

Notifications end up here in one of two ways: either they are ignored in app, or they came in when your screen was locked (that’s how you can get to the appropriate app of the lockscreen notifications). The interface is identical to the lockscreen interface, but you can touch the notifications to open their appropriate apps.

This list is scrollable and interactive!

Installation

As you can tell, this notification is pretty nice.

And luckily, the installation is pretty easy! 🙂

Go into Cydia, tap Manage, tap Sources, tap Edit, and tap Add. When it asks for the URL, enter http://phajas.xen.prgmr.com/repo. Once that’s added, click search. Enter MobileNotifier, and install the result.

That wasn’t too hard, was it?

Conclusion

Until iOS 5 is released, MobileNotifier is quite a nice notification system.

Now, if you aren’t jailbroken, click here to go to a post on how to jailbreak the Verizon iPhone 4.

Enjoy!


Jailbreak iPhone 4 Verizon

Yes, I got an iPhone 4.

Do I support apple’s business ethics?

No.

Do I think the iPhone is pretty and shiny? Yes.

Now, don’t think that I’m immediately jumping on the Apple bandwagon.

The very first thing that I did with this was jailbreak it.

If you have one of these suckers and are looking to jailbreak, I’m about to make it WAY easier for you.

But JUST so you know how much easier I’m making it for you, here’s the traditional way of doing it.

Traditional

You’ll need a few things: PwnageTool 4.2, the original IPSW for the Verizon iPhone 4, and the Pwnage bundle for 4.2.8.

First, download everything mentioned above. Unfortunately, all of the links on every other website are all dead. That means you have to go on a search on the internet looking for all of the above.

Then, open the package contents for PwnageTool 4.2, go into Contents>FirmwareBundles and click and drag the Pwnage bundle for 4.2.8 in.

Next, open up PwnageTool and select advanced. Drop in the IPSW for the Verizon iPhone 4, And hit continue, continue, continue, wait for ten or so minutes. In the end you’ll have an IPSW that you need to use.

In PwnageTool, select Put phone into DFU Mode to put the iPhone 4 into DFU. It gives you step by step instructions on what buttons to press and for how long. Once you’ve put it into DFU, open up iTunes and it will tell you that it detects an iPhone in recovery mode. In iTunes, select your iPhone, then hold down the option key while clicking restore. It will give you a selection window, where you need to browse to find the custom IPSW that you made with pwnagetool. Then, let it work its magic. After the restore is complete, you will have a jailbroken iPhone!

Easier way.

Time to make this much easier!

I am going to give you the custom built IPSW and the download for PwnageTool. That means that all you have to do is the very last paragraph! 🙂

Download the files

Now that link right there will download a ZIP of the Custom built IPSW and a copy of PwnageTool.

Then, just follow these directions:

In PwnageTool, select Put phone into DFU Mode to put the iPhone 4 into DFU. It gives you step by step instructions on what buttons to press and for how long. Once you’ve put it into DFU, open up iTunes and it will tell you that it detects an iPhone in recovery mode. In iTunes, select your iPhone, then hold down the option key while clicking restore. It will give you a selection window, where you need to browse to find the custom IPSW that you made with pwnagetool. Then, let it work its magic. After the restore is complete, you will have a jailbroken

INSTALLING ROMS ON YOUR DROID INCREDIBLE: FULL GUIDE

1. Background check and root

If you haven’t yet, click here to read the guide on rooting your droid incredible.

2. Find some ROMs

The first thing you need to install a ROM would be the ROM itself (go figure).

If you have a droid incredible, I highly recommend downloading the fusion ROM from this post. Fusion is an extremely well-done and compatible ROM based off of CyanogenMod7 (another ROM), so you’ll get the dimension-opening power of 2.3.2 gingerbread.

If you don’t want this ROM, you can always do a google search. Not too hard, eh?

2. Download the ROMs

With the example I’m using (fusion), there are two ROMs. It includes first the base gingerbread ROM, but on top of that it also has a ROM for the Android Market, Gmail, YouTube, and Maps applications, as they do not come by default on the Android base operating system.

For now, I am only going to discuss installing the base, but for other ROMs it is sometimes the same situation with the two seperate ROMs. So later on I’ll discuss installing the gapps (dev talk for Google Apps).

There are two ways you can get the ROM to your device.

The first one involves your computer. Download the ZIP file(s) onto your desktop, then plug in your phone and move the zip(s) onto the root of your SD card.

The second way requires an app called Root Explorer (I discussed it in the guide to rooting). On the phone itself, use the web browser to download the ZIP file(s). Then, open up root explorer and navigate to the downloads folder (probably on your sdcard). Then, tap and hold the zip and select move. Navigate to the root of the sd card and tap paste. (Do this with the second ROM if you have one).

3. BACK UP!

This is an extremely important step to this, because if you forget to backup then you will never be able to restore your phone to the condition it was in when you rooted. That means that the HTC sense operating system that came on your phone will be GONE.

So, you’ll need to boot into recovery and backup.

Turn off your phone and turn it back on while holding the down volume button. It will boot into HBOOT, a diagnostics screen. Once it is done checking for update images on the SDcard, use the volume and power buttons to navigate to and select RECOVERY in the menu that you see.

It will show the HTC booting screen, but then boot into recovery (with very small fonts, I might add).

In this screen, scroll down and select backups (you can now use the optical trackball to do this). Then, select create a backup (or something like that).

It might take a while, but eventually a backup should be made of all of your stuff on your phone. So we shall now proceed to the next step.

Install the ROMS

Now is the fun part.

Boot back into the recovery screen by holding the down key and the power button at the same time.

Then, hit Wipe Data/Factory Reset.

This will wipe all of the data off of the phone.

WAIT WAIT WAIT! I STILL WANT MY BACKUPS!

Calm your caps lock keys, wiping the data from the phone doesn’t wipe out the sd card, which is where the backups are.

Now, select install zip from SD card.

Select choose zip from SD card

then, select the zip that you either downloaded or transferred over.

Then, select the yes, and magically, the ROM will install.

Wait a while, and it should be installed and working!

Upon first boot it will take a very long time to load. It has to configure everything and get it working. But every time you reboot the device the reboot time should be less and less until it is less than 30 seconds.

Anything else?

You might have downloaded 2 zip files to your SD card which you downloaded from the site that gives out the ROMs. This is probably because one of them is a Google Apps zip.

Make sure that before you move the two zips on to the sd card, you name them so you can tell which one is the base OS and which is the Gapps. (if you have no idea what I’m talking about, you need to click here and read up on your background info.) Make sure that first you install the Base OS zip, then, after it’s done, select Install zip from sdcard once again and select the gapps zip. Make sure that you don’t hit wipe data/factory reset, because what that will do is wipe out the base OS so you only have gapps and nothing to run it on. Not too functional if I may say so myself.

Where to find these ROMs?

As I said, the best ROM for the Droid Incredible at the moment is the Fusion ROM.

But there’s other ROMS too.

One of the most popular is CyanogenMod. They’ve been releasing ROMs with upgraded features since the dawn of time (or android).

However, after a little mixup with google, they are no longer allowed to have Gapps on their OS. So you’ll have an android phone with…. no android market. Or gmail. Or youtube. Have fun!

One of the easiest ways to find ROMS for your droid incredible is to just google it.

If you google Droid Incredible ROMs, a large amount of different websites will show up. If you are too lazy, here’s a direct link to that google search for ya. You’re welcome.
Hanging restore after Jailbreak fix

Here’s the storyline.

You jailbreak your iPad.

Then, you find an app called Wi-Fi sync, where you can sync your iPad over Wi-Fi with your computer. This includes both an app from Cydia on your iPad AND it requires an app on your PC/Mac.

Then, you want to undo the jailbreak.

So you go into iTunes and click the Restore button.

It restores for the most part, but then, it hangs at the very end.


Uhoh.

Now your iPad is in recovery mode, and you can’t restore it.

Well, as you might have thought, you need to uninstall Wi-Fi Sync!

Just download the file HERE (mac only) and run the uninstaller. After you uninstall, the restore should go perfectly.