About This Mac in Lion

For the longest time, if you wanted to get to your information about your computer, you used System Profiler. The interface was clunky and confusing, obviously aimed at more advanced users.

Although it’s not advertised much, there is a new app replacing System Profiler called About This Mac, introduced in Lion.

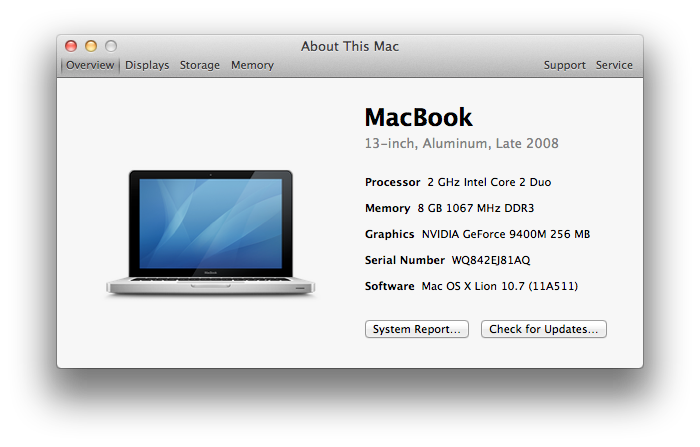
Unlike system profiler, About This Mac is easy to use, and makes the more important things stand out. It also uses graphics to make explanations easier to understand.

As you can tell by the above picture, it’s a very easy to understand and streamlined interface.

Displays

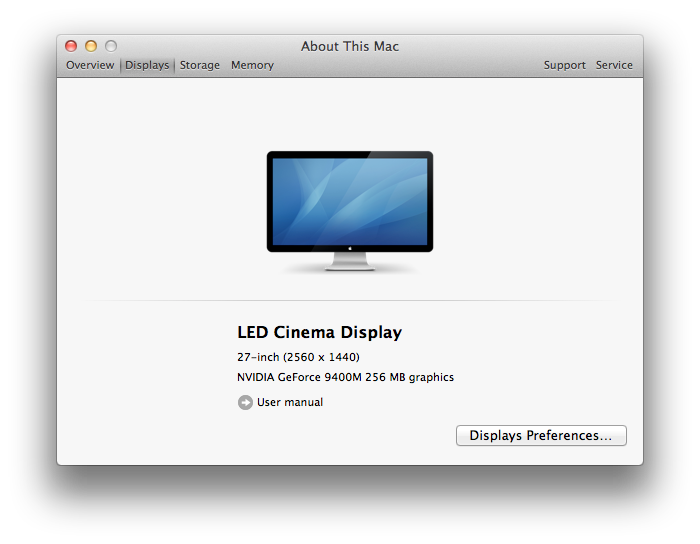
The Displays Pane is simple and easy to understand.

As you can tell, it’s quite easy to understand.

It gives you a graphic of the display, and the name of the display. Then, in smaller text (indicating that it’s probably less important to you) it tells you the dimensions, size, and graphics card.

If it’s an Apple monitor, it will even give you a link to the user manual – handy!

Storage

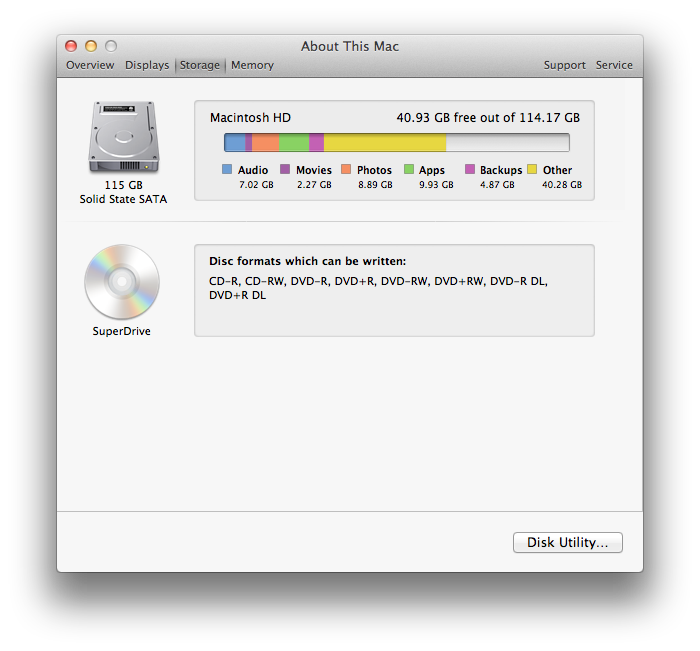
The storage pane gives you some quite-welcome insight into what’s taking up your disk space. It may seem similar to something you’ve seen in iTunes.

It’s definitely handy that it gives you this info.

It also lists other volumes that you have mounted/installed, such as your CD/DVD Drive and any USB drives.

Memory

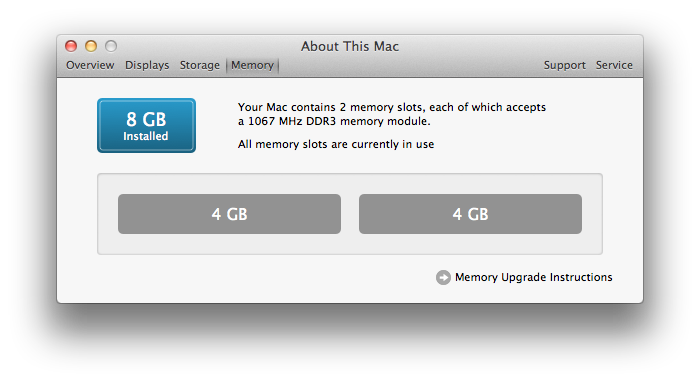
Memory, the easier term for RAM, is crucial to your computer. If you didn’t have any Memory installed, you would have an EXTREMELY slow computer.  The Memory Pane gives you an easy explanation using graphics and easy to understand english.

It gives you a simple box telling you how much total memory you’ve installed in your computer. It then tells you how many slots your computer has, and tells you the specifications for what Memory modules can go in .

Then it gives you an easy to comprehend graphic telling you how much Memory is in each slot. So easy to understand, even your grandpa can understand it.

In case it needed to get even more useful, they added a link to the Memory Upgrade Instructions – just in case you want to add some more, and don’t want to go around fishing online. Handy!

Support

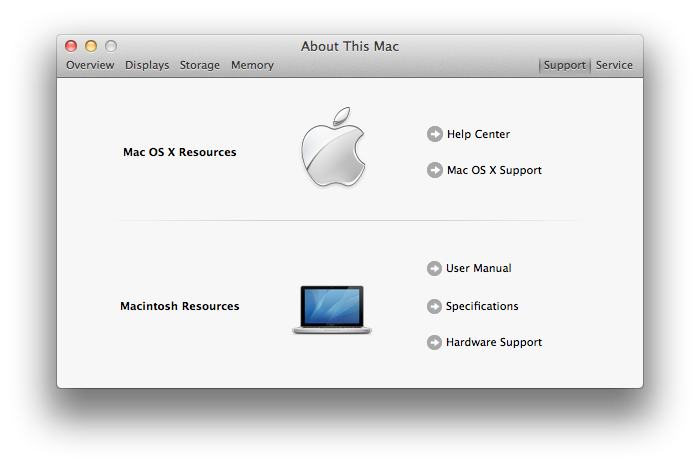
The support pane just gives you links to different online Apple support resources.


Service

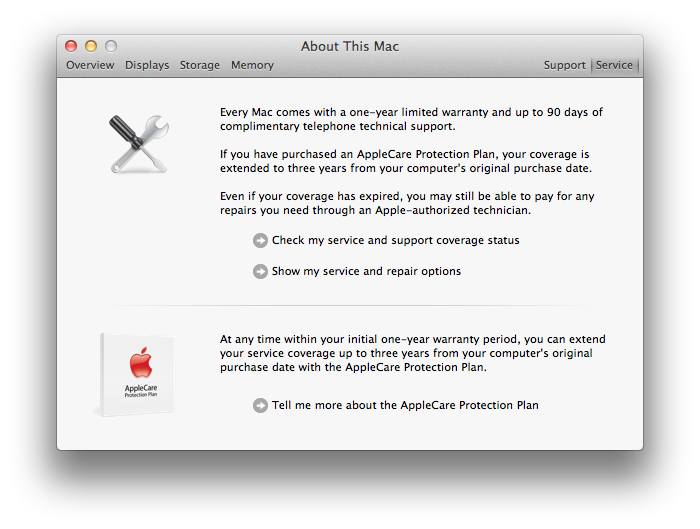
This is definitely an extremely useful pane. Use this pane to clearly understand your warranty information, and get more information about the AppleCare support plan.

In addition to giving easy to understand repair descriptions, it also gives you links that you can use to check the status of your current warranty. It will send your serial number to Apple, then you will get a page telling you about the warranty status of your computer.


About This Mac is definitely a welcome replacement to system profiler, especially because it brings easier to understand graphics and descriptions, all in basic english. This will definitely be a big help for Mac users who need to learn more about their computers, but aren’t rocket scientists.

About This Mac can be found under the Utilities folder in the Applications Folder.

Mac OS X Lion

Two days ago, I wrote a post saying that Lion was coming the next day.

Right again.

We’ve been waiting to hear the mighty roar for quite a while, and it’s finally audible to all who desire to hear its beautiful outpour (too far?).

Mission Control

Mission Control

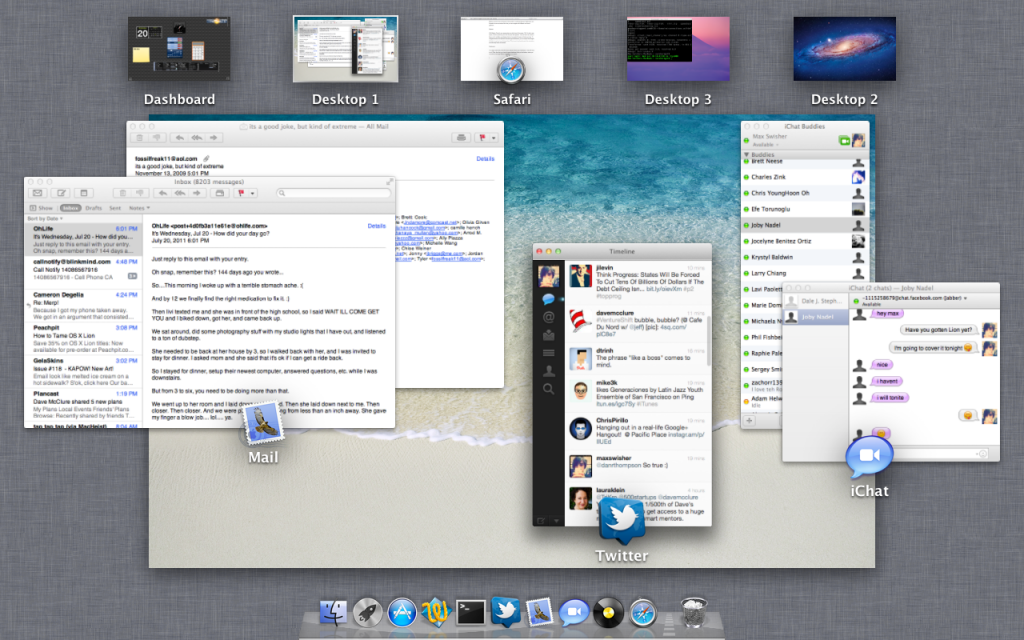
Mission control is the real big part of this update. It combines Spaces, Dashboard, and Exposé into one convenient view that you can navigate with different multi-touch gestures.

To access Mission Control, just swipe up with three fingers.

Spaces:

With Mission Control, your spaces show up at the top of the screen. (Tip: To add a new space, hold the option key and click the plus that appears – this one took me a while to figure out.) In addition, applications that you’ve made full screen will show up here. To navigate between the Spaces/Fullscreen apps/Dashboard, you can swipe three fingers left/right at any time to go between them. This is one of my favorite parts; the animations are extremely fluent and smooth.

Dashboard:

You might notice that on the left of your spaces, there’s your dashboard – that’s all there is to it! Other than that, you have the same dashboard that you had before, where you can add and arrange different widgets for your needs.

Exposé:

As you can tell by the picture above, all of your running applications in your current space will group and display with an icon and a label. It’s just like the previous exposé, with a couple of little visual upgrades.


As I mentioned, there is now support for full-screen apps. I could make a completely separate section for this, but what is there to say? You can click a little icon in the top right and the app will take up the whole screen. Whoopdidoo!

Launchpad

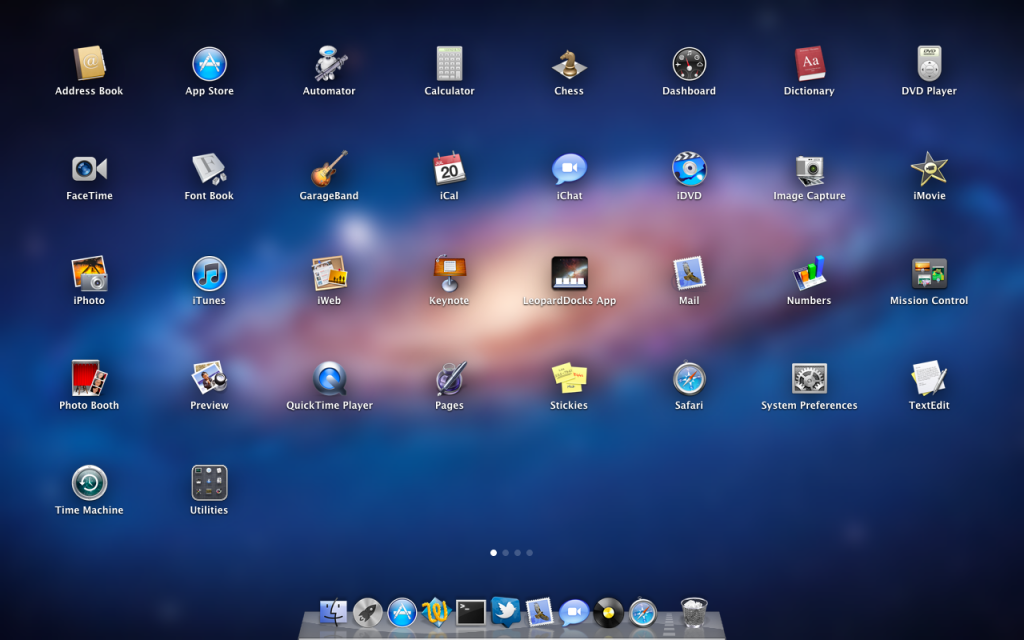
Launchpad is basically the iOS home screen for mac. You’ll get a little rocket icon in your dock, and clicking it brings up Launchpad which looks a bit like this:

Launchpad


You can swipe between the screens with two fingers. If you’ve ever used an iOS device, you know how this works: click and hold to rearrange the icons, or even move them into folders. You can even remove an app by clicking the X. Looks like iOS to me.

Versions, auto-save

I’m not going to cover this in too much detail.

Versions will keep track of all of your changes in your documents, and if you want to revert to an older version or get older elements, you can scroll through different “versions” of your document. Unfortunately, this isn’t available in many applications yet – mostly just the iWork suite – but should become more available as apps are updated to be compatible with Lion.

Auto-save is fairly self-explanatory: Your documents will be automatically saved.

Conclusion

There’s TONS of other features in Lion, and I’ll be posting different tips/tricks as I find them. There’s TONS of other new things in Lion, like a new prettier Mail app and more effects in Photo Booth – however these are small improvements. You can read more about all 250+ little new features over here.

Where can I get it?!

Unlike previous versions of OS X, this update won’t come on a disc. Instead, just go to the Mac App Store and Lion will be in there for $30. You can download and install instantly (time may vary, depending on your internet speed of course). Click here to open Lion in the Mac App Store.

Enjoy the roar of the lion.

RAWR!


How-to: Make Your Dock REALLY Big!

Okay, this post is FAR from useful. But if you’re bored, or want to play a prank on someone, this is a cool visual effect.

If you go into System Preferences > Dock, you’ll be able to enable dock magnification. This will cause the dock icons to magnify when you hover over them.

But using this simple trick, you can make it even BIGGER!

Open Terminal (in Applications/Utilities) and type in:

defaults write com.apple.dock largesize -float 256.000000

You can change 256 to be even bigger or smaller, depending on how big or small you want your dock magnification to be.

Hit the enter key and, well, nothing will happen.

Next, type:

killall Dock

Your dock will disappear and reappear.

Now hover and enjoy!

To set it back, just type the same thing you did to activate it but replace 256 with 128.

This has absolutely nothing useful about it. But it’s fun if you’re really bored, or you’re just waiting for Lion to come out.


Mac OS X Lion: Coming Tomorrow!

During an earnings call with Apple, the CFO nonchalantly announced that Lion is being released tomorrow.

Lion is the “big cat” name for Mac OS X 10.7, the next operating system for Mac Computers. It was announced a little while ago, and was said to be announced in “July.” Lion brings some new features in Exposé and Spaces, fullscreen apps, and an iOS-like homescreen called Launchpad.

The update will be available in the Mac App Store for $30, and there’s no more discs available.

If you have a Mac, I recommend that you read this post to make sure your mac is ready for Lion.

After using Lion for a little while, I will write a post describing the good and bad of the new features.

Mac OS X Lion is Right Around the Corner!

Mac OS X Lion was announced a while ago and brings new features like Launchpad, an iOS like App Launcher; Mission Control, which combines Spaces and Exposé into one, easy to view panel; and plenty of other new features.

The announcement stated that the update would be released in July 2011, and would be downloaded directly from the Mac App Store for $30.

Well would you like at the time, it’s July!

The Mac OS X Lion update is estimated to be released to the public in the next couple of weeks, according to my reliable sources.

There’s a few things you should probably do to make sure your computer is ready

  1.  Make sure you have some disk space available!

If you don’t, you’ll download the Lion update and your computer won’t be able to easily boot. Make sure you have at least 6 gigs of disk space free. If you don’t, you’re in trouble whether you’re installing Lion or not! Try an app called GrandPerspective (reviewed here) and delete the biggest files.

2. Say goodbye to PowerPC

Over the years, Intel machines have been compatible with PowerPC Apps through a bridge called Rosetta. Now, with Lion, Rosetta is no longer compatible. If you have any apps that run on Rosetta, it’s time to find Intel compatible alternatives.

3. Install all available updates

Go to the Apple Menu > Software Update… and install any available updates. After you’ve installed the updates, re-check for updates in case there are updates for the other updates.

As I said, OS X Lion should be available from the Mac App Store in the next couple of weeks for only $30.

Disappearing Disk Space?! 10 Step Fix

Today, I left my Mac alone for a few hours. When I come back, I am confronted with messages telling me that I don’t have enough disk space left.

A quick check of my available disk space using Finder reveals that I only have 200mb of free space left on my 115GB SDD.

Wait, WHAT?! I left my computer and it had 50 GB free. How can 49.5GB just magically appear on my hard drive?!

I couldn’t even DOWNLOAD that much during the time I was gone.

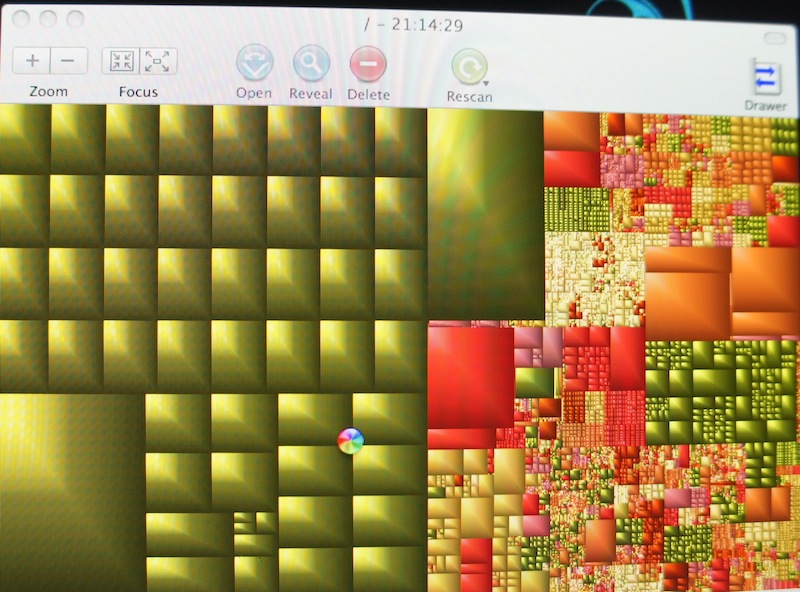
So I decided to find out what was taking up so much space using a wonderful free application called GrandPerspective (review here, what a wonderful app if I may say so myself) and decided to try and find out what was taking up so much space. Here’s what the result looked like:

WHOW THERE! What is all that green that’s taking up half of my hard drive?

A quick hover reveals that these are “swap” files that live in a hidden folder that’s reserved for system use.

Swap files are spaces where application memory/files is held. It’s like a less random access version of RAM. And somehow, my computer had 50GB of it.

Here’s the fix:

  1. Shut down your computer. If necessary, just hold down the power button and force shut it down.
  2. Hold down the shift key.
  3. Press the power button while still holding the shift key.
  4. When the apple logo appears on screen, lift your finger from the shift key.
  5. A loading bar will now appear. Wait a while and it will eventually show the login screen. It will let you know that you are booted into safe mode.
  6. Don’t log in!
  7. press the Back button on the login window, then press Shut Down.
  8. Press the power button without pressing any keys.
  9. Wait for the computer to boot.
  10. Enjoy your spacious computer!

There ya go! It’s a simple fix for a near catastrophic problem.

To prevent this from happening, restart your computer every couple of days. That was probably my problem, as I haven’t restarted in about a week. Oops!

When you restart, you don’t need to do the safe boot, as it will still clear a large amount of the swap files and cache. This is more proof that it’s a good idea to restart now and then, preferrably daily!

A reboot a day keeps the swap files away!

Opera 11

Opera features a clean, blended interface

Opera has always been a web browser that kind of lagged behind everyone else. Although it had some interesting features, the speed, interface, and stability put it pretty low on the list (next to internet explorer).

But with Opera 11, this web browser brings some nifty new stuff to the table.

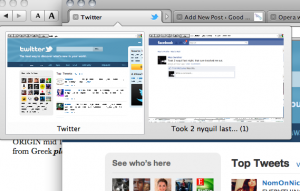
The biggest thing that is new in opera would be tab stacking. With tab stacking, you can

A tab stack with twitter and facebook

drag one tab over another and it will create a “stack.” Then, when you hover over it with your mouse, the page previews of all of the tabs in that stack show up.

I see why this could be useful, as this officially eliminates the need for multiple browser windows. I can have a tab stack for my google docs, a tab stack for my website editing, and a tab stack for all of my email.

In benchmarking tests, Opera rated second slowest next to firefox. So you can’t go for this browser for speed. Also, Opera boasts its “Opera Turbo” addition, which supposedly compresses the webpage on opera’s servers then send the compressed version to the computer. However, with this turned on, nothing ever loads at all. With opera 9, I couldn’t get the browser to load anything even with it turned off. So at least in Opera 11 with Turbo turned off, things load… usually. Sometimes things just plain don’t show up. After a plethora of refreshing, stopping, and re-entering the URL, you can usually get things to load. Note: This only happens once in a while, but can still be annoying.

There are a couple other nifty features I would also like to note. When you save a

Expanded thumbnail view of your tabs

password in the password manager, whenever you go onto that same site just press command-enter and it will fill the login and hit return, all so you don’t have to. This makes the whole logging in thing a bit less tedious. Accidentally hit that X on your tab? No problem, just hit the little closed tab button in the top right and your recently closed tabs will be shown so you can get back to it. And one last tiny little nifty feature: you can expand the tab bar so in addition to showing the page title it also shows a thumbnail view of the page.

Opera 11 is available both for Mac and PC, each fitting in with it’s appropriate interface. Links below.

Opera 11 for Desktops

Printopia

With the release of iOS 4.2 came AirPrint. AirPrint is a plugin that app developers can use to print directly from an iPad to a wireless/LAN printer. It’s a great idea, and when I have an email on my iPad I’d love to print I won’t have to open up my computer.
One problem though: barely any printers are supported. So this leaves most of us in the dust for printing from an iPad.
But here comes Printopia. Printopia is a system preference pane that turns your Mac into an AirPrint server. This allows you to print from your iPad to any printer connected to your computer, including USB printers.

Here’s a video that I made showing how it works.

If you look closely on the screen where I choose the printer, you’ll probably notice that it says “Send to Mac.” Select this printer, and your document will instantly show up in PDF format on your screen, and you will find a PDF file under Documents/Printopia of what you printed. This can be extremely convenient if you have written a notebook on your iPad when at a conference/event, then you can quickly offload all of the pages in a single PDF document onto your computer. If you print to “Send to Dropbox,” the same thing will happen but the PDF will end up in your dropbox. (You need to have Dropbox installed on your Mac first.)
Printopia is only available for Mac and will cost you $10. There’s a full featured 7 day free trial, but for this quality and simplicity for something so functional, I think it’s work it.

ecamm.com/printopia

swackett

Sometimes weather is just too damn complicated.

There’s the temperature, clouds, chance of precipitation, humidity, pressure, dew point, wind chill, and feels like.

But what’s the main reason you look at the weather? Usually it’s because you’re going somewhere. And why do you need to care about the weather at that somewhere? Because you need to know how to dress to suit the weather conditions.

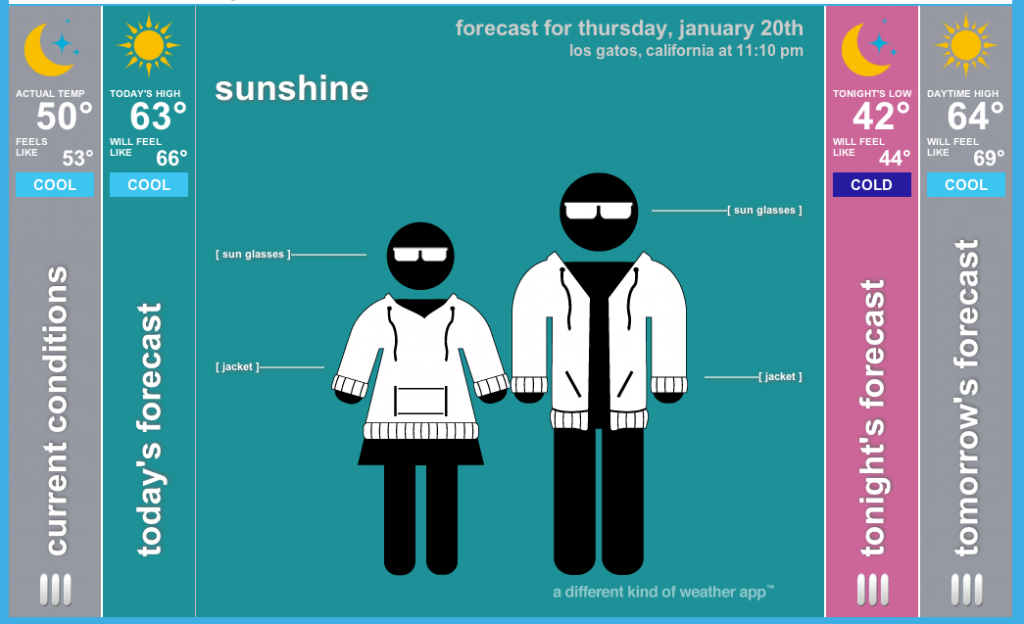
Swackett is an app that gives weather to you straight. It tells you exactly what you need to wear, and even labels it for your convenience.

As you can tell, it does give you some of the weather information so you know what to expect, but the main feature of it all is how it tells you what to wear and labels it all for you.

In addition to todays forecast, you can also see that it has the current conditions, tonight’s forecast, and tomorrow’s forecast, all of which tell you what you should wear.

Long are the days of trying to relate temperature, humidity, and chance of precipitation to what you should wear.

This app is available for FREEE on the Mac App Store. You can also purchase different styles of clothing that the weather models wear, but I don’t find that very necessary if all you need is to know what you should wear that day.

App Store direct link

Create a WiFi network with your Mac

I am currently in Japan, and in the Hotel we have no wireless in our room. We do have a wired connection, but we have iPads that need WiFi. Here’s how to take your mac and turn it into a WiFi network in a few steps.

1. Plug in ethernet

into your Mac. Make sure the internet connection is working by visiting a few sites. Many hotels have pages where you have to agree to terms. Make sure you agree and/or pay before proceeding.

2. Turn on internet sharing

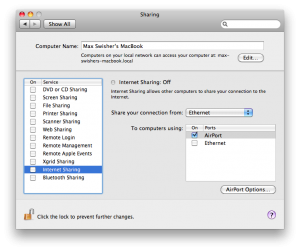
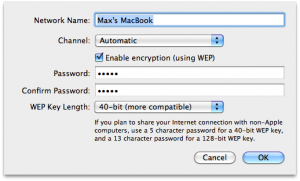
Open up System Preferences and click on Sharing. In the list, click on Internet Sharing, but don’t click the checkbox. Configure it so it looks like this:

Then, click on AirPort options in the bottom right. Here you can put in the name of your Wifi network and a password if desired.

Click OK, and now you can click the checkbox next to internet sharing.

3. Connect your devices

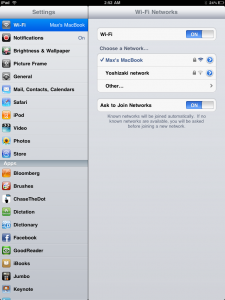
On your WiFi enabled devices you should be able to see a WiFi network with the name you put in under Airport Options in step 2. Connect to it and enter a password if you configured one.

Tada! Now your devices should be able to browse the internet. Cool! Be aware that you can’t be on a WiFi network on your Mac while sharing your internet.

Use it wisely!

Turn your iPad into display with Air Display

Well, you got your shiny iPad. It does everything as advertised. But it can do even more. You can turn it into a secondary display for $9.99!

First, on your iPad, download an app called Air Display for $9.99.

Next, connect your Mac (sorry PC users, this won’t work for you) and iPad to the same WiFi network (if you don’t have any available create an AdHoc network on your mac). Then, open the Air Display app on your iPad. It will give you detailed instructions on how to download and install the plugin for your Mac (free). I’ll walk you through it anyway:

First, download the plugin at avatron.com/ad. Then, install the package and restart your computer. Make sure your iPad is awake and Air Display is open. Click on the Air display icon on your mac’s menubar and select your iPad from the list. Your screen will turn blue, then your iPad should be connected. By default, your iPad is configured to be on the left. So drag a window off of the left side of your main screen and it will appear on the iPad. cool! You can also touch on the iPad like a mouse (no right click though).

Now that you have your Air Display configured, lets personalize it.

Open System Preferences and click Displays. You will see a window show up on each of the displays. But the one we really want to use is the one on the main display (the main display is the one with the Menubar at the top). You will see that on this display there is a window that has an arrangement tab at the top. Click Arrangement and here you will see two screens: the smaller one is your iPad. You can click and drag you iPad to a different side of the main display depending on the physical position.  You can also drag the menubar to the iPad to make it the main display.

Now this is cool and stuff, but a really cool use is that you can finally run flash on an iPad! the fps is less then 30, but it will do for the most of us.

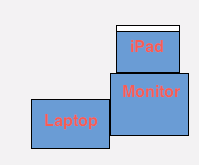
Now if you have a physically plugged in external display, this means that you could have 3 screens without having to buy something like the viBook for $120. Here’s how I set it up with the Air Display:

System Preferences Arrangement

As you can tell, I have the Macbook to the left of my monitor. I then put my iPad on top of my monitor and am using my iPad as my main display;. This eliminates desktop clutter, and when working in photoshop all of my tools don’t get in the way so I can work on a pretty big image.

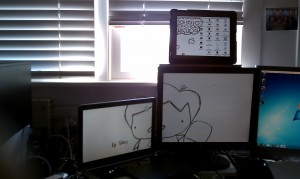
Here’s how it looks in real life:

By default the wallpaper won't span

As you can tell, it looks similar right? All of my icons are on my iPad along with the menubar, allowing more room on the main display. Sadly, the wallpaper doesn’t span across all of the monitors automatically, it just takes a lot of cropping in photoshop so you get three different pictures that eventually come together as one image. Also, cool picture right? It’s a portrait of me drawn by one of my friends. If you look on the iPad, you’ll see a thought bubble with binary.

Sadly, you need to add the iPad as a display with the menubar icon every time you restart your computer. Also, it’s hard to use it while the iPad is syncing.

There’s a cool way to impress your friends!

[ad code=1]

Macworld 2010: a Letdown?

Well, of course I went to Macworld. This is the first Macworld without Apple, and my first Macworld myself.

I went and as I found, I couldn’t see anything that was interesting AND affordable, making it quite boring for me. Sure, there was MacDictate but lets go through the list:

#1: Would it benefit to my lifestyle?

#2: Is it affordable?

Well, MacDictate; I don’t need it, therefore it wouldn’t benefit to my lifestyle. Plus, it is how many hundreds of dollars?

Lets see…

Scoche Earbuds. Would it benefit to my lifestyle? No, I already have a great pair of earbuds. Nope.

And so on.

To guage that this was in fact NOT USUAL for it to be so boring was my good friend Spencer Schoeben (netspencer.com), who I came across and assured me that Macworld isn’t usually like so.

In fact, I came back with absolutely NO VIDEO at all. And I won’t be coming back tomorrow.

But I did pick up a Gelaskin at half price, because it was so cool and of course it was at half price, review coming soon.

What did you think of the Macworld Expo (if you went)?