Tiny Tower is a simple, 8-bit graphics game. You own a tower in an urban metropolis, and your goal is to make money and build floors. You start out by making a residential floor and moving people in. Then, you make a store and give the people who live on the residential floor jobs at the store. You make money from the store, and have to constantly keep the items in stock (and pay and even wait to restock it).
Once you have enough money, you can build another floor with another store.
And you just keep going trying to make your tower as high as possible. One of the coolest aspects of the game is that you have to wait; it takes time to restock supplies in your stores, and it can take hours to construct a new floor.
And having gritty, 8-bit graphics just makes the whole thing even more addicting.
Tiny Tower is compatible with the iPhone, iPod Touch, and iPad for a wallet-loving $0.
Then, you find an app called Wi-Fi sync, where you can sync your iPad over Wi-Fi with your computer. This includes both an app from Cydia on your iPad AND it requires an app on your PC/Mac.
Then, you want to undo the jailbreak.
So you go into iTunes and click the Restore button.
It restores for the most part, but then, it hangs at the very end.
Uhoh.
Now your iPad is in recovery mode, and you can’t restore it.
Well, as you might have thought, you need to uninstall Wi-Fi Sync!
Just download the file HERE (mac only) and run the uninstaller. After you uninstall, the restore should go perfectly.
While at the Launch Conference, I got to play with Robert Scoble’s Motorola Xoom. Here’s what I thought.
Software:
Honeycomb was quite a bit mesmerizing. It looked beautiful on that tablet’s screen, and it’s 3D rendering capabilities showed on the home screen. The speed was pretty good, and the browser seemed extremely nice and smooth to use. The software side of this tablet really shined in speed and smoothness of effects, and this tablet would have been terrible with anything but honeycomb.
Also, remember when BumpTop was bought by Google?
Well, turns out they used some of their 3D stuff in Honeycomb. Good to see such an awesome piece of software go to a good cause!
Hardware
Lets start off with this: I hated the widescreen layout. I prefer to use my iPad in horizontal mode because when reading you can see a lot more, therefore you don’t have to scroll as much, and the Xoom sideways resulted in a very overwhelming layout that was like a widescreen monitor turned sideways.
I HATED the location of the power button. It’s in a very odd place in the back. Someone had to literally show me where the power button was. If you can’t immediately turn it on without any doubt of the power button location, you know that there’s a problem with your product.
The two cameras? Absolutely terrible. They don’t even have an auto focus, or a focus at all. I would never even attempt to take a picture with this thing.
Conclusion
Overall, it’s a nice product, but the screen annoyed me, the power button takes getting used to, and the cameras aren’t even worth having. They are worse than nothing, because you get to see what it would be like to have a camera on a tablet, but a terrible implementation of it.
With the release of iOS 4.2 came AirPrint. AirPrint is a plugin that app developers can use to print directly from an iPad to a wireless/LAN printer. It’s a great idea, and when I have an email on my iPad I’d love to print I won’t have to open up my computer.
One problem though: barely any printers are supported. So this leaves most of us in the dust for printing from an iPad.
But here comes Printopia. Printopia is a system preference pane that turns your Mac into an AirPrint server. This allows you to print from your iPad to any printer connected to your computer, including USB printers.
Here’s a video that I made showing how it works.
If you look closely on the screen where I choose the printer, you’ll probably notice that it says “Send to Mac.” Select this printer, and your document will instantly show up in PDF format on your screen, and you will find a PDF file under Documents/Printopia of what you printed. This can be extremely convenient if you have written a notebook on your iPad when at a conference/event, then you can quickly offload all of the pages in a single PDF document onto your computer. If you print to “Send to Dropbox,” the same thing will happen but the PDF will end up in your dropbox. (You need to have Dropbox installed on your Mac first.)
Printopia is only available for Mac and will cost you $10. There’s a full featured 7 day free trial, but for this quality and simplicity for something so functional, I think it’s work it.
So let’s just say that you are driving somewhere and you have your computer (or iPad or iPod touch for that matter) along with your droid incredible. Well now for free (actually, the expense of battery life) you can use your Droid Incredible as a wifi tether, so you can have an iPad on verizon.
Sadly, the speeds are dramatically reduced to a groping 70 kb/s. But I think it’s better than nothing. Can load pages, not so great for downloads and video/audio streaming such as youtube or pandora.
Step 1. Make sure your phone is rooted. Just do steps 1-4 of the tutorial HERE (continue the steps to install android 2.2, if desired!).
Step 2. On your incredible go to THIS LINK (try using chrometophone, review on that soon!)
Step 3. Once the link is downloaded open it and install the application.
Step 4. Open the application on your phone.
Step 5: Press menu and go into the settings and change around your preferences. change the SSID, and add a passphrase. Enable access control if desired.
Step 6: Press the big tether button.
Step 7: On your wifi enabled device go to the network selection and select the nework name that you had entered in the SSID preferences. Enter your asscode and Voila, you can connect to the internet!
One of the cool benefits of this is that you can be on the internet while in a car. Cool, eh?
So all of the other smartphone companies are drooling over the sales of the iPad. So they are all trying to make their own tablet.
But it seems that they all have to take their name (or part of it) and put PAD at the end. That will be two more products that people are going to be commenting on their revalance to a female hygiene product. That’s just what we needed.
Apple has been boasting about their iBooks app featuring the iBookstore. I’m soon going to be taking a trip to Japan, so i’d like some books to read on the way there. So instead of csarrying around books I’d love to just take my beautiful thin iPad.
But all of the books in the store are about $15 (varying on the book). I could just go down to my local library and get it for free and just give it back when I’m done.
So woultn’t it be great if there was an iLibrary instead? How about you can download the book for free, but just like rented movies it could only be on one device. How about you could send it to someone else if they want to read it? And how about there’s a due date, and you can renew it 2 times before it needs to be sent back to the library. And if you don’t want to send it back or you are saving it, you could just buy it?
Now as good as this sounds, I doubt that the publishers would be in much favor. After all, the iLibrary wouldn’t be paid for by taxes.
But how about the libraries offer books in ePub format, and you can rent them and sync them to your iPad? Apple would have to add support for rentals, but they wouldn’t have to deal with the publishers.
Today, the iPhone 4 was released. Of course it’s exciting, but it’s much less exciting then the iPad.
Why?
Because compare this picture from Gizmodo from 2 months ago:
Gizmodo's iPhone, April 19th
To this one on the apple website.
Apple's iPhone, Jun 7th
I think they’re pretty similar.
And that’s why the news of it during WWDC was.. well… almost outdated. Everybody had already seen the fourth iPhone, just unofficially. So nobody was in for much of a surprise today.
But for the iPad, nobody had a clue. People were sure it would run Leopard, have a CD drive, USB ports, and they gave us this whole different idea. Not a tablet per se, but this thing that just made sense. And who knew!
But everybody knew about the iPhone. I didn’t walk home that day grinning because of excitement like I did during the iPad announcement. Because I had already seen the thing. And I’m pretty sure you all have as well.
As you know, I got my beautiful new HTC incredilble.
It comes with built in support for tethering, but another $30/ mo.??!! NO. Luckily, there’s an easier way: PDAnet.
It’s a free download from the android market and works without any extra charge.
Sadly, I can’t give you any screenshots due to android. 🙁
But it is simple enough.
First, open the app. You will be introduced with the option to turn on USB or Bluetooth tethering. The USB tethering requires an extra plugin to be installed, and my mac supports bluetooth DUN built in, so I just used that. Here’s a video on how I set it all up.
There you go! Sadly this does not work with the iPad, as DUN isn’t available quite yet.
Next, connect your Mac (sorry PC users, this won’t work for you) and iPad to the same WiFi network (if you don’t have any available create an AdHoc network on your mac). Then, open the Air Display app on your iPad. It will give you detailed instructions on how to download and install the plugin for your Mac (free). I’ll walk you through it anyway:
First, download the plugin at avatron.com/ad. Then, install the package and restart your computer. Make sure your iPad is awake and Air Display is open. Click on the Air display icon on your mac’s menubar and select your iPad from the list. Your screen will turn blue, then your iPad should be connected. By default, your iPad is configured to be on the left. So drag a window off of the left side of your main screen and it will appear on the iPad. cool! You can also touch on the iPad like a mouse (no right click though).
Now that you have your Air Display configured, lets personalize it.
Open System Preferences and click Displays. You will see a window show up on each of the displays. But the one we really want to use is the one on the main display (the main display is the one with the Menubar at the top). You will see that on this display there is a window that has an arrangement tab at the top. Click Arrangement and here you will see two screens: the smaller one is your iPad. You can click and drag you iPad to a different side of the main display depending on the physical position. You can also drag the menubar to the iPad to make it the main display.
Now this is cool and stuff, but a really cool use is that you can finally run flash on an iPad! the fps is less then 30, but it will do for the most of us.
Now if you have a physically plugged in external display, this means that you could have 3 screens without having to buy something like the viBook for $120. Here’s how I set it up with the Air Display:
System Preferences Arrangement
As you can tell, I have the Macbook to the left of my monitor. I then put my iPad on top of my monitor and am using my iPad as my main display;. This eliminates desktop clutter, and when working in photoshop all of my tools don’t get in the way so I can work on a pretty big image.
Here’s how it looks in real life:
By default the wallpaper won't span
As you can tell, it looks similar right? All of my icons are on my iPad along with the menubar, allowing more room on the main display. Sadly, the wallpaper doesn’t span across all of the monitors automatically, it just takes a lot of cropping in photoshop so you get three different pictures that eventually come together as one image. Also, cool picture right? It’s a portrait of me drawn by one of my friends. If you look on the iPad, you’ll see a thought bubble with binary.
Sadly, you need to add the iPad as a display with the menubar icon every time you restart your computer. Also, it’s hard to use it while the iPad is syncing.
Over 1,000,000 iPads have been sold, and I just got the WiFi version. But I know many went for the 3G version because they could browse the internet anywhere (that is, if you’re in Texas of course). But what if you don’t want to pay the $30 for unlimited, or just have the WiFi version? Offline Pages is a free app that allows you to download pages and view them on your iPad even when you don’t have an internet connection.
And It’s actually quite easy. First, open the app on your iPad. The interface is simple. At the top there is a URL bar where you can browse to the page you want to save. Once you’ve found it, you can tap the button directly to the right of the URL bar (the down arrow into the box thing) to save it for viewing later. A small red badge will appear over the button to the left of the URL bar indicating that it is being saved. After the badge has disappeared, you can safely close the app and go anywhere knowing that you still have the webpage.
To view the webpage, just tap the button directly to the left of the URL bar (the box with the papers in it) and your saved pages will be listed. Tap on one to see it.
But there is one problem with this method: What if you are browsing pages in Safari with an internet connection and you find a page you want to save for when you are on the road? You’d have to copy and paste the URL, then go into Offline Pages, open the page in offline pages, and save it. Oy Vay!
But these people are amazingly smart. They know that, so they created a bookmarklet to do it for you. To install the bookmarklet, just go into the options and under general there is a selection to install the bookmarklet.
This will bring you into a webpage in safari, and amazingly you can install the bookmarklet to another iPad or computer!
Tap which ever one you want to do and it will give you step-by-step instructions to install the bookmarklet.
After you’ve done so, just browse to a page in safari, tap the bookmarklet, click save to iPad, and Voila! Just open Offline Pages and the page will be saved for offline viewing. Great if you are going on an airplane without WiFi!
Even better, the app is free and for iPod, iPhone AND iPad! Bravo! [Applaud]
If you just got that new shiny iPad, it may be a great tool for checking the weather, in fact, there’s an app for that!
So I have tried the weather channel, but similar to their iPhone app it is quite buggy. But luckily i found weatherbug which has a very nice interface and is very functional.
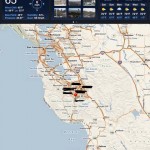
When you open the app, you are greeted with a radar map and a bar on the top.
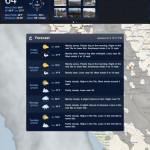
The bar on the top has multiple squares with current conditions, live cameras, a forecast, and if you slide the bar left it acts like a page. You a then shows hourly forecast, active alerts, and a video thingy. You can tap the different boxes to see a more detailed view.
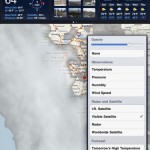
On the map, you can click on map settings to change the view to temperature, pressure, humidity, wind speed, infrared satellite, visible satellite, and radar. Cool!
You can also press the play button in the bottom left to see a time-lapse of the radar images.