Search Google – now with your Voice

Google's Voice Search integrated into the web

Since its debut in 1997, Google Search in general has grown in size and strength.

Since then, the keyboard and mouse have always been a primary tool in searches.

In 2008, the Google Mobile App was released to the Android and iOS operating systems, allowing native and mobile searching of the web.

A few months later, they integrated a new feature that they had been working on into the mobile apps called Voice Search. Voice search was a new idea on how to revolutionize searching. But most Google searches were done on the computer, so even if everyone used voice search on their phones, more requests would be made from a keyboard.

Google took a surprising 2½ years to make their next move. Then about a month ago, they released Voice Search online, using the same microphone input as Gmail chat. However, they confined it the Chrome as an experimental search feature.

I think that Google really has enough “innovations” that they’ve given to us and that using a keyboard is just fine for searches. Personally, I talk faster than I type, but I am so used to typing that a switch to talking instead is actually harder, at least for a while. I see where they are going with the user-friendly ideas, but this is one of their kind of unnecessary ones. The recognition accuracy is ok, but as I expected it doesn’t work well with names, even of well-known people.

If you want to try it out, head on over here in Google Chrome and hit Try It Out.

Google+ iPhone App Awaiting Approval

Google+ is already available via the web and an Android app, and now Google has submitted their iPhone app to Apple for approval into the app store.

Everyone knew that Google was going to develop an iPhone app for Google+ eventually, but we weren’t aware that they had already created a full app and submitted it.

If all goes well, the app will be available to iOS users in about two weeks.

But…

Who was here for Google Voice?

You may remember that the Google Voice app sat waiting for approval for months, and was eventually rejected.

Then google resubmitted it, this time not so happy. Apple finally approved it, and I currently have Google Voice on my iPhone.

I hope that Google+ doesn’t end up going down this same disapproval tunnel…

Only time will tell if Apple wants to really battle Google in this way, which could be cause for some kind of lawsuit from Google.

(Personally, I just want to get Google+ on my iPhone, lawsuits not necessary)

(via Mashable)


App of the week: Tiny Tower for iOS

Tiny Tower is a simple, 8-bit graphics game. You own a tower in an urban metropolis, and your goal is to make money and build floors.  You start out by making a residential floor and moving people in. Then, you make a store and give the people who live on the residential floor jobs at the store. You make money from the store, and have to constantly keep the items in stock (and pay and even wait to restock it).

Once you have enough money, you can build another floor with another store.

And you just keep going trying to make your tower as high as possible. One of the coolest aspects of the game is that you have to wait; it takes time to restock supplies in your stores, and it can take hours to construct a new floor.

And having gritty, 8-bit graphics just makes the whole thing even more addicting.

Tiny Tower is compatible with the iPhone, iPod Touch, and iPad for a wallet-loving $0.

Click here to view it in iTunes.

Parrot AR.Drone

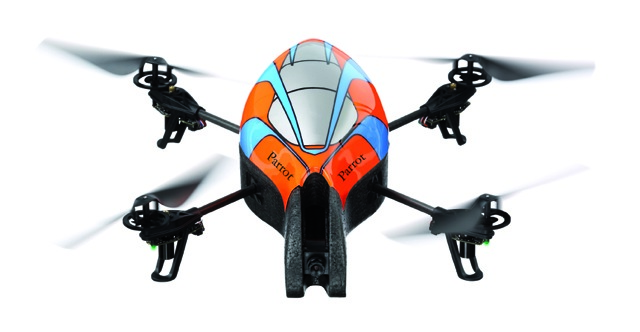
The AR.Drone is a french developed electronically advanced quatracopter. It’s a helicopter, but it has three blades. It is controlled via an iOS device through WiFi.

And It’s fun, but hard to fly.

I could go farther into depth with this, but I’m not going to.

Although it’s cool, it’s also ridiculously time consuming and expensive. Now, the AR.Drone itself is only $300. But over the course of three weeks it’s costed me over $500. Did I mentioned that I probably only got about two hours of time being able to fly it?

The real reason it’s so expensive is the repairs. You’re going to break every single piece of this thing, and the pieces aren’t too cheap when they all add up.

First, I broke a crosspiece. $30, plus two days shipping and an hour replacing it.

Then, I busted a gear. $30 later, I waited two days and spent about ten minutes replacing it.

Next, one of my batteries went bad. $40 and two days later, I fixed it.

And now, my main board is bad. But after all of those repairs, I’m not going to even order the replacement, as it’s $160 and would of course take another two days to come. Then I’d break something else and pay for another part.

This thing is fun when it works, but that’s a very small amount of time. That’s why I’m not going in to detail about it, as I’m going to save you the trouble to tell you this: Unless you have a college fund built up to repair it, don’t buy an AR.Drone.

Free WiFi Tethering with iPhone

You may have read my post on tethering with Android.

However, I did switch over to iPhone!

Now, you can tether using the iPhone by paying AT&T or Verizon, and you’ll get a portable hotspot.

But that’s extremely expensive!

Here’s an easier way: MiWi.

MiWi is an application available from Cydia (you need to be jailbroken, if you have a Verizon iPhone 4 click here) for $20. That may sound expensive, but it’s much cheaper than spending $20 each month! If you have read elsewhere about the Sinful repo, you can get it for free, but that’s cheating the developer out of what he has earned, so I don’t encourage it.

Installation

If you know how to get apps from Cydia, skip this paragraph. If you don’t, continue reading. To get MiWi, open the Cydia app from your homescreen, wait for all of the data to “reload,” and click search. Type in MiWi, and tap the result. Then, click “Install” in the top right corner, followed by “Confirm.” Let it install, and then click the big black button at the bottom. MiWi will now be on your homescreen.

Use

MiWi is an extremely simple app.

Upon opening it, you will be greeted with three tethering possibilities: USB, Bluetooth, and WiFi.

Bluetooth is advertised to use mainly with iDevices, however I don’t like bluetooth tethering as it is unreliable compared to USB and WiFi tethering.

USB Tethering only works with Laptops, and I had a terrible experience with it. Although it may boast a faster connection, you need to get it connected in the first place. That’s where I had my problems.

So that leaves WiFi. And let me just say, getting WiFi to work is painlessly easy.

You can easily setup a WiFi Password, change your SSID (network name), and even control which computers are on the network. Even better, you will get a notification bar at the top of your screen that tells you how much has been downloaded and uploaded. Handy!

The speed isn’t too shabby either! I was able to crank 1.0MB/s down, which isn’t too bad. It works great for email and basic web browsing, but I wouldn’t try to stream video over it.

Conclusion

MiWi works great for WiFi tethering. But I wouldn’t recommend it for USB or Bluetooth, as they are far less reliable.

MobileNotifier

As Zach Orr mentioned in a post about iOS 5 Notifications, MobileNotifier is pretty nice until iOS 5 comes out. Here’s a more in depth review.

The Basics

MobileNotifier has three main features. In-app notifications, Lockscreen Notifications, and Switcher Notifications.

In-app Notifications

Nothing’s more annoying than having a big blue block-up when you’re trying to navigate an app. If it’s playing a game or replying to an email, having a big blue window that blocks everything else is quite obnoxious. Mobilenotifier solves that issue in an extremely elegant way.

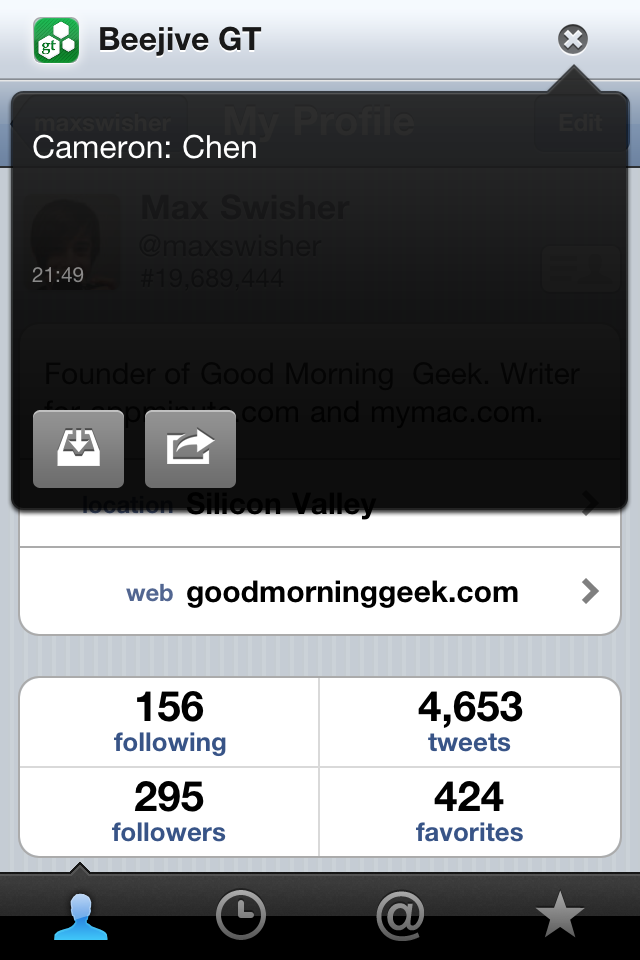
Instead of that annoying blue box, you’ll get a little notification at the top of your window with the icon and name of the app the notification is from.

Unobtrusive notifications

The left button saves it for later. The right opens the appropriate app.


When you tap on the notification, it will tell you the notification text then give you the option to go to the app right now or just ignore it. Or, you can not interact with it at all and the strip will disappear after a little while.

Lockscreen Notifications

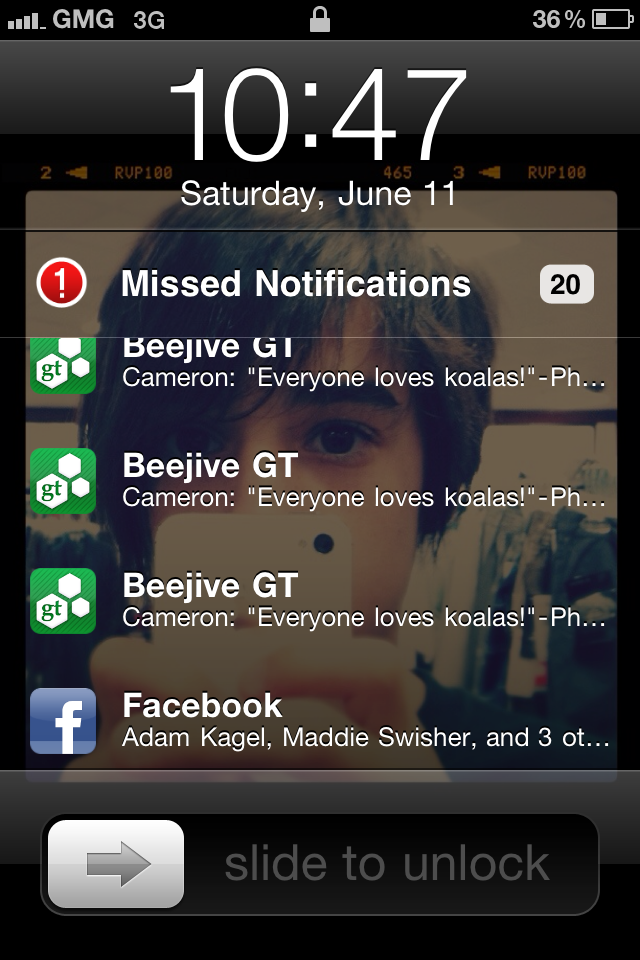
Normally in iOS the lockscreen notifications suck just as much as the in-app notifications. It gives you a blue window with a cute little list of notifications. MobileNofifier gives you a list that you can scroll through of all of your notifications. Much nicer than the normal iOS notifications! Unfortunately, you can’t select the notifications  to open the appropriate app. But it’s still much nicer than usual!

This list is scrollable!


Switcher Notifications

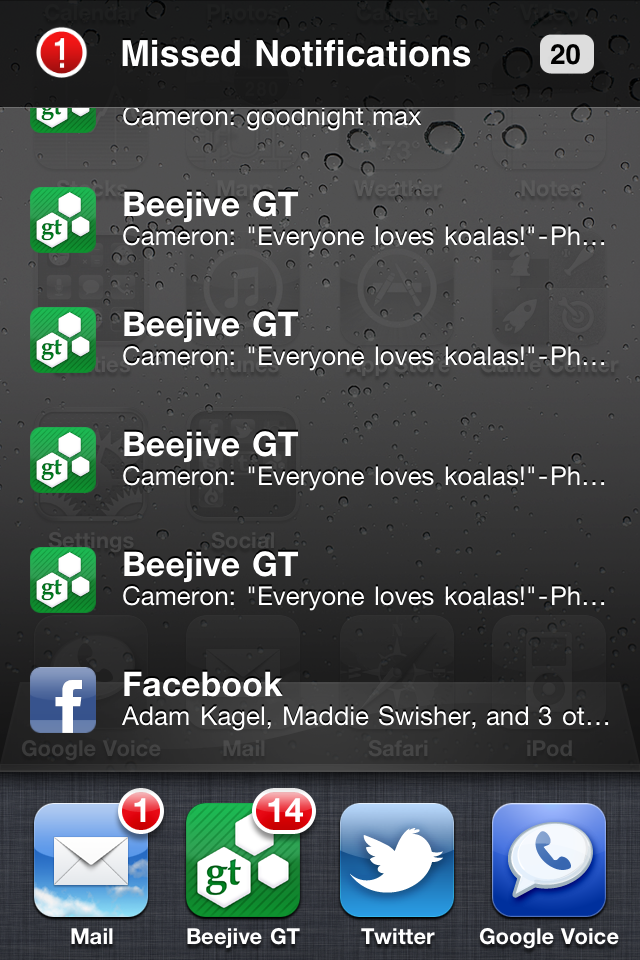
Notifications end up here in one of two ways: either they are ignored in app, or they came in when your screen was locked (that’s how you can get to the appropriate app of the lockscreen notifications). The interface is identical to the lockscreen interface, but you can touch the notifications to open their appropriate apps.

This list is scrollable and interactive!

Installation

As you can tell, this notification is pretty nice.

And luckily, the installation is pretty easy! 🙂

Go into Cydia, tap Manage, tap Sources, tap Edit, and tap Add. When it asks for the URL, enter http://phajas.xen.prgmr.com/repo. Once that’s added, click search. Enter MobileNotifier, and install the result.

That wasn’t too hard, was it?

Conclusion

Until iOS 5 is released, MobileNotifier is quite a nice notification system.

Now, if you aren’t jailbroken, click here to go to a post on how to jailbreak the Verizon iPhone 4.

Enjoy!


Jailbreak iPhone 4 Verizon

Yes, I got an iPhone 4.

Do I support apple’s business ethics?

No.

Do I think the iPhone is pretty and shiny? Yes.

Now, don’t think that I’m immediately jumping on the Apple bandwagon.

The very first thing that I did with this was jailbreak it.

If you have one of these suckers and are looking to jailbreak, I’m about to make it WAY easier for you.

But JUST so you know how much easier I’m making it for you, here’s the traditional way of doing it.

Traditional

You’ll need a few things: PwnageTool 4.2, the original IPSW for the Verizon iPhone 4, and the Pwnage bundle for 4.2.8.

First, download everything mentioned above. Unfortunately, all of the links on every other website are all dead. That means you have to go on a search on the internet looking for all of the above.

Then, open the package contents for PwnageTool 4.2, go into Contents>FirmwareBundles and click and drag the Pwnage bundle for 4.2.8 in.

Next, open up PwnageTool and select advanced. Drop in the IPSW for the Verizon iPhone 4, And hit continue, continue, continue, wait for ten or so minutes. In the end you’ll have an IPSW that you need to use.

In PwnageTool, select Put phone into DFU Mode to put the iPhone 4 into DFU. It gives you step by step instructions on what buttons to press and for how long. Once you’ve put it into DFU, open up iTunes and it will tell you that it detects an iPhone in recovery mode. In iTunes, select your iPhone, then hold down the option key while clicking restore. It will give you a selection window, where you need to browse to find the custom IPSW that you made with pwnagetool. Then, let it work its magic. After the restore is complete, you will have a jailbroken iPhone!

Easier way.

Time to make this much easier!

I am going to give you the custom built IPSW and the download for PwnageTool. That means that all you have to do is the very last paragraph! 🙂

Download the files

Now that link right there will download a ZIP of the Custom built IPSW and a copy of PwnageTool.

Then, just follow these directions:

In PwnageTool, select Put phone into DFU Mode to put the iPhone 4 into DFU. It gives you step by step instructions on what buttons to press and for how long. Once you’ve put it into DFU, open up iTunes and it will tell you that it detects an iPhone in recovery mode. In iTunes, select your iPhone, then hold down the option key while clicking restore. It will give you a selection window, where you need to browse to find the custom IPSW that you made with pwnagetool. Then, let it work its magic. After the restore is complete, you will have a jailbroken

Otterbox Reflex Series for iPhone

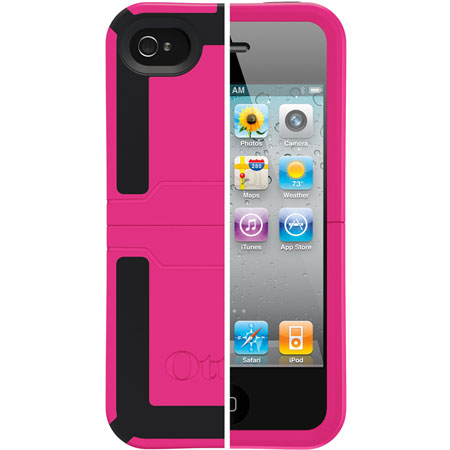
Otterbox is well known for their amazingly stylish yet rugged cases. The Reflex series is a new case from otterbox, and it boasts a whole new design.

Here’s how cases work: When there is a shock in one part of the case, it is absorbed by the rest of the case, usually by a form of flexibility that causes shock absorption. This is sometimes accomplished by rubber, the flexing of plastic, or other various materials.

What the Reflex series does is brings a hard plastic shell, but in places of the shell there is flexible rubber that crumples and flexes to absorb the shock. This design was inspired by the crumple zone of a car, and from the result of shock on the case it works very well.

The other feature that Otterbox is known for is style. The Reflex Series comes in a variety of colors, all of which have nice, even, black rubber highlights where the crumple zone is. Instead of hiding the crumple zone, otterbox has used it to enhance the style of the case. Genius!

A new feature of the case would be that the bottom half slides off for docking access. In the past, you had to completely remove the otterbox cases to accomplish this, but thanks to the innovation in this version full case removal is no longer necessary.

The Reflex Series is available only for the iPhone at the moment, but in the future will be available for the BlackBerry Curve and iPod Touch (4th Generation). You can purchase it by clicking here for about $45.

[Thanks to Otterbox for sending this to me for review! You guys make awesome cases! :D]

Using AirPort express for AirPlay alongside a Time Capsule

You may remember that a long time ago I reviewed the Time Capsule. It’s a wonderful wireless AP, and all of my data is totally safe.

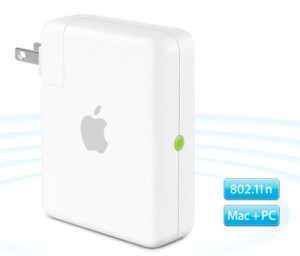
But the Time Capsule doesn’t have AirPlay. On AirPort extremes and expresses, there is a headphone jack, and when connected, you can wirelessly stream your music to your speakers from your iDevice.

I’ve had an airport express for a long time, but I stopped using it when I got my time capsule. After hearing about the AirPlay improvements, I decided to break the thing out.

The AirPort Express creates its own WiFi network, and if I’m connected to that then I won’t be able to backup to my time capsule. Luckily, it is now possible to plug the AirPort Express directly into the Time Capsule, and have them both work as the same wireless network. This means that I can stream music AND backup at the same time!

With this all settled, you will now see the AirPlay icon appear on all of your devices. From this point on, it’s all extremely easy. Just tap the icon and up pops a menu of all AirPlay devices on the network. Tap the speaker system you wish to stream to Voila, we have wireless music!

If you’re on a computer, however, you can only stream your music from iTunes. That is, of course, unless you have an app called AirFoil.

This allows any application on your computer to output sound to your AirPlay speakers.

However, there’s a small issue.

There is a two second delay between when you cause the sound to happen and when it actually comes out of your speakers. On the iDevices, the movies are in sync because they are decoupled 2 seconds back. When you change the volume on your computer, you will see the small notification popup, yet you won’t hear anything for two seconds. Quite annoying.

For videos, AirFoil has included the “AirFoil Video Player.” I don’t know if it’s very good, as I can’t even get it to work without freezing and crashing.

In general, this system is simple and functional. But if you’re trying to stream content from your computer, you will notice an extremely distinct delay. It’s not like that audio quality isn’t good, so all audio (including pandora and other streaming services) work fine.

AirPort Express

AirFoil

Otterbox Defender Case for iPhone

Otterbox is known for their high quality cases. They have many series of cases, each with their own level of protection, and here I have the series that boasts highest level of ruggedness, the Defender Series (for iPhone).

This case takes heavy duty to a new level. It features multiple layers of protection, starting with a silicone layer the outside, a hard shell inside, then in that soft felt against the phone itself.

In addition to the shock protection, it has rubber plugs to keep dust out of the ports, and has plastic protection over the screen, camera(s), and apple logo in the back (a stylish touch I guess).

Unlike other cases, the plastic protection over the screen isn’t adhesive. The screen protector is actually part of the case. This is definitely very cool (so if you don’t want the case on it then the screen protector comes off too), but there is a downside. If you have scratched up the screen cover and want a new one, then you have to get a new/different case.

Also, if you get dirt on any of the camera protectors, then you can see a bit of a haze over the camera. Yes, this can be solved by simply wiping off the cover, but this is bittersweet. The camera itself ends up being more protected against dirt and scratches, but when you get the cover dirty/scratched you can see the results in your pictures/video.

So who is this case for? I’d think that this case would be for the people who really handle their device harshly. If you’re a construction worker and drop this off a roof, then whoops! The phone should be fine. This is great if construction workers want to have a fancy expensive smartphone but don’t want to replace it all the time because it’s broken.

This is also good for those clutzes who tend to drop their phone all the time. If you don’t drop your phone that much at all, then you might want to go with the commuter series, which still offers good protection but has a little bit more style. But this case seems to be up for some of the worst conditions someone could throw at it.

But I have a droid! Or a Nokia! and I don’t like black! I want pink! No I want blue! No red!

Calm down internetgoer, there’s hope. Otterbox sells this case for a large range of models in many different colors.

The case sells online for $50, which seems a bit excessive but you’re getting protection that’s worth the price.

Otterbox Defender Homepage

Defender for iPhone

Well, back to making fun of Microsoft

Unless of course you live under a rock, you have heard about the terrible antenna problems the iPhone 4 has been having. Basically, if you put your hand over the left black line, all of your signal drops. Apple was having a PR disaster, but today Apple held a press conference and it seems that the truths were revealed.

But I must say, Apple wasn’t playing fair here.

First, Steve Jobs ponts out how all of the smartphones antennagate. He showed test videos of many popular phones including the BlackBerry Bold. This is simply putting down the competition and saying “we can’t go against the laws of physics… yet.” [Steve Jobs]. Fine.

So I got curious and asked I wonder if my phone does this…

Well, I gutters its back to making fun of microsoft…

Traitor? I think not.

Some people have said some hurtful but understandable things about me, as said in the title of the post.

Well, allow me to say, that I’m not switching over to chrome OS. I’m not switching to windows either, I’m just switching over to android.

What’s the big difference between Mac OS X and iOS? Well, I mean other than one is a mobile operating system. Mac OS X allows development to run in the background. Mac OS X also allows applications to manipulate the core of the operating system (although not preferred).

iOS is completely shut off. For example, people can’t even use their own APIs! It is a closed off system and it is completely CLOSED source.

Android on the other hand seems more like Mac OS X. It is open source, so people can use their own APIs to do whatever they want. Apps still need to be accepted into Android Market, but there is an option to allow other applications that weren’t approved by the app store to be installed. And that’s what makes the difference.

So I’m not exactly a traitor, I’m just supporting what I believe in and personally is best for me. I’m sure I’m not the only one…. Anyone?…….. Comments welcome.