About Max Swisher

14-year-old web developer and writer. Avid collector of vinyl, cameras, and typewriters.

Well, back to making fun of Microsoft

Unless of course you live under a rock, you have heard about the terrible antenna problems the iPhone 4 has been having. Basically, if you put your hand over the left black line, all of your signal drops. Apple was having a PR disaster, but today Apple held a press conference and it seems that the truths were revealed.

But I must say, Apple wasn’t playing fair here.

First, Steve Jobs ponts out how all of the smartphones antennagate. He showed test videos of many popular phones including the BlackBerry Bold. This is simply putting down the competition and saying “we can’t go against the laws of physics… yet.” [Steve Jobs]. Fine.

So I got curious and asked I wonder if my phone does this…

Well, I gutters its back to making fun of microsoft…

New view on apple

I used to dub apple as the greatest of all. But my view is changing as apple begins to turn into the evil empire.

If you look at some of the press you will see how apple us taking a very bad response to this iphone for antenna problem. They have been saying nothing to the press and they are not anything their problem. This is kind if odd for a company so focused on its reputation and good press.

So here what I now say: apple has some of the best computers and electronics and design basi (plural of basis?) But as a company are entirely evil.

On the good side is google, but o don’t really dub apple and google in the same field other than mobile operating system (where I dub android better, more on that later) so I cant really call them head on competitors. But I praise google for being so open. I mean I even have a google socket on the back of my macbook and iPad.

So I guess I like them both.

As far as pcs go, I’m less crazy about mac. I man, people have their reasons, but overall I still dub apple as the best overall computer creator.

That concludes this postapalooza…

Our first postapalooza lasted from June twelfth to the twenty fourth! We had a total of twenty three posts!!

This postapalooza ended because I missed a day among all of my travel to Japan. If you think I missed a day or doubleposted, its just because of the time zone change.

Another reason is because I ran out of things to blog about. That’s why id like to have your suggestions. Click the suggestions tab on the left and suggest something that goes along these guidelines:

Technology related
Won’t cost me more than $5 (if its an iPhone or iPad app)

Thanks! I’ll try to make a postapalooza happen every quarter. 😉

Swype

These days, to type on a keyboard, you press the touchscreen. This usually requires thumbs, which can get VERY tired after a lot of typing. It can also take a while…………

Swype is a way to replace typing by instead of touching the keys you swipe over the letters on the keyboard to create the word instead of typing them. It has already broken the world record for fastest typing speed.

Luckily, Swype is allowing beta users on Android. And thanks to my Droid Incredible I got the chance to try it out.

As you can see, it may take a little bit of practice, but there are other videos where people are much faster than me. I’ll probably be able to swype a bit faster when Im not in japan, as here it is so humid my screen fogs up and becomes sticky.

Swype is rolling out on many new phones and the beta seems to work just as advertised.

To get swype, you need to have an android phone, an internet connection (which it looks like you have), and an email address.

Just go to beta.swype.com and register. Make sure you can access that email address on your android phone. After registering, check your email on the phone and click the link. You will need to allow third party installations, which the process varies depending on your phone. Once it is downloaded, open it and login with the information you entered into the swype website. Continue through the rest (it is quite self explanitory) and once it is done installing, just long press any text field, select input method, and select swype. Tada! You’ve just installed swype on your android phone.

New betas are always on the way, and there are numerous tips for Swype here.

Media Temple (mt)

If you’ve been reading Good Morning Geek since 2008, you may remember the times of maxswisher.blogspot.com. I liked that because it was completely free and easy. Then you may remember the times of goodmorninggeek.wordpress.com. Just as easy and free. Then, you may have realized that goodmorninggeek.com worked. That was just a redirect.

I was getting tired of not having much flexibility and storage (I was on Hurricane Electric which gave me 5GB/mo.), and because I was now earning some more money, I decided to get some real hosting of my own.

After asking around at the Teens In Tech conference, I concluded that Media Temple would be right for me.

I signed up for the Grid Server (gs) plan, which is 100GB, $20/mo (or $200/yr), and 1TB of bandwidth.

I had no idea that those $20 gave me SO MUCH.

I got

  • Email with built in spam filtering
  • FTP
  • 24/7 help

But there were 2 things that really made it for me.

1-Click applications

Using this service I installed wordpress on this domain with a FEW (:O) clicks. I then imported the posts from goodmorninggeek.wordpress.com. You can install wordpress, drupal, and zen-cart with 1 click.

Multiple domains to one service

Because it is grid server, I can have different domains linking to different directories on a single hosting. That means that maxswisher.com, goodmorninggeek.com, teentechie.net, and every sub-domain is on a single $20/mo. hosting plan.

Definitely recommend this to everybody who is looking to host their own website. In fact, skribit (they power the suggestions tab on the left) uses (mt). Who knew?!

http://mediatemple.net

Apparel Available!

You can now get a Good Morning Geek T-shirt, mug, messenger bag, hat, or even clock at the Good Morning Geek Shop.

Click here to visit the shop, and click Apparel in the top left at any time to go to the same place!

Your purchases are much appreciated. 😀

The current design on all of the items is shown below. Thanks!

[BUGGED] Favorite→RT

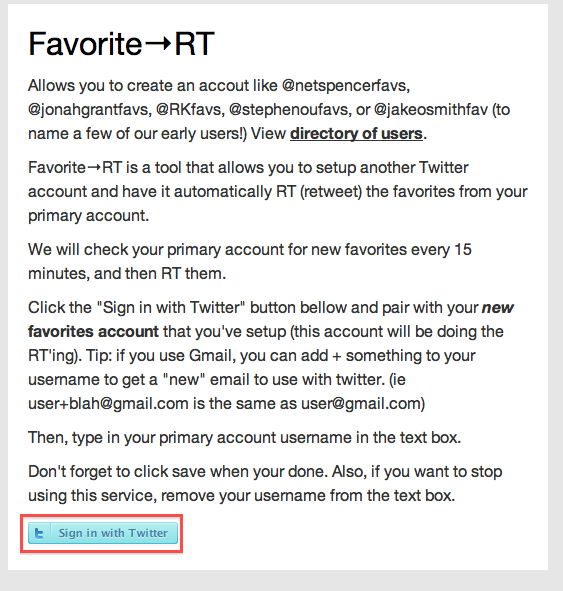
You may not know this, but it is possible to favorite a tweet. It’s supported in all twitter clients and the website.

Unfortunately, it is difficult to see what tweets a user has favorited (I haven’t been able to). But this service from my friend Spencer Schoeben makes it so a [yourtwitternamehere]favs account will retweet every tweet you favorite.

For this example, I will be using the TeenTechie twitter account.

Step 1

The account that will have the favorites is considered the “Primary account”. For this example, that would be TeenTechie. We need to create the favorites account that will retweet the tweets that TeenTechie (the primary account) favorites. That account should be [primaryusername]favs (TeenTechiefavs). Go to twitter and create the account.

Step 2

Go to http://spncr.me/favrt and click Sign in to Twitter at the bottom of the page.

Step 2

Frown in disappointment about the errors that occur.

🙁

Don’t worry, the problem should be fixed in a little bit. Once it is fixed, I’ll write a post that shows you how to create the account SUCCESSFULLY!.

In the meanwhile, save that [primaryusername]favs account, and while you wait, you might want to create a picture by taking the Primary account’s photo and putting a star in the bottom right (to denote the favorites account).

Thanks! I’m sure it will be fixed soon, Spencer says he’s ON IT and fixing it ASAP. Now smile in happiness for what is to come. 😀

Cooliris

We all have media we want to look at. These days, video and images are quite the hubbub. Cooliris is a way to “immerse yourself” into your content using a 3D wall.

Using it is very simple. Go to a google image or youtube search and click the cooliris wall button in the top right (in Safari). Your google image search will be displayed on a 3d wall. To go across the wall, you can

  • Click and dragx
  • Click the arrows at the bottom of the screen
  • Click and drag the blue doohickey to the left of right
  • Horizontally scroll with your mouse

If you find an image you like, you can click on it to view it and get more information about it.

This process works on many different media sites including flickr, YouTube, and more.

When you are in the cooliris wall you can search these sites instantly with the search bar on the top. You can also use the sidebar on the left to navigate through different sources like news, entertainment, featured, etc. You can even view pictures on your computer!

Here’s a video showing cooliris in action:

Sorry, the video isn’t in good quality.

Currently, I am an intern at Cooliris doing bug testing a brainstorming. I did in fact do a review of Cooliris a long time ago, but many new features have been added (and more are on the way).

Cooliris homepage

Cooliris download page

MindNode

We all have thoughts to organize. Mind maps are a great way of doing so, but a lot of software can be clunky, expensive, or hard to figure out. MindNode is a free, functional, and simple way of creating mind maps.

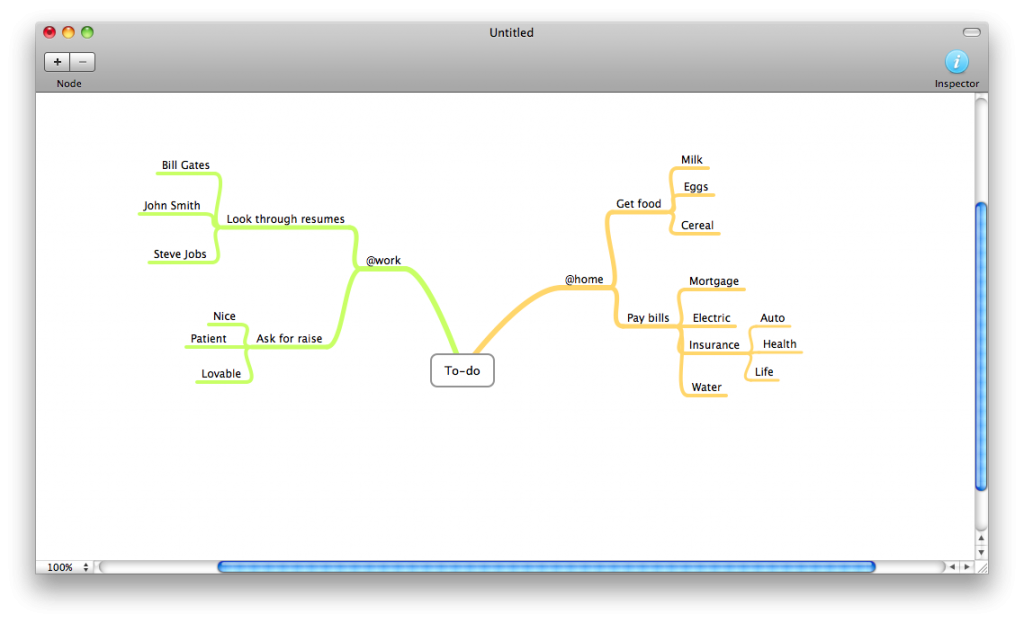
Upon opening the app, you will be greeted with what is called the “supernode”. Every different branch coming off of the supernode is called a node.  Click and drag the plus off of the supernode to create a node, and then you can type to name the node. When hovering over a node there will be a plus so you can create nodes off of other nodes.
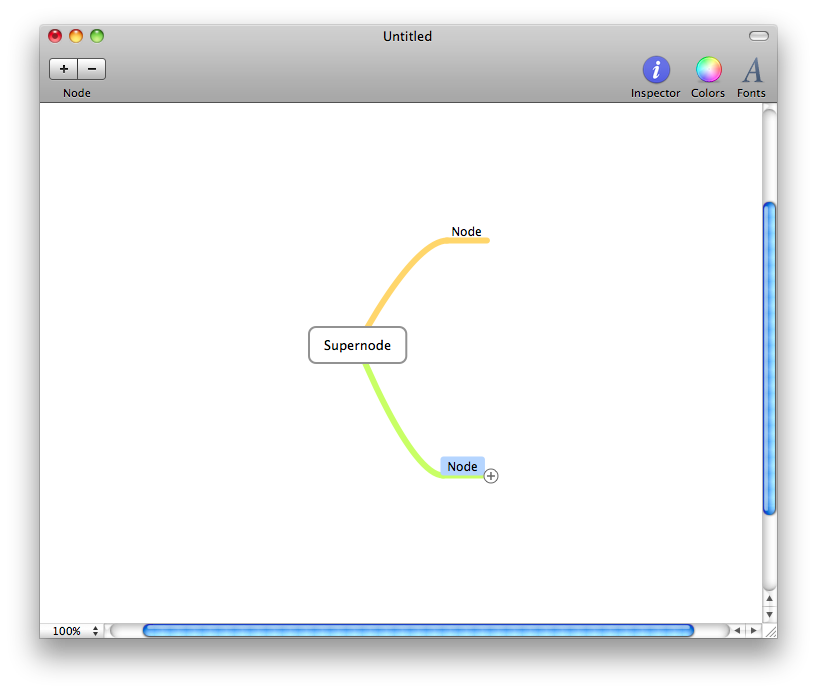
So you can organiza thoughts and ideas for things like to-do lists, projects, and more. Here’s an example for a to-do list:
You can also configure the color of the nodes using the inspector (the i in the top right), which makes it easier to visualize.
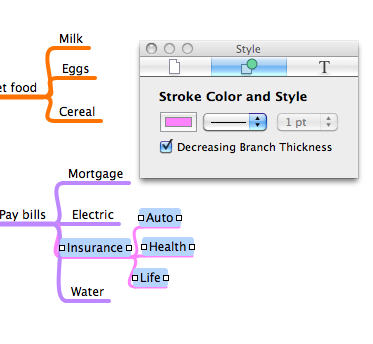
As you can tell, the inspector only applies to items that are highlighted. And to highlight an item, you guessed itL you CLICK on it. :O

If you look closely, there are white squares to the left and right of every highlighted node (when you highlight a node that has nodes coming off of it, all of the “sub-nodes” are also highlighted). Click and drag one of the squares to resize the node to change text wrapping.

It can also be used to separate sub-nodes from other nodes so you don’t get them confused. If you use both this and the ability to change the color, you can easily distinguish the sub-nodes.

In addition to being simple, powerful, and free, MindNode can export a document to

Click Here to download an example of the PDF.

Here is what the text outline looks like:

Thanks to it’s simplicity and flexibility, MindNode can be used for many different purposes.

MindNode Homepage

MindNode Download

What’s your favorite post?

UPDATE: The site’s theme has changed. This post no longer applies.

If you look at the top, you may notice a new grey bar with posts that go across. These may seem random, but I choose which ones appear. This posts are considered “featured“.

I’ve decided to let YOU, the computer user, decide which post goes up there.

So if you look to the RIGHT (–>) at the TOP (^^^) you will see something that says “which post should I feature?”. In the box there, type in what your favorite post has been.

New reader? Look into the archives on the right to read some other posts, then tell me which one is your favorite!

Create a WiFi network with your Mac

I am currently in Japan, and in the Hotel we have no wireless in our room. We do have a wired connection, but we have iPads that need WiFi. Here’s how to take your mac and turn it into a WiFi network in a few steps.

1. Plug in ethernet

into your Mac. Make sure the internet connection is working by visiting a few sites. Many hotels have pages where you have to agree to terms. Make sure you agree and/or pay before proceeding.

2. Turn on internet sharing

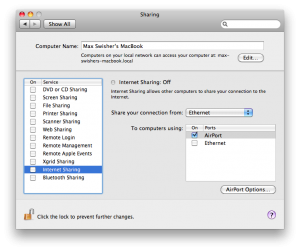
Open up System Preferences and click on Sharing. In the list, click on Internet Sharing, but don’t click the checkbox. Configure it so it looks like this:

Then, click on AirPort options in the bottom right. Here you can put in the name of your Wifi network and a password if desired.

Click OK, and now you can click the checkbox next to internet sharing.

3. Connect your devices

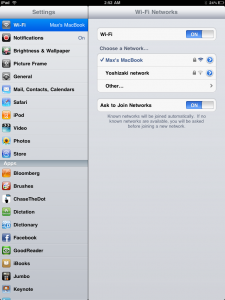
On your WiFi enabled devices you should be able to see a WiFi network with the name you put in under Airport Options in step 2. Connect to it and enter a password if you configured one.

Tada! Now your devices should be able to browse the internet. Cool! Be aware that you can’t be on a WiFi network on your Mac while sharing your internet.

Use it wisely!