Carbon Copy Cloner

[youtube=http://www.youtube.com/watch?v=gJ9u4jWnhQU&hl=en&fs=1&rel=0]

When was the last time you backed up your hard drive? If you haven’t, start soon. Yank that hard drive from that old computer, stick it in a USb enclosure, and copy your important (or even not important) files over, you don’t need software to do that. Backing up is nice, and is what most people do. But what about your settings, wallpaper, wireless networks, bluetooth devices, and modded boot logos you put on there? When you back up, you only have files and maybe even applications. But to get the rest, you have to do something called cloning. It means exactly what it sounds like: clone your hard drive to a disk image or other hard drive. This means that you can boot off of the clone (only if it is a hard drive) and everything will be there: modded boot up, wireless networks, bluetooth devices, email, apps, wallpaper images, even monitor profiles. and if you have the right tool, cloning is free and as easy as 123. But that’s only if you have an awesome app called Carbon Copy Cloner. This is a REALLY easy to use freeware app for Mac, and is usually referred to as CCC. It really is as easy as 123.
1- Select source hard drive or file(s).
2- Select target hard drive or disk image
3- Click clone!
It will take a little while, and there is even a scheduler. Sadly, if you select the delete files on the target that aren’t on the source selection, you cannot save that as a scheduled task. But I just put a sticky note on my monitor and clone right before I go to sleep, and let it run overnight. My MacBook has a SATA drive, which is really easy because they make USB enclosures for those, and I have a 200GB SATA sitting around. So I have found that it is best like this for me:
1- Source as whole hard drive
2-Target as my 200 GB SATA in a USB enclosure, formatted as the default format for your Mac’s hard drive (for the Leopard computers like mine, Mac OS Extended (Journaled), which I would never change).
If you are running a desktop computer, get a other usb hard drive, or if you have one of the same kinds of hard drives you have in your computer sitting around, find a dock or usb enclosure for it to use as the target.
Now here is why you want the exact same kind of hard drive to clone to: If your computer crashes and you need your data immediately like you are in the middle of a conference call, just plug in and power on your hard drive through USB, and hold the option key while pressing the on button. You will see the hard drive of your computer, then with a USB icon (depending on how you connect your clone, it may vary) there is your backup. Click it/move with the arrow keys to select it and hit enter. Before you know it, you are booting your hard drive as it was when you hit the clone button in CCC at the speed of USB 2.0 which is 480 MBPS. Not the fastest ever, but loads almost as fast as the hard drive plugged in. now you are forgetting that you are running of of a clone. That is if you need your data right then. But if you have a little time, I recommend getting everything back to normal. In your computer, remove the crashed/ruined/wiped/whatever happened as long as it wasn’t destroyed physically drive and put in the backup. Then, put the crashed/ruined/wiped/whatever happened as long as it wasn’t destroyed physically drive in the USB enclosure. Boot from the backup that you put in the computer and open CCC. Then say clone to your original hard drive which is now classified as USB (or however you connected it). Then once it is finished cloning, switch the hard drive again. It will be like nothing ever happened. Now that is something that a backup can’t do. you can’t boot off of a backup, you can only boot off of a clone.
And to tell you the truth, I hated backing up. Backup applications were slow, time machine is a piece of crap (along with iCal: FIX IT APPLE!), and copying manually took to long. Finally, I get a nice interface, cloning, super quick cloning, and best of all, FREE!

Cover Flow + Remote App + iTunes DJ= Awesome wireless listening experience

Sometimes I like to do nothing but listen to music. My computer on my desk playing music, me sitting on the other side of the room on a pile of stuffed animals. But what do I look at when I listen to my music???? And how do I change the music, request a song in iTunes DJ (itunes 8.1 only), or change the volume??

Well, all of that is now solved.
I always use iTunes DJ for my needs now. It plays my higher rated ones more often, I can request songs, and I can remove songs from the DJ playlist. I have a great set of speakers, and I can turn them up to a very high volume. I must say, the iTunes DJ is very good at thinking what music you want to listen to. And the request feature makes it a very realistic “DJ”. Too bad it doesn’t have a voice… but Apple could definitely put that in there. I mean, they put it in that ipod.. Hey, where is it?, aka, the iPod shuffle.
Question 1: What do I look at when I’m listening to my music?
Answer 1: The awesome cover flow look. I can see what song just played, and what song is coming up. I can put it fullscreen, so that’s all I see- My album artwork of what song is playing, and a few before and after the song that is currently playing.
Question 2: How do I change the music, request a song in iTunes DJ, and control the volume from across the room?
Answer 2: Simple. I have an iPod touch as you may know, and I have a cool app that is made by apple and is called remote. You can hook it up to your iTunes library, and over wifi, you are able to control the music. It also puts your iTunes library as the Music app’s interface, but sadly you can’t rotate to view cover flow. but I can do all that: request a song in iTunes DJ, go to the next song, and even control the iTunes volume.
VIDEO!!!!!!!!!!!

MappedUp

Despite having a Mac-like name, MappedUp is also in a version for PCs. This app is great for news junkies.

Ever wondering what is going on around the world, and on a map where it is happening? This is a free app just for that.
Sorry for the amateur quality, I am unable to afford software like captivate, or another video camera with a microphone.
DOWNLOAD IT!
Macs:
PCs:

Quicksilver

Pre Script:Quicksilver is not to complicated but easy to use. also, in the screenshots of this page wallsaver is not enabled because it sucks up 2 things-

Battery life and RAM.
Spotlight is a very convenient tool. only with key commands, you can search applications, files, folders, web history, and much more. But some things you can’t do, like type in urls, or run scripts, or execute large text. Quicksilver is
pretty much a spolight, but you can execute urls. for example, here is typing in google.

To get to this text entry tool, just press the period key. it will look like this. this is after I had done the search for Financing. It automatically selects what ever you had come in the results of whatever you had typed in before pressing the period key.
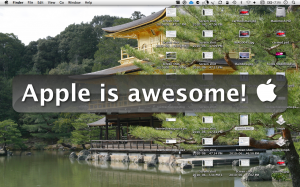
Then you can do things like Large Type, and URLs. To open any item, just hit enter. it will do whatever the action is that is to the right to whatever is on the left. After Pressing the period key, I typed some stuff in. Here I typed in Apple is awesome!  and as you can see on the right it said Large Type (if all you see after Apple is awesome! is a square, it is actually an apple logo. if it is a square, you obviously have a PC).
Once you hit enter and execute it, the text will appear huge ( in this case “Large”, as Quicksilver says) accross you screen in white text. you can then hit the enter key or hit the escape key to exit large type.

Then when you hit enter, it will execute the Large Type. Once executed, it will do exactly that- Make it really big over your screen.
Plugins can also be used to do other things with quicksilver.
If you find to be using quicksilver more often than spotlight but find that you are used to the spotlight command-space, you can go into the spotlight preferences and disable the key command, then go into the quicksilver preferences and configure it to have the same key command.

Wallsaver

Here’s it simple-

Wallsaver puts a screensaver as your desktop.
I use it all of the time, with my LotsaWater screensaver, which takes a screenshot of your screen and makes ripples over it. the only problem with using the screenshot feature with wallsaver is that when something moves on your dock with wallsaver enabled, Then the same thing of when you didn’t click on it will be there too. so thats wy I just used some image behind it. in this case, a cool apple spotlight picture. this one.
But to have wallsaver  use lotsawater is very hard. What you have to do is open the .saver file in system preferences, change it in system preferences to have the apple image under the options button, then it will actually modify the .saver file itself. then, you need to open the folder containing the .saver file in finder, at the same time as haveing wallsaver open then click and drag the file from the folder in finder to the wallsaver window. I enabled the aoutoactivte as well as the hide after activation, then on top of that had wallsaver open on startup, so the window would appear, then the wallsaver would activate, then the wallsaver window would disappear again. also, you can quit the application and the wallsaver wil still be in activation. also, after you sleep/close the lid of your mac it will still be activated when you open it back up, even without the wallsaver application running.
Here are the download locations.
LotsaWater:
Wallsaver:

cocunutBattery


cocunutBattery is a very cool application for Macs. you can see all about your battery, the age of your mac, and how much it holds compared to how much it held when you first bought the mac/battery, and even battery load-cycles. The application is very simple, and that is about all it has. it only works on macs.

Icon

(728KB; Required: MacOS X 10.4.5+)

Disctop

Disctop is a really cool piece of software, that is both freeware, and really awesome. when you insert a disc into your mac, it till actually show the disc on your desktop. for iMacs, this is really cool because it will show the disc on your screen where the disk actually is. for macbooks, it can’t quite show it on the keyboard, so it shows it on the top right of the screen. it will show it actual size, and if it is a music CD, then Disctop will go out to amazon.com and find the CD artwork, and display it on the cd (I mean the one on your desktop!).

here’s a video I made.

Desktopia

Here’s the bottom line:

Desktopia is an application where you can set different background pictures for different times, in which you can specify.
here is a screenshot of the controller.

It’s pretty basic, but incredibly convenient.
It only has one flaw: That it doesn’t work unless the app itself is running. 
Now, what you see in the screenshot above is not the app, its only the controller. to make it so the app runs on startup, go to the app
lications folder in Finder, find a file called desktopia, then move it to the dock. right click the dock icon, then click open at login. then, you
can drag it off of the dock. then, in the top right, there will be a flower indicating its running.
click on that icon, and click open at login. when you do that, it should look like the image below.


Thats really all there is to it. You select the image add the time, and let it do the rest.

HandBrake

We all love to watch DVDs right? but sometimes when you want to watch them on the go, you have to have a player or something right? so thats why we get an iPod, or PSP, or iPhone. but you have to buy the right format from iTunes of the movie. but i just wanted my dvd on my iPod. dundundunda! here domes HandBrake. HandBrake is a 100% free application the transfers DVDs to most formats for a player. the newest version is only for OSX, but there are older versions for windows and linux. it has presets for things like iPhone, iPod lo-res, hi-res, PSP, and in the following formats: .mp4, .mkv, .avi, and .ogm. i use this al of the time on ipod lo-res for my dvds. for iPods, iPhones, PSPs, etc. you need to output it to .mp4. i use it for all of my DVDs.
Download!
Mac OSX