How-to: Get Facebook Chat in iChat

Many of us use Facebook, and have probably noticed that there is a chat function. Also, man of us use AIM in iChat. Personally, there are always more people on facebook than on AIM, so I can chat with a ot more people. Here’s how to integrate it with iChat so you don’t have to login to facebook every time you want to chat with someone or let someone else chat with you.

Luckily, Facebook recently launched their Jabber thingy, which has done well.

In iChat, click in the menubar iChat>Preferences. Then click accounts, where you should get a tab like this.

The Accounts preferences is shown here.

Now, just click the little + in the bottom left, and you are shown this screen.

For account type, select Jabber.

For the Account Name, you need to find some info.

Login to facebook.com and click on profile in the top right. It should go to your profile page with wall postings and your profile picture. Next, look in the URL bar of the browser. It should say http://facebook.com/user.

What is says where user should be is what you put in front of @chat.facebook.com. So for this example, the Account Name would be user@chat.facebook.com.

Your password is your password that you use to login to facebook all 5 times a day.

Now click done and wait. The new buddy window will appear, but it will say connecting. It may take a while for it to connect, and times may vary. for me it took about 45 seconds, others about 5. Whatever, but it still works!

After is connects, you will see all of your online facebook friends. Double-click a friend that has a green dot next to it and start chattin it up!


Tweetie for Mac

Looking for a balance between the minimalistic Twitterific and the feature rich TweetDeck?

Well, you have found you match, and it’s name is Tweetie.

Tweetie is a simple yet feature rich free app for Mac. The free app is ad supported, but DON’T WORRY! The ads appear in-line with tweets, and use the same format, and don’t flash at all! The ads are provided by Fusion, and I’m sad to say that I’ve actually clicked on many of the ads because they looked interesting, and I actually bought an iPhone app that was being advertised.

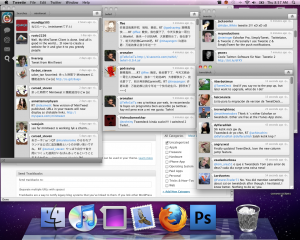
Start out by looking at the interface.

Sleek, simple, stylish interface!

As you can tell, these are simply the tweets of people I follow. In the left you can click the variety of icons, that are self explanatory [but just in case, @= replies, the envelope=DMs, the magnifying glass=search].

If you look at the replies (@ symbol), you can see there is a blue dot above it. This indicates that there is a tweet in that category that I have not read. Once I have read the tweet the dot disappears.

Lets take a look at the replies tab [just click on the @ to get there].
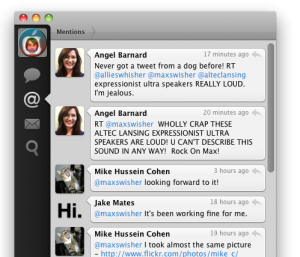
Same sleek interface, but filtered everything but replies.

You can reply to a tweet at anytime by clicking the curvy arrow at the top right of each tweet. You can also repost (AKA retweet) a tweet by right clicking on a tweet ad clicking repost. You can set if it does ______(via @_____) OR RT @_____: _________ I prefer the RT @____:__ because it is more commonly used. You can change that in the preferences.

The DM (envelope) tab is quite interesting.
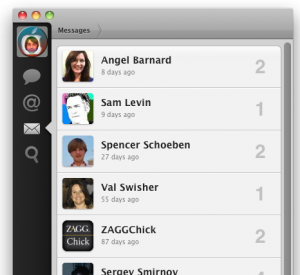
As you can tell, DMs are sorted into conversations with each tweeter (tsk-tsk) you have sent and received DMs with. Click on a user to see your conversation with them.

Almost like iChat!

You can click the big reply button in the top right to DM someone back.

The search function is also very interesting.
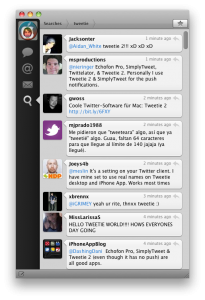
Search for Tweetie by entering tweetie on the previous screen and pressing return!

To search, click on the magnifying glass. In the search box that appears in the top right, enter a term (in this case it was tweetie), and press return. the box will disappear and tweets for your search will appear in the window. Visit any other tabs and come back to the search and the search term will disappear!

Another great cool feature of search is having multiple searches in different windows.
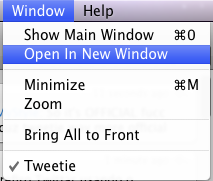
This function only available in searches.

After you open it in a new window, go back and enter another term. The window will remain with the same search terms, and you can open as many windows (which means as many searches) as you want.
Plenty of searches for popular twitter clients!

Also, did I mention you can use boolean search terms with the search (such as AND or OR)?

Wow, I almost forgot

1 to create a tween, just press Command-N. a small window will open where you can type anything. Type in a URL and press Option>Command>S to automatically shorten it. Then, just press command>return and the tweet will be off. You can also get a bookmarklet for your browser so on any page, you can click on the bookmarklet and a tweet will open with the URL in it. Cool! Also, you can even assign a global hot-key so in any app, anywhere, you can press this key sequence and the new tweet window will open, and not bring all of the other tweetie windows with it. Awesome!

Among all of these great things there are a couple of extra things that Tweetie does.

Tweetie has seamless support for multiple accounts, so you can have it look like this:

Click on the other icon to see replies, dms, etc. for that account!

Also, you can enable a small menubar icon which does one simple thing: indicate when you have unread tweets. When you have unread tweets it looks like this:

Click on the icon to show the tweetie window!

But when you have no unread tweets it looks like THIS:

Blends in fine!

I hope you enjoy tweetie, and for $20 you can disable ads, which by the way look like this:

Simple, interesting, in-line ads.

Ad-supported Download

Registration Homepage

Homepage

How-to: Create huge posters and cool entryways

You like that picture on your computer. but you want to put it on your wall. Wait. You want it to COVER the wall. But, it’s too expansive to print on big paper at kinkos, etc., etc. So what do you do? You use an online tool called the rasterbator.This great tool will simply take your image and make the pixels big dots. The size of the dot will depend on brightness of the poto and how big you want it to be.

To use to this online tool, just click HERE, upload your image, crop if desired, size to the number of pages you want it to be, SELECT MULTI-COLOR ON THE NEXT PAGE, and download and print the PDF. Well, then of course there’s cutting it and putting it together, etc.

So originally I had a big picture of the aple logo that was screddd and hanging from my door, shown below.

Old Entry...

But I was getting very bored of it.

So I had just made my new logo, and I decided that I should create an entry thing with my logo. I was having some problems with the software I had previously used, so I used the rasterbator this time. Below is the image I uploaded to the rasterbator.

Original Image

As you can see, it’s simply two of my logos on top of each other.

So after downloading the PDF I printed it out (turned out to be about 30 pages) and put it together… with nothing but scissors and Scotch tape. This is quite the challenge as with a normal printer there will be a border, which you have to find a way to fold over.

After piecing it I did what needed to be done: I cut the whole thing in to strips EXCEPT FOR THE TOP. Then, I simply hung it above my door and this is what I got.

New Entry

As you can tell, this one hangs much mower than the old entry, and in a cose-up, you an see how this tool really fit it to this big of a size.

Pixels to dots

The rasterbator did just what I said it would do – pixels to dots. The brightr, the smaller the dot (as more white will appear). And of course, the bigger you want the picture, the bigger the dot.

But some people go REALLY far with this thing.

Whow...

smcFanControl

Doodoodoo, workin on my Mac, Lalala iStat Menus Running..Lalala GAH @#$%%@#$!@ 95º F enclosure base!!! GAH!!!! Even though I’m on a flat surface with great air flow…

What now?

smcFanControl!

This is a simple little menubar app that allows you to control the speed of your computer’s fan. You can make presets, tell it to use different presets for charging, battery power, and plugged in. I can also just use the slider and select RPM. So the below video demonstrates the proper thing to do.

That is really it.

But the real fun is when you listen.

It’s really coll how hardare ties into software. By moving this ound thind and pressing down, I can make a motor spin faster.

It’s amazing how these things tie in.

But so far, it has not failed me!

I must say that is does ware down your battery life a bit, and may reduce the life of your fan (after all, you are literally puching the limits), but if you need a wuick and easy remedy to get that fan speed going, just click the links below or the download and the homepage of smcFanControl!!!

Direct Download
Homepage

Good Afternoon Geek

Introducing…

[youtube=http://www.youtube.com/watch?v=y1kKL87Q3a0&hl=en&fs=1&]
(Actually, it’s hard to see here, so just click on this link. Watch in HD as well!!!(
Good Afternoon Geek!
My AWESOME podcast!
It’s packed with how-tos, reviews, and your questions!
Yes, send in YOUR TECH QUESTIONS to podcast@goodmorninggeek.com .
Then tune in to the next episode with a question as the title to have your question answered!

Proteus

You may remember this post where i mentioned that iChat is great. But, it in fact as I said, doesn’t support Yahoo! which I now really need. So I turn to Adium, but the interface just bothers me. Why? I really have no idea. But, I lived with it, and one day it refused to connect to Yahoo!. Below is a list of the only good multi-protocol IM clients for Mac.
Adium
Fire
Instandbird
Proteus

So Adium won’t connect to Yahoo!. Off the list.
Fire as discontinued development, and I don’t want an updateless application.
Instantbird is a little too purist, with contact list, chat.
Hmm Proteus? Never tried it.

Wow. It connects to everything. It looks great. It operates great. The interface is nice. And best of all, the dock icon rocks. And I think I know why I didn’t like Adium–there was always a bird watching me a flapping it’s wings when I got a new message. Luckily, with proteus when I get a new message, the dock icon just bounces.

Proteus is the one IM application for Mac that I can live with. Yes, there is Pidgin, but that requires using the fin library and X11 (which trust me, don’t even try). The interface is simple, it connects to everything, it has options.

So Proteus is changing some of their sites, so the links to get extra stuff are all broken. I’m sure that will be fixed in the future, but the interface is still amazing, simple and functional. That’s why I like this more than the others: No flapping ducks, simple and easy but customizable interface, frequent updates, and connects to everything no problem. And that’s why it’s better than Adium, Instandbird, and fire.

Download
Homepage

Podcasting Part 1 (Q+A)

This isn’t about just one piece of software–this involves feeds, servers, podcatchers and iTunes.

Podcasting. That one free thing of audio broadcasts that everyone has hopped onto, and people can subscribe too. Sadly, I’ve seen many people who have no idea how it’s done. Here’s some FAQs about podcasting with iTunes.
Q: Do you submit a podcast by getting the right account with apple and uploading it to their servers?
A: No. Apple does not provide any server space to host your podcasts, that is something the podcaster needs to have.
Q: Is podcasting as easy as putting an mp3 on a server?
A: After you have set it up, you put it on the server and update the XML feed.
Q: I want to do a podcast. I have people, material, (a) microphones(s), a way to save to mp3, and a server with a working domain. Can I podcast to iTunes?
A: Yes. That is al you need, but you need to create an XML feed for iTunes. This is NOT easy, unless you know how to do it the easy way (which we will talk about later).
Q:How do I submit the podcast to iTunes?
A: As I said, you need to have an XML feed. To submit the podcast, just go into the iTunes store in the iTunes application, select podcasts in the left sidebar, scroll down and click submit a podcast (left sidebar). There, put in the URL of your XML feed.
Q: After submitting, does it just appear in the iTunes store?
A: If all goes well during the submission, you will get a confirmation email saying that your podcast is under review wait approximately 24 hours, and you should get another email saying it was approved, ad the email will contain a link that opens to your podcast in the iTunes store. 24 hours after that, the podcast will be searchable in the itunes store.
Q:How much money does it coat to do it the easy way?
A: Other than the server space, completely free of charge.
I hope that this gave you a better understanding of what podcasting is like under the hood. There will be more posts on podcasting, including what the “easy way” is.

Butler

At your service, for no cost at all! Sorry, PC users, this Mac essential is only for Macs. Butler is cabable of doing many things. It can show the iTunes song, bring up a google search window, and do a spotlight kind of search. But those I truly don’t need, and the reason I love this so much is because of one feature: Multiple pasteboards. I can copy one thing, then copy another. usually this would wipe the last copy, but if you have pasteboards enabled then it will remember it. You can also set a limit of how many pasteboards you want it to remember. you can open the pasteboards menu by assigning a keyboard shortcut or opening it from the menu. I prefer keyboard shortcuts because I have things I need to do, and clicking on things doesn’t speed up the process. I assigned option>Command>V because it is like paste with the option key. this will open a small window with things you have copied. Each thing you have copied will be numbered, and the most recent will be 0. Just press the number on your keyboard to paste it. Of all features, this is definitely the best–and the only one I use. But, I do still use the google search feature. But I must say that the configuration window is kinda hard to figure out. But just look through the help file. I now see why it is called help. Get multiple pasteboards and more-Butler.

Pandora

[youtube=http://www.youtube.com/watch?v=-L9ef4cMitA&hl=en&fs=1&]
This is probably one of the most well known web applications in the existence of existing. Pandora[.com] is a free (with a few ads) internet radio that quote “Plays only music you like”. First, put in your favorite song/artist (no registration required, but registration keeps track of all your stations for use on other devices). It will then find tracks like the artist or song you put in, and will make a “station”out of it called “[Artist/song here]”. Then, it will play a track with very close qualities to the artist/song you put in. You can them select thumbs down or thumbs up to modify the station. It will play constantly for about an hour and then say “Are you still listening?”. To avoid this, just click something over there. It only does that when it thinks you aren’t there and the app stays motionless for 1 hour. You can have LOTS of stations, I don’t know the maximum (if there is one). And with Fluid (clickable) you can turn it into a desktop application. What else could you ask for? No ads! To do this, you need to subscribe to pandora ($$). Ever hear music playing through my live feed? A lot of the time it’s pandora. Also, you can even create stations based on genre.

Links:

OpenOffice.org

There is Microsoft Office and iWork, but this site is only freeware. OpenOffice is a completely free office program which features everything you need, including compatibility with all of the Microsoft Office files. It has a word processor Writer (Word/Pages), Calc for creating spreadsheets (Excel/Numbers), Impress for creating presentations (PowerPoint/Keynote), Draw for creating things like designs (Not in MSO or iWork), and Base, for creating databases (Not in MSO or iWork). OpenOffice is made by Sun, and here is the best part: it works for EVERY operating system imaginable. Say you run a business and you want to straighten out your budget. Bam. Just use OpenOffice. The software is easy to use, and really straightforward. Really struggling with money? Switch to Ubuntu, and Ubuntu even comes with OpenOffice. Also, if you have just switched to a new operating system and you need to start with office documents fast, just use OpenOffice. I have OpenOffice installed on all of my Windows 7 computers, which in fact, does include my MacBook. I installed it on my HP as well. Sorry, it was just rumored to be so much better and it was free, so what the heck. Why not. OpenOffice is great for someone who is a publisher, hi-tech business employee, freeware fanatic, or just someone who needs to write something down, make a presentation, letter, database, spreadsheet, or design. Or even someone with every single operating system imaginable. Easy free office pack- Openoffice.org.

iStat

[youtube=http://www.youtube.com/watch?v=5O-MXWa-XQ8&hl=en&fs=1&rel=0]

Some people who have followed my other blog Good Night Geek before it turned into an iPhone app review blog may have seen my post about MenuMeters. I have found an even better alternative though. iStat menus is a form of one of my favorite dashboard widgets called iStat (download link at the bottom). This is in menu form, but unlike MenuMeters, gives you a lot more info, such as temperatures and fan speeds. Also for you multi-core users, there is a separate CPU meter for each core. Finally, some definition between two cores. Also, I can monitor things like how fast my fan is running (for me it’s usually about 2000 RPM). You can also see why your computer is making far more noise than it usually is. I know. I’ll take a good look at my iStat menus. Wow, my temperature is almost 100ºF (you can change it form F to C to K), and Wow, my fan is running 3 times faster than usual at a blasted 6200 RPM! Now I know. I have my primary temperature (the one that appears in the menubar) as the enclosure bottom, but I can have it configured so it shows the temperature of well, almost anything! The nice thing is that if you want to monitor multiple temperatures, just choose the most important one as the primary and to look at any of the temps, just click the temperature in the menubar. it will then give you details of everything in your computer that has a heat sensor including CPU(s), Heatsinks, batteries, and even the bottom of your computer (enclosure bottom). It groups fans and power together, so if you click on the fan speed in my case, I can see how many watts everything is using and how fast my fans are going. Click on my CPU info and I can see a lot of info about what is taking up the most CPU, uptime, and even a button to open activity monitor. There is much more you can put up there in many different ways, But I already have a lot of stuff in the menubar and that does not work good with photoshop because of how many menus it has.

BUT HOLD EVERYTHING!
Now you can even check it out on your iPhone or iPod touch! All you need to do is download iStat server (free!) and install the iStat app on your iPhone ($1.99). Then, open the iStat server on your mac. It will give you a passcode. Next, open the iStat app on your iPhone. If you are connected to wifi, just select your computer and type/tap in the passcode. Or, you can simply click add and type in the IP address of your computer. After that, tap your Mac in the menu and bam. You will see Fan, network, CPU, uptime, and everything else that you could see on the computer itself. This will be viewable from anywhere as long as your computer isn’t asleep/offline. What’s going on inside your mac-iStat menus and server.
iStat menus
iStat server and iPhone
iStat Dashboard widget

Mactracker

[youtube=http://www.youtube.com/watch?v=uC62nggALlA&hl=en&fs=1&rel=0]Ever wondering how that old Mac you got 10 years ago sounded right when it turned on, just to remember what it was like? Ever wanted to see how much RAM that first mac that ever existed had? That is exactly what Mactracker is for. It is a free easy app, that gives you info an every single apple product in existence. In fact, for many it has the available startup chime and even death chime that you can play right out of your speaker system. It gives you history, If it is still supported, memory, RAM, ports, and everything else you could imagine including OS version and Finder version. It is really that simple. When I say it shows every apple product, I mean laptops, iPods, iPhones, Desktops, Cameras, Printers, and even Newton models! Who knew that the MessagePad 2000 had a code name of Q, 5 MB of RAM, and ran Newton OS 2.1, and was available in english and german? All of that and more came from a single window in Mactracker. and lucky for everyone out there, it’s available for windows too! there is also a FREE iPhone app of it that features all of the features from the desktop app, but lacks the history feature. In fact, the Apple genius training class in cupertino uses this app, and that is where I found out about it. Apparently they use it so much they even have a dock icon for it! Info on every single Apple product: Mactracker.