Bluetooth not available? Here’s a 10-step fix!

I’ve had this happen a few times where suddenly for no reason it appears, my bluetoth magic mouse stops working. I go to my bluetooth icon to see if it is connected and it is greyed out with a squiggly on it. Clicking it shows this text:

Bluetooth: Not Available

Usually when this happens I end up wiping out my computer and reinstalling snow leopard. but instead, I tried a little harder this time.

By instinct, I just restart. I go up into the menu and hit restart. The sad truth about this is that it never shuts down the computer, it never stops running. (If it did, how would it know to boot back up again?)

However this didn’t work. So I thought that maybe something on startup was consuming the bluetooth card, making it unavailable for the little menubar to see. To fix this, I just went into System Preferences under Accounts, Login Items, and deleted every single item there. I then shut down, unplugged the power cord, took out the battery, put back in the battery, plugged in the power cord again, turned off bluetooth in every other device I had laying around, and turned it on again. Tada! I had bluetooth again. So here’s an easier guide:

  1. Open System Preferences.
  2. Click on Accounts
  3. Click on Login Items under your username
  4. Select the top item and click the – until there are none left in the box
  5. Go to  in the menubar and click Shut Down…
  6. After it shuts down, remove the power cord
  7. Remove the battery (If possible)
  8. Reinsert the battery
  9. Reinsert the power cord
  10. Turn off bluetooth on all surrounding devices

Start back up and your bluetooth should be available again!

    Tether your android device

    As you know, I got my beautiful new HTC incredilble.

    It comes with built in support for tethering, but another $30/ mo.??!! NO. Luckily, there’s an easier way: PDAnet.

    It’s a free download from the android market and works without any extra charge.

    Sadly, I can’t give you any screenshots due to android. 🙁

    But it is simple enough.

    First, open the app. You will be introduced with the option to turn on USB or Bluetooth tethering. The USB tethering requires an extra plugin to be installed, and my mac supports bluetooth DUN built in, so I just used that. Here’s a video on how I set it all up.

    There you go! Sadly this does not work with the iPad, as DUN isn’t available quite yet.

    Turn your iPad into display with Air Display

    Well, you got your shiny iPad. It does everything as advertised. But it can do even more. You can turn it into a secondary display for $9.99!

    First, on your iPad, download an app called Air Display for $9.99.

    Next, connect your Mac (sorry PC users, this won’t work for you) and iPad to the same WiFi network (if you don’t have any available create an AdHoc network on your mac). Then, open the Air Display app on your iPad. It will give you detailed instructions on how to download and install the plugin for your Mac (free). I’ll walk you through it anyway:

    First, download the plugin at avatron.com/ad. Then, install the package and restart your computer. Make sure your iPad is awake and Air Display is open. Click on the Air display icon on your mac’s menubar and select your iPad from the list. Your screen will turn blue, then your iPad should be connected. By default, your iPad is configured to be on the left. So drag a window off of the left side of your main screen and it will appear on the iPad. cool! You can also touch on the iPad like a mouse (no right click though).

    Now that you have your Air Display configured, lets personalize it.

    Open System Preferences and click Displays. You will see a window show up on each of the displays. But the one we really want to use is the one on the main display (the main display is the one with the Menubar at the top). You will see that on this display there is a window that has an arrangement tab at the top. Click Arrangement and here you will see two screens: the smaller one is your iPad. You can click and drag you iPad to a different side of the main display depending on the physical position.  You can also drag the menubar to the iPad to make it the main display.

    Now this is cool and stuff, but a really cool use is that you can finally run flash on an iPad! the fps is less then 30, but it will do for the most of us.

    Now if you have a physically plugged in external display, this means that you could have 3 screens without having to buy something like the viBook for $120. Here’s how I set it up with the Air Display:

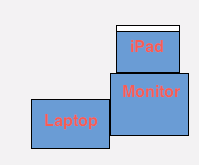
    System Preferences Arrangement

    As you can tell, I have the Macbook to the left of my monitor. I then put my iPad on top of my monitor and am using my iPad as my main display;. This eliminates desktop clutter, and when working in photoshop all of my tools don’t get in the way so I can work on a pretty big image.

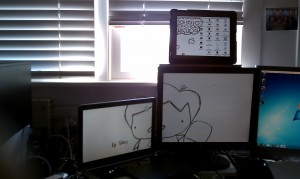
    Here’s how it looks in real life:

    By default the wallpaper won't span

    As you can tell, it looks similar right? All of my icons are on my iPad along with the menubar, allowing more room on the main display. Sadly, the wallpaper doesn’t span across all of the monitors automatically, it just takes a lot of cropping in photoshop so you get three different pictures that eventually come together as one image. Also, cool picture right? It’s a portrait of me drawn by one of my friends. If you look on the iPad, you’ll see a thought bubble with binary.

    Sadly, you need to add the iPad as a display with the menubar icon every time you restart your computer. Also, it’s hard to use it while the iPad is syncing.

    There’s a cool way to impress your friends!

    [ad code=1]

    Apple isn’t telling us everything…

    We all know that apple doesn’t tell anybody anything.

    But you’d think theyd tell you SOMEWHERE (maybe on the web?) everything about a product that was already released, right?

    Think again.

    We all know that apple made an array of accessories for it’s new baby the iPad.

    One of which happened to be the camera connection kit. This costs $29 and comes with two things: A little dongle that plugs into the bottom of your iPad with an SD card slot, then a similar one with a USB slot.

    We all thought that the USB slot was for plugging in your camera. And it is! But…

    So many people have told me that they can’t use any keyboard other than apple’s. WRONG! You can plug a keyboard into the USB slot!

    You can also plg in USB headphones, microphones, headsets, and probably more. You can even connect your iPhone to get the photos off it, so you no longer have an excuse for no camera an the iPad! I mean, you took them on the go, and they are on your iPad, am I right?

    But why didn’t apple tell any of us? Comments welcome.

    How-to: Get Facebook Chat in iChat

    Many of us use Facebook, and have probably noticed that there is a chat function. Also, man of us use AIM in iChat. Personally, there are always more people on facebook than on AIM, so I can chat with a ot more people. Here’s how to integrate it with iChat so you don’t have to login to facebook every time you want to chat with someone or let someone else chat with you.

    Luckily, Facebook recently launched their Jabber thingy, which has done well.

    In iChat, click in the menubar iChat>Preferences. Then click accounts, where you should get a tab like this.

    The Accounts preferences is shown here.

    Now, just click the little + in the bottom left, and you are shown this screen.

    For account type, select Jabber.

    For the Account Name, you need to find some info.

    Login to facebook.com and click on profile in the top right. It should go to your profile page with wall postings and your profile picture. Next, look in the URL bar of the browser. It should say http://facebook.com/user.

    What is says where user should be is what you put in front of @chat.facebook.com. So for this example, the Account Name would be user@chat.facebook.com.

    Your password is your password that you use to login to facebook all 5 times a day.

    Now click done and wait. The new buddy window will appear, but it will say connecting. It may take a while for it to connect, and times may vary. for me it took about 45 seconds, others about 5. Whatever, but it still works!

    After is connects, you will see all of your online facebook friends. Double-click a friend that has a green dot next to it and start chattin it up!


    How-to: Create huge posters and cool entryways

    You like that picture on your computer. but you want to put it on your wall. Wait. You want it to COVER the wall. But, it’s too expansive to print on big paper at kinkos, etc., etc. So what do you do? You use an online tool called the rasterbator.This great tool will simply take your image and make the pixels big dots. The size of the dot will depend on brightness of the poto and how big you want it to be.

    To use to this online tool, just click HERE, upload your image, crop if desired, size to the number of pages you want it to be, SELECT MULTI-COLOR ON THE NEXT PAGE, and download and print the PDF. Well, then of course there’s cutting it and putting it together, etc.

    So originally I had a big picture of the aple logo that was screddd and hanging from my door, shown below.

    Old Entry...

    But I was getting very bored of it.

    So I had just made my new logo, and I decided that I should create an entry thing with my logo. I was having some problems with the software I had previously used, so I used the rasterbator this time. Below is the image I uploaded to the rasterbator.

    Original Image

    As you can see, it’s simply two of my logos on top of each other.

    So after downloading the PDF I printed it out (turned out to be about 30 pages) and put it together… with nothing but scissors and Scotch tape. This is quite the challenge as with a normal printer there will be a border, which you have to find a way to fold over.

    After piecing it I did what needed to be done: I cut the whole thing in to strips EXCEPT FOR THE TOP. Then, I simply hung it above my door and this is what I got.

    New Entry

    As you can tell, this one hangs much mower than the old entry, and in a cose-up, you an see how this tool really fit it to this big of a size.

    Pixels to dots

    The rasterbator did just what I said it would do – pixels to dots. The brightr, the smaller the dot (as more white will appear). And of course, the bigger you want the picture, the bigger the dot.

    But some people go REALLY far with this thing.

    Whow...

    Special Thanksgiving How-to: Floppy Disk Notepad

    Everyone knows what floppy disks are. They mark the real beginning of the evolution of data storage, which meant smaller space and more capacity.

    Yet, now they remain useless, as they only hold 1.44MB. I can’t even put a song onto that much.

    But after you think about it, you can see that floppy disks are very versatile – in the same way as duct tape.

    In fact, you could almost definitely make a floppy disk wallet.

    But the thing that I really want to show you is a floppy disk NOTEPAD!

    Floppy Notepad!

    I must say, making it was simple.

    Here’s what you’ll need:

    • 2 Floppy disks with lock switches (more on that later)
    • A small stack of the paper of your choice
    • Scissors
    • A hole punch (preferably 3 hole)
    • A Pencil
    • Zip ties

    First things first- Your floppy disk needs to have a lock/unlock switch. This is so 2 holes on the same side are exposed to put the zip tie through, as shown below:

    Two Holes!

    After, trace the outline of a floppy disk on a stack of no more than 4 sheets of your preferred paper (I used graph paper). Next, cut about 1/4 cm. inside from the lines you traced and cut out the square. After cutting out one stack, you can make another outline and do the same thing somewhere else on the paper(s).

    Cutting...

    After you should have a nice stack of papers.Split the stack into shorter stacks that can be done by a hole puncher. On the top paper of each stack put your floppy on it and trace the inside of the litle holes that are on the floppy disk.

    Tracing the holes...

    Next, go at the stacks with the hole puncher. Punch as close as you can to exactly centered to the tracings you made from the holes on the floppy (exactly centered might have you cutting through the edge of the paper). After, line all of the stacks and floppies up (one floppy on top, the stacks, then one floppy on the bottom). put the zip ties through the holes on the floppies, then the holes in the stac, then the other floppy. loop it around and tighten until it is VERY LOOSE!! You don’t want it tight or else it won’t be able to open or close! You should be able to have the two floppies open side by side with a little space in between, as shown below.

    You need space between the disks!

    Now you’re done! Trust me, everybody will be JEALOUS of how awesome it is.

    Now go off and write…well…whatever needs to be written!

    Go write... well...whatever needs to be written!

    ***I hope you enjoyed this special how-to, with “special” images. I’ll do something special for most of the major holidays in the future.***

    How-to: Make your own awesome mousepad

    No, this isn’t from scratch, but this is how to turn your old and dirty mousepad into an amazing super-sleek mousepad.

    Sadly, the below picture is pretty much all I can show you.

    Superpad

    Super-Mousepad!

    But it was pretty simple to make and pays off. Here’s what you’ll need:

    Old and dirty mousepad
    Duct tape
    Cardboard
    Blue tape
    Wax paper

    So fist cover the old and dirty mousepad with duct tape. Do it strip next to strip, as close as you can but NOT OVERLAPPING! Do this once vertically and trim the edges, then do another layer horizontally using the same technique.

    Now that you have a fully duct-taped mousepad, it’s going to be a bit rubbery and hard to you the mouse on it. So, carefully take a large and un-crinkled sheet of wax paper and cut it down to be about 1 inch bigger than the duct tape mousepad on each side. Now, fold over the edges and use duct tape to tape them down on the back. At the corners they will have to fold, so try to keep that as neat as you can.

    There you go! Or at least for a little bit. I found that the wax paper will crinkle, and make it look kinda bad and feel bad too. So my remedy is to cut a piece of cardbord to the same size as the mousepad, and duct tape it on to the bottom. Now it won’t bend. But you just eliminated the grip, so it slides a lot. My remedy for this? Just use blue tape to tape it to your keyboard tray or desk.

    So, what’s awesome about this mousepad?

    • Instead of just having plain waxpaper down, it provides a bit of a cushion
    • It’s super smooth and easy to track on
    • Easy to make
    • Puts that old icky mousepad to use
    • Another great way to use duct tape

    Happy Tracking!

    Trick #1:Your Mac keyboard has potential

    The inspiration for this post all started out in math class. We are studying use of variables, pre-algebra, you know that stuff. And we have always been told– Don’t use an X for multiplication, you could get it confused with the variable! So on we went, using the dot [•]. She would always teach using an overhead projector, but when it came to a pre-test, she had to us it on the computer. But there was only one downside–she had to use the X for multiplication! o people (as she predicted) were confusing the X or the variable, and she is saying “Sorry, I can’t make a dot on my computer”. So I say, “Actually, you can. option eight”. And She’s like “What? Come over here and show me”. So I go over there (all f the teachers have new MacBook Pros, similar to my MacBook) and type option 8. below and behold, There it was: •

    A Dot!!
    So she was incredibly happy with this, and I just had to- I told her that you can unlock LOTS of different charters by holding the option or the option+shift key(s). And good thing I had LOTS of experience with this, because next she asked” So how can I see all of the characters I can type?” Good thing I specialize in this area. Well, All you do is go into system preferences, click on International (Language and text if in snow leopard), Select input sources, check Keyboard Viewer (should be somethin along those lines for 10.5 and 10.6), Check Show input menu in menubar, click the little american flag, click Keyboard viewer and Voilà! Press the option or Option and shift keys and it will show the large array of different characters you can type. Here are most of them:
    ¡™£¢∞§¶•ªº–≠œ∑´®†¥¨ˆøπ“‘«åß∂ƒ©˙∆˚¬…æΩ≈ç√∫˜µ≤≥÷⁄€‹›fifl‡°·‚—±Œ„´‰ˇÁ¨ˆØ∏”’»ÅÍÎÏ˝ÓÔÒÚÆ¸˛Ç◊ı˜Â¯˘
    Now, I really don’t know how to do this on a PC. If you can, it’s probably far too complicated to do that well, I would simply suggest you get a Mac.
    So if you are a scientist or Math Teacher, NEVER use an X for multiplication again!!

    Podcasting Part 1 (Q+A)

    This isn’t about just one piece of software–this involves feeds, servers, podcatchers and iTunes.

    Podcasting. That one free thing of audio broadcasts that everyone has hopped onto, and people can subscribe too. Sadly, I’ve seen many people who have no idea how it’s done. Here’s some FAQs about podcasting with iTunes.
    Q: Do you submit a podcast by getting the right account with apple and uploading it to their servers?
    A: No. Apple does not provide any server space to host your podcasts, that is something the podcaster needs to have.
    Q: Is podcasting as easy as putting an mp3 on a server?
    A: After you have set it up, you put it on the server and update the XML feed.
    Q: I want to do a podcast. I have people, material, (a) microphones(s), a way to save to mp3, and a server with a working domain. Can I podcast to iTunes?
    A: Yes. That is al you need, but you need to create an XML feed for iTunes. This is NOT easy, unless you know how to do it the easy way (which we will talk about later).
    Q:How do I submit the podcast to iTunes?
    A: As I said, you need to have an XML feed. To submit the podcast, just go into the iTunes store in the iTunes application, select podcasts in the left sidebar, scroll down and click submit a podcast (left sidebar). There, put in the URL of your XML feed.
    Q: After submitting, does it just appear in the iTunes store?
    A: If all goes well during the submission, you will get a confirmation email saying that your podcast is under review wait approximately 24 hours, and you should get another email saying it was approved, ad the email will contain a link that opens to your podcast in the iTunes store. 24 hours after that, the podcast will be searchable in the itunes store.
    Q:How much money does it coat to do it the easy way?
    A: Other than the server space, completely free of charge.
    I hope that this gave you a better understanding of what podcasting is like under the hood. There will be more posts on podcasting, including what the “easy way” is.

    Cover Flow + Remote App + iTunes DJ= Awesome wireless listening experience

    Sometimes I like to do nothing but listen to music. My computer on my desk playing music, me sitting on the other side of the room on a pile of stuffed animals. But what do I look at when I listen to my music???? And how do I change the music, request a song in iTunes DJ (itunes 8.1 only), or change the volume??

    Well, all of that is now solved.
    I always use iTunes DJ for my needs now. It plays my higher rated ones more often, I can request songs, and I can remove songs from the DJ playlist. I have a great set of speakers, and I can turn them up to a very high volume. I must say, the iTunes DJ is very good at thinking what music you want to listen to. And the request feature makes it a very realistic “DJ”. Too bad it doesn’t have a voice… but Apple could definitely put that in there. I mean, they put it in that ipod.. Hey, where is it?, aka, the iPod shuffle.
    Question 1: What do I look at when I’m listening to my music?
    Answer 1: The awesome cover flow look. I can see what song just played, and what song is coming up. I can put it fullscreen, so that’s all I see- My album artwork of what song is playing, and a few before and after the song that is currently playing.
    Question 2: How do I change the music, request a song in iTunes DJ, and control the volume from across the room?
    Answer 2: Simple. I have an iPod touch as you may know, and I have a cool app that is made by apple and is called remote. You can hook it up to your iTunes library, and over wifi, you are able to control the music. It also puts your iTunes library as the Music app’s interface, but sadly you can’t rotate to view cover flow. but I can do all that: request a song in iTunes DJ, go to the next song, and even control the iTunes volume.
    VIDEO!!!!!!!!!!!

    Dashboard developer mode


    The developer mode of the apple application is very convenient, and easy to use. As you can see in the screenshot above, I can put dashboard widgets straight on to my desktop. They run there as if applications, but it really has one annoying problem- they always are on top of your apps.
    To click something that is under a widget in developer mode, you have to move it first.
    Also, it can be convenient for those with Mac OS X server who need to always be monitoring their stats while working. You can download the iStat Pro widget and put it on your desktop, and it will then look like this.


    You may also notice that my Desktop picture is changing on every screenshot, and that is bcause have it set to rotate my desktop wallpaper every 1 minute.
    You can also download many, many more widgets from apple.com, which you can also put on your desktop.
    Of course with everything else on this site, to do this is easy and free. First, you have to download Deeper, which is an app where you can go into Deeper system preferences, including the dashboard. There, you will find a checkbox that says “Enable the Developer Mode of Dashboard”, as shown in the screenshot below.

    Then, all you have to do to get a widget onto your desktop is click and drag a widget at the same time you are closing the Dashboard, and the idget you were dragging will not dissapear with the rest of the dashboard. you can then safely drop it on your desktop. you can click and drag it on your desktop to change its place, and you can click the i to change the preferences and do everything you could do with it as if it was in the dashboard.