How-to: Make Your Dock REALLY Big!

Okay, this post is FAR from useful. But if you’re bored, or want to play a prank on someone, this is a cool visual effect.

If you go into System Preferences > Dock, you’ll be able to enable dock magnification. This will cause the dock icons to magnify when you hover over them.

But using this simple trick, you can make it even BIGGER!

Open Terminal (in Applications/Utilities) and type in:

defaults write com.apple.dock largesize -float 256.000000

You can change 256 to be even bigger or smaller, depending on how big or small you want your dock magnification to be.

Hit the enter key and, well, nothing will happen.

Next, type:

killall Dock

Your dock will disappear and reappear.

Now hover and enjoy!

To set it back, just type the same thing you did to activate it but replace 256 with 128.

This has absolutely nothing useful about it. But it’s fun if you’re really bored, or you’re just waiting for Lion to come out.


Google+ for iOS released, Welcome to Crash Central

Google+ is Google’s stab at facebook that has some great new features that really puts it in the competition (read more here). The Android app was available immediately; the iOS app was supposed to come a few weeks after.

Well, it’s here. Unfortunately, it’s not worth getting.

You are greeted with a front page where you can view your stream, profile, huddles, circles, etc. Everything works until you hit stream; that’s where it crashes. It will give you a spinner saying that it’s loading… then it will keep spinning… and spinning… and spinning… and when you’re sick and tired of it, you just hit the grid to go back to the home screen. But it doesn’t go. So you hit it again. Same result. So you start frantically hitting buttons, but it’s not going to respond. Then, there’s the crash.

For now, this is all you’ll get. Jailbroken or not, iOS 5 or 4. The app is just a crasher.

Facebook announces video integration with Skype

During a live facebook event that took place today, Mark Zuckerberg announced that Facebook has partnered with skype to provide one click video chatting to users.

It is referred to as a “mini skype client” by the CEO of Skype, and installs with a simple download of a java applet.

Zuckerberg claimed that there are no financial agreements with Skype, which is interesting to try and figure out who is benefiting from this. Skype CEO Tony Bates said that “We are planning to add paid skype over time as well.” This means that if you have a skype premium plan, you might be able to group video chat – but that’s just an assumption.

Speaking of group video chat, Facebook doesn’t have it! With Google Hangouts, Google’s chat service that allows up to 10 person video calling, may have an advantage over facebook. However, facebook has 750+ Million users – that’s a lot of people that are one click away from a video chat.

Video chat is available now to the public, just click here to get started.

Google+ iPhone App Awaiting Approval

Google+ is already available via the web and an Android app, and now Google has submitted their iPhone app to Apple for approval into the app store.

Everyone knew that Google was going to develop an iPhone app for Google+ eventually, but we weren’t aware that they had already created a full app and submitted it.

If all goes well, the app will be available to iOS users in about two weeks.

But…

Who was here for Google Voice?

You may remember that the Google Voice app sat waiting for approval for months, and was eventually rejected.

Then google resubmitted it, this time not so happy. Apple finally approved it, and I currently have Google Voice on my iPhone.

I hope that Google+ doesn’t end up going down this same disapproval tunnel…

Only time will tell if Apple wants to really battle Google in this way, which could be cause for some kind of lawsuit from Google.

(Personally, I just want to get Google+ on my iPhone, lawsuits not necessary)

(via Mashable)


App of the week: Tiny Tower for iOS

Tiny Tower is a simple, 8-bit graphics game. You own a tower in an urban metropolis, and your goal is to make money and build floors.  You start out by making a residential floor and moving people in. Then, you make a store and give the people who live on the residential floor jobs at the store. You make money from the store, and have to constantly keep the items in stock (and pay and even wait to restock it).

Once you have enough money, you can build another floor with another store.

And you just keep going trying to make your tower as high as possible. One of the coolest aspects of the game is that you have to wait; it takes time to restock supplies in your stores, and it can take hours to construct a new floor.

And having gritty, 8-bit graphics just makes the whole thing even more addicting.

Tiny Tower is compatible with the iPhone, iPod Touch, and iPad for a wallet-loving $0.

Click here to view it in iTunes.

Jailbreak iPhone 4 Verizon

Yes, I got an iPhone 4.

Do I support apple’s business ethics?

No.

Do I think the iPhone is pretty and shiny? Yes.

Now, don’t think that I’m immediately jumping on the Apple bandwagon.

The very first thing that I did with this was jailbreak it.

If you have one of these suckers and are looking to jailbreak, I’m about to make it WAY easier for you.

But JUST so you know how much easier I’m making it for you, here’s the traditional way of doing it.

Traditional

You’ll need a few things: PwnageTool 4.2, the original IPSW for the Verizon iPhone 4, and the Pwnage bundle for 4.2.8.

First, download everything mentioned above. Unfortunately, all of the links on every other website are all dead. That means you have to go on a search on the internet looking for all of the above.

Then, open the package contents for PwnageTool 4.2, go into Contents>FirmwareBundles and click and drag the Pwnage bundle for 4.2.8 in.

Next, open up PwnageTool and select advanced. Drop in the IPSW for the Verizon iPhone 4, And hit continue, continue, continue, wait for ten or so minutes. In the end you’ll have an IPSW that you need to use.

In PwnageTool, select Put phone into DFU Mode to put the iPhone 4 into DFU. It gives you step by step instructions on what buttons to press and for how long. Once you’ve put it into DFU, open up iTunes and it will tell you that it detects an iPhone in recovery mode. In iTunes, select your iPhone, then hold down the option key while clicking restore. It will give you a selection window, where you need to browse to find the custom IPSW that you made with pwnagetool. Then, let it work its magic. After the restore is complete, you will have a jailbroken iPhone!

Easier way.

Time to make this much easier!

I am going to give you the custom built IPSW and the download for PwnageTool. That means that all you have to do is the very last paragraph! 🙂

Download the files

Now that link right there will download a ZIP of the Custom built IPSW and a copy of PwnageTool.

Then, just follow these directions:

In PwnageTool, select Put phone into DFU Mode to put the iPhone 4 into DFU. It gives you step by step instructions on what buttons to press and for how long. Once you’ve put it into DFU, open up iTunes and it will tell you that it detects an iPhone in recovery mode. In iTunes, select your iPhone, then hold down the option key while clicking restore. It will give you a selection window, where you need to browse to find the custom IPSW that you made with pwnagetool. Then, let it work its magic. After the restore is complete, you will have a jailbroken

GMGtv Episode 1: The new GMGtv!


As you may have noticed, I haven’t been posting much about GMGtv. This is because it’s a pain to have to setup equipment, practice a script, and edit it, at the same time as maintaining an internship, blogging, conferencing, and of course, going to school/doing homework. So that’s why I am deciding to make the new GMGtv audio only, totally unscripted. I am going to find something in the news, then just talk for a minute or two about it. It’s raw thoughts from my head, and is pretty much the same stuff I would write here on GMG. I am doing these episodes far more often, and because they’re audio only, they take up a LOT less file space.

Here’s the first episode of the new GMGtv!

Also, please subscribe to the podcast on iTunes!

SUBSCRIBE

Worried about your server? Get warned if it goes down.

Are you worried about the state of your server?

Maybe you have a website, and you’re worried if it’s always up and running, especially when you’re asleep and can’t fix it.

Well, I’ve written an extremely simple script that will solve this issue for you. Just plug your mac into the sound system where you sleep and crank it up to full volume. Whenever there’s a problem, your system default error will start going off every three seconds. That should wake you up! Then, you can go over and check the state of things.

The underlying command here is ping. I am using what you type as a simple variable, $website, and using -A to make it audible and ring, and -i to time the ping out so you don’t accidentally crash your server. In the end, the command is

ping -A -i 3 $website

And when you type in the website, $website is replaced with whatever that is.

It’s not a complicated or amazing script, but it helps to get things done easier and faster.

Download

To use it, download the script and navigate to it’s enclosing folder using Terminal. Then, type:

chmod+x

This will make the script executable. Next, type:

./makesure.sh

You will be greeted and asked to enter the URL (or IP address) of the site you want to keep track of. Type in the URL and press enter. You will see the ping output across your screen updating every three seconds. If ping stops responding, your computer will begin to make the system default error sound every time there is a request timeout. If you have the volume loud enough, that should be able to wake you up.

Enjoy!


INSTALLING ROMS ON YOUR DROID INCREDIBLE: FULL GUIDE

1. Background check and root

If you haven’t yet, click here to read the guide on rooting your droid incredible.

2. Find some ROMs

The first thing you need to install a ROM would be the ROM itself (go figure).

If you have a droid incredible, I highly recommend downloading the fusion ROM from this post. Fusion is an extremely well-done and compatible ROM based off of CyanogenMod7 (another ROM), so you’ll get the dimension-opening power of 2.3.2 gingerbread.

If you don’t want this ROM, you can always do a google search. Not too hard, eh?

2. Download the ROMs

With the example I’m using (fusion), there are two ROMs. It includes first the base gingerbread ROM, but on top of that it also has a ROM for the Android Market, Gmail, YouTube, and Maps applications, as they do not come by default on the Android base operating system.

For now, I am only going to discuss installing the base, but for other ROMs it is sometimes the same situation with the two seperate ROMs. So later on I’ll discuss installing the gapps (dev talk for Google Apps).

There are two ways you can get the ROM to your device.

The first one involves your computer. Download the ZIP file(s) onto your desktop, then plug in your phone and move the zip(s) onto the root of your SD card.

The second way requires an app called Root Explorer (I discussed it in the guide to rooting). On the phone itself, use the web browser to download the ZIP file(s). Then, open up root explorer and navigate to the downloads folder (probably on your sdcard). Then, tap and hold the zip and select move. Navigate to the root of the sd card and tap paste. (Do this with the second ROM if you have one).

3. BACK UP!

This is an extremely important step to this, because if you forget to backup then you will never be able to restore your phone to the condition it was in when you rooted. That means that the HTC sense operating system that came on your phone will be GONE.

So, you’ll need to boot into recovery and backup.

Turn off your phone and turn it back on while holding the down volume button. It will boot into HBOOT, a diagnostics screen. Once it is done checking for update images on the SDcard, use the volume and power buttons to navigate to and select RECOVERY in the menu that you see.

It will show the HTC booting screen, but then boot into recovery (with very small fonts, I might add).

In this screen, scroll down and select backups (you can now use the optical trackball to do this). Then, select create a backup (or something like that).

It might take a while, but eventually a backup should be made of all of your stuff on your phone. So we shall now proceed to the next step.

Install the ROMS

Now is the fun part.

Boot back into the recovery screen by holding the down key and the power button at the same time.

Then, hit Wipe Data/Factory Reset.

This will wipe all of the data off of the phone.

WAIT WAIT WAIT! I STILL WANT MY BACKUPS!

Calm your caps lock keys, wiping the data from the phone doesn’t wipe out the sd card, which is where the backups are.

Now, select install zip from SD card.

Select choose zip from SD card

then, select the zip that you either downloaded or transferred over.

Then, select the yes, and magically, the ROM will install.

Wait a while, and it should be installed and working!

Upon first boot it will take a very long time to load. It has to configure everything and get it working. But every time you reboot the device the reboot time should be less and less until it is less than 30 seconds.

Anything else?

You might have downloaded 2 zip files to your SD card which you downloaded from the site that gives out the ROMs. This is probably because one of them is a Google Apps zip.

Make sure that before you move the two zips on to the sd card, you name them so you can tell which one is the base OS and which is the Gapps. (if you have no idea what I’m talking about, you need to click here and read up on your background info.) Make sure that first you install the Base OS zip, then, after it’s done, select Install zip from sdcard once again and select the gapps zip. Make sure that you don’t hit wipe data/factory reset, because what that will do is wipe out the base OS so you only have gapps and nothing to run it on. Not too functional if I may say so myself.

Where to find these ROMs?

As I said, the best ROM for the Droid Incredible at the moment is the Fusion ROM.

But there’s other ROMS too.

One of the most popular is CyanogenMod. They’ve been releasing ROMs with upgraded features since the dawn of time (or android).

However, after a little mixup with google, they are no longer allowed to have Gapps on their OS. So you’ll have an android phone with…. no android market. Or gmail. Or youtube. Have fun!

One of the easiest ways to find ROMS for your droid incredible is to just google it.

If you google Droid Incredible ROMs, a large amount of different websites will show up. If you are too lazy, here’s a direct link to that google search for ya. You’re welcome.

Better alternative to OMGB-6! HELLO FUSION!

OMGB-6 is great. It’s a simple, well made Gingerbread build for the droid incredible that worked really well.

But it had a couple problems.

First of all, it didn’t support google voice.

Also, many apps didn’t work. Twitter didn’t work, and the app I am doing testing for didn’t even work. Also, the version of the market was outdated.

Well, if you want a fuller and better and more supported phone, then say hello to the fusion rom.

Fusion is built on CM7, and has a base of 2.3.2. This gingerbread is tasting FRESH.

It boasts a newer version of the android market, FULL app support, and it also supports google voice.

If you don’t know how to install ROMS, then you have a bit of reading to do.

First, click here to learn what all of this means and do your background reading.

Then, do steps 1-4 on this page.

Downloads

BASE

GAPPS

Installation

Put both of those on your SD Card.

Then, reboot into recovery and BACK IT UP. BACK IT UP. BACK IT UP… STEADY….. BACK IT UP…. STOP! Don’t do this with ROM manager. Why, I don’t know. But apparently bad things happen and black wholes open into other dimensions when you use the ROM manager to install this. O.o

Once you’ve backed up hit Wipe data/factory reset in the recovery.

Done?

Ok.

Now, hit “install zip from sd card”, select “choose zip from sd card”.

And in the list that appears, select fusionbase.zip.

Then hit yes out of the large groups of nos.

(tic toc tic toc)

Done yet?

No?

Ok…

(tictoctictoctictoc)

Done now?

Good.

Now, go through the same screens, but when you select the zip select the gapps zip and install it.

While that’s installing, I’ll explain why there are two separate zips for this ROM.

Android is a base operating system. It doesn’t include the android market. It doesn’t include gmail. It just includes the base operating system.

So the base zip is the 2.3.2 base operating system without the android market or gmail or anything like that.

So you could just install the base and nothing else. But I don’t think you would be too happy when you can’t download any apps.

Done yet?

Ok good.

Now, select “Wipe cache partition.”

Done?

That didn’t take long.

Now, hit reboot, and wait a LONG time. It will probably be 5 minutes or so of the flashing android logo before it actually boots.

But once it does, you’re in business! Enjoy the new market, full app support, and using your Google Voice account, all without sacrificing the magnificent dimension-opening speed (and bragging rights) of Gingerbread 2.3.2.

Rooting, Recovery, and ROMs: What it’s all about.


So you’ve got an android phone.

And you can use the stock operating system with all of the manufacturer’s skinning and apps and versions and keyboard and everything.

Congratulations.

But if you are feeling a bit ballsy, then you can really take your phone to a true mobile computing level.

Here’s the steps to this.

  • Root
  • Install a recovery
  • Find ROMS
  • Make backups
  • Install ROMS
  • Use Wireless Tether

Lets explain what all of this is.

Rooting

Rooting means that you can create a way for apps to get superuser access. This is handy for getting to wifi, modifying files, or installing ROMs.

Recovery

For the Recovery, that will usually be installed when you root the phone. The recovery is where you can make and recover backups of the phone, install ROMs, and a slew of other stuff that might come in handy (but could also kill your phone).

Backup

Once you have the recovery installed (you can’t have the recovery without the root FYI) then the first thing you need to do is make a backup of your phone.

This is pretty easy. Just boot into Recovery (just hold down volume on boot and select recovery when given the option), Select backups, and select make a backup now. Your screen will flash many random things, and no matter how long it takes, don’t force shut it down or take out the battery. It will almost always finish.

ROMs

Once you have a backup of your normal operating system, you can go crazy with other ROMs.

ROM stands for Read Only Memory. In android poweruser terms, it is an operating system that can be installed on the phone using the recovery mode.

You can find many roms on the internet all over the place. XDA-developers is a great place to get ROMs. Sometimes a ROM will even be for the next Android version that htc hasn’t released yet.

When you download a ROM, it will come as an easy to handle zip file. And from here it’s simple.

Plug in your phone to your computer and mount it as a disk drive/USB Mass Storage. Then, just click and drag the ROM from your computer onto the root of the SD card. Eject and unplug the phone, then reboot into recovery.

Select install zip from sdcard and select the name of the file that you moved over. Then, choose the yes among the long list of nos to confirm you really want to install it and whabam, you will be installing a new operating system.

Then, reboot your phone, and you will be with your brand new OS that you yourself downloaded from the internet and installed on your phone.

Unfortunately, this process is different for every android phone. Sometimes there is a one-click root. Sometimes you have to use a command line application to open a port on the phone and install the root like that. But once you have gotten the phone rooted, installing zips is a piece of cake.

Wireless Tether

Aside from installing ROMs, another thing you can do is install and use apps that usually wouldn’t be possible if you weren’t rooted.

The one example I am going to use here is called Wireless Tether. And basically, it’s just that.

You can make your phone into a wi-fi hotspot with no hassle, just using verizon’s mobile hotspot plan. But that will cost you an extra $20 a month and you have a 5 GB limit before you start getting overage fees. Ouch.

With Wireless tether, you can connect unlimited devices, the data comes out of your data plan for your phone, and that also means there’s no overage fees.

Once you are rooted, just search for Wireless Tether in the android market and you will be able to install it on your phone and use it. You can change the SSID of the WiFi network, and you can even enable encryption and a password on your network. In addition, it allows you to use access control, where you can disable a device’s access to the network. Very handy sometimes.

Do it yourself

So that is the whole concept of rooting, recovery, and roms. You can find roms for things using google: Just do a search for “[your phone] 2.3 ROMS” or “[your phone] Cyanogenmod” and you should have plenty of luck. If you want to find out how to root your phone, just do a google search for “[your phone] root” and that should turn up some helpful results.

If you have a rooted droid incredible, click here to learn about the stable and functional gingerbread rom by WeDoDroid.

Opera 11

Opera features a clean, blended interface

Opera has always been a web browser that kind of lagged behind everyone else. Although it had some interesting features, the speed, interface, and stability put it pretty low on the list (next to internet explorer).

But with Opera 11, this web browser brings some nifty new stuff to the table.

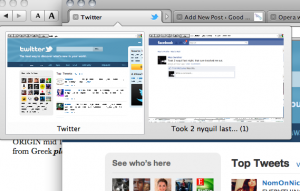
The biggest thing that is new in opera would be tab stacking. With tab stacking, you can

A tab stack with twitter and facebook

drag one tab over another and it will create a “stack.” Then, when you hover over it with your mouse, the page previews of all of the tabs in that stack show up.

I see why this could be useful, as this officially eliminates the need for multiple browser windows. I can have a tab stack for my google docs, a tab stack for my website editing, and a tab stack for all of my email.

In benchmarking tests, Opera rated second slowest next to firefox. So you can’t go for this browser for speed. Also, Opera boasts its “Opera Turbo” addition, which supposedly compresses the webpage on opera’s servers then send the compressed version to the computer. However, with this turned on, nothing ever loads at all. With opera 9, I couldn’t get the browser to load anything even with it turned off. So at least in Opera 11 with Turbo turned off, things load… usually. Sometimes things just plain don’t show up. After a plethora of refreshing, stopping, and re-entering the URL, you can usually get things to load. Note: This only happens once in a while, but can still be annoying.

There are a couple other nifty features I would also like to note. When you save a

Expanded thumbnail view of your tabs

password in the password manager, whenever you go onto that same site just press command-enter and it will fill the login and hit return, all so you don’t have to. This makes the whole logging in thing a bit less tedious. Accidentally hit that X on your tab? No problem, just hit the little closed tab button in the top right and your recently closed tabs will be shown so you can get back to it. And one last tiny little nifty feature: you can expand the tab bar so in addition to showing the page title it also shows a thumbnail view of the page.

Opera 11 is available both for Mac and PC, each fitting in with it’s appropriate interface. Links below.

Opera 11 for Desktops