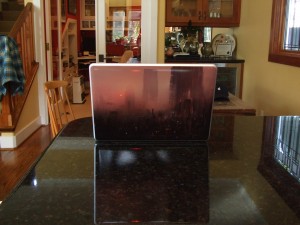
The iPad experience

The date is April third. 7:00 AM. Where’s am I? Of Course, at the Apple Store. There are about fifteen people in front of me, and one behind. The black screen is up, hiding everything in the apple store.

One hour and a half later, across the street from the store is the local high school jazz band warming up for some reason. There are now 20 people behind me.

Ten minutes later (8:40) there are about 80 people behind me. There are hands over the black screen and everybody in the apple store is coating down a from ten. Once at zero, the screen is dropped and the iPad signs are all up in the apple store.

Five minutes later the apple store employees are running down the line and giving high-fives.

Five minutes later the doors open and the local high school band starts to play. The first twenty or so people are let in going through a line of apple employees giving you high-fives. I am then greeted by the manager (who I happened to know) and we pick what we want: a 32GB iPad, an iPad case, an iPad dock, and some headphones. We check out and at the bottom of the post there is a picture I got.

I get home and unbox the thing. I sync and start exploring. I download some apps, hookup email and everything.

I put on the case and started playing some games.

Then, I open the word press app and I write this post.

There you go, the iPad experience. I caught most of it on HD video, which I will put up very soon.

There will be reviews of every aspect up over the next few weeks.

This thing rocks!

Incase Neoprene Sleeve Plus

Do you have a laptop? Chances are you do. And because you are reading this, chances are, it’s a Mac. Probably a MacBook or MacBook Pro. And I’m guessing you travel with it (after all, it’s a laptop). Instead of just throwing it into your suitcase, protect it. And now with just any case, protect it with a custom-fitted incase neoprene sleeve.

These cases don’t fit with any laptop. They are custom-fitted for particular computers. The 13-inch version works with the new 13″ MacBook and MacBook Pro. If you have a 13″ MacBook (late 2008, aluminum unibody) it works as well (that’s what I have).

The computer snugly fits it, so it doesn’t bump around in the sleeve. It is lined with a faux-fur interior, which will not scratch that precious laptop in a million years (as long as you don’t get sand in it for some reason). It even has a cool protective border around the edges, so in case something bumps in to it your MacBook will be just fine.

And last but DEFINITELY not last, you are rushing through airport security. Avoid everybody in the line behind you yelling at you for taking too much time, because this sleeve is airport safe. Just slip the whole thing out of your backpack and safely through security it goes. Another benefit of this is you don’t have to expose your MacBook to where all sorts of things go (in the bins, I mean). If there is sand in one of those bins and you put your precious but bare MacBNook in there, SCRRRRRATCH! Not good, and that will NOT put a smile on my face. Also, if any of you consult support from me (feel free to by emailing support@goodmorninggeek.com), I highly recommend use thus case. It is available in multiple colors and also for 15″ MaxBook Pro, among many other diferent computers.

Let me warn you, it’s $40 (er, $39.95), but definitely worth it. Get yours below!

13″ MacBook and MacBook Pro

15″ MacBook Pro

17″ MacBook Pro

MacBook Air

iPaperPad

Not magical or revolutionary, it’s a paper pad

The iPaperPad

As we ALL know, the iPad was recently announced on February 27th. And it already has a competitor.

The iPaperPad is sold as a three pack for $24.99, which is MUCH cheaper than Apple’s incredibly overpriced iPad.

The iPaperPad has many advantages over the iPad. For example, the battery life. Everybody was amazed by the iPad and its amazing 10 hour (which actually means 6 hour) battery life. The iPaperPad utilizes well-known technology to achieve a remarkable feat: Unlimited battery life!!! Apple is yet to come out with a product for only $24.99 that has UNLIMITED battery life!

Battery life isn’t the only advantage over the iPad. We know that the iPad has a 1280X768 resolution. They call that”Hi-Def”. The iPaperPad takes an incredibly strike at Apple’s iPad, once again, with the utilization of well-known but under-used technology to create an amazing feature: Unlimited DPI. In fact, the iPaperPad can’t even be defined in such ways. The screen has yet another a benefit over the iPad: It works with numerous input devices. The iPad only works with a finger (it works with a marker too, but that might not be a good idea..), but the iPaperPad was tested with a pencil, a marker, a crayon, a sharpie, the possibilities just go on and on! You can even write on it with a feather pen. Apple’s iPad can’t even compete with that.

But it doesn’t even end there. The iPaperPad is coded in such a code that a 2-year-old can become a developer. It is coded in a well known system called “Imagination.” This system doesn’t use any confusing numbers. You just draw what you want and it comes to life.

The iPaperPad opens up many possibilities for game development as well. Known games like hangman will be redesigned. There will be a gold rush of app developers to create intuitive programs for the iPaperPad.

The iPaperPad even has multitasking. You can draw a picture while playing hangman. You can take notes while doodling. The iPad does NOT do THAT.

The iPaperPad lacks one thing from the iPad, though: Networking/Wi-fi access.

As you can tell, the iPaperPad will be a true competitor to the iPad at its amazing price and features. Did I mention that it’s 100% recyclable, quite unlike the iPad? OOH, and it’s flexible!! The iPad would just crack in half if it was exposed to the forces that the iPaperPad takes. Jealous? Get one below.

And, it’s already shipping!

iPaperPad Homepage

iPaperPad Amazon Page

Apple Time Capsule!

Sleek!

As you saw in this post, I wrote the following:

Time Machine is incredibly specific about the things it is happy about.

And I’d agree. But when you get the Time Capsule, because it is made for time machine, al of your problems disintegrate.

Wireless Networking

The Time Capsule is actually an AirPort Extreme and a 1/2TB hard drive built in. The Time Capsule has dual-band connecting 802.11g and 802.11n. On the back, you connect the Time Capsule to [ethernet] WAN and then using the AirPort Utility to configure all of your options. Then, plug in a wireless printer! To configure it, go to the Print & Fax pane in system Preferences. Click the + icon and select your printer from the list that appears. Tada! You can now wirelessly print to your USB printer! Then, in the WiFi menu in your Mac’s Menu bar select yur time capsule’s network name, enter a password and now you are connected to the internet through your Time Capsule!

Time Machine

The Time Machine Icon

Once you have configured your time capsule using the AirPort Utility you can now backup to it with Time Machine. Time Machine comes on very mac and is a functional backup tool. To start using time machine, open the time Machine preference pane in System Preferences and turn the big switch on. If a dialog doesn’t automatically appear click Select Disk…. In the dialog that appears select your Time Capsule (Usually Data on [your Time Capsule’s Name]) and click Use For Backup. It will then backup all of your data in what is called the initial backup. This one first bakup wil usually take about 3-7 hours depending on how much data you have (4-5 for 30GB in my experience). It will backup wirelessly, so feel free to move around the house while it backs up. After the initial backup is done, it will create a backup of new files every hour. DON’T WORRY! It doesn’t replace duplicate files, so the backup’s size shouldn’t change that much over the use of it unless of course you make some huge deletion or addition.

Uh-oh, you deleted that one special file[/folder]! It’s easy to get it back using using Time Capsule with Time Machine. On your mac, open a finder window where the file you deleted existed (before you deleted it, of course). Then, open the time machine APPLICAtION (NOT System Preference Pane!). The finder window will then slide up to a cool wormhole-like interface with windows going back. Each window going back is hourly into the past. You can quickly navigate using the lines on the right of the interface. You can click a window a ways back to fly over to it. Now browse  found the file you want to restore in one of the windows! Before bringing it back to life (or your hard drive) check to see if it is in any more recent backups: you probably want the latest version of it. Once you’ve found the latest version, click on it once to select it. Then, in the bottom right, click restore. The file will be”magically pulled from the past into the present” with a cool effect. Tada! your file has now been revived (or stored on your local hard drive)!

In case you have a LOT of data, you an always select particular parts of your hard drive to backup. If you are a system file experimenter (like me) you probably want to keep backups of your whole hard drive, as that will include the configuration of all of your setting etc, which when reformatting you can restore from a backup an hour before the one with the screwed over file (happened many times when messing around with system settings, I screw over one file which gets backed up, so make sure that if you had screwed a file and the hard drive hadn’t crashed you use a backup older than the most recent one!).

Just in case you have a LOT of data, you can select which folders you want to exclude in the Options… dialog in the Time Machine system preference pane. If you tend to accidentally screw with your system files and you happen to destroy your mac (or part of it) doing so, Then when reformatting you can actually reformat using a backup from your Time Capsule. If I were you, I would use a backup prior to the one that was made when your mac was screwed over (as a result of screwing with a system file) or else it will just be the exact same. OORRR, while in the reformat menu you can select restore from the Time Capsule but DESELECT SETTINGS AND CONFIGUREATION. This will put all of your applications and files back, but leave the system config files (the ones that would screw up your mac) brand new right from the disk. Smart!

Whoops, I forot to mention: If (and possible when) your Time Capsule runs out of space because of backup, it will delete older backups first instead of giving you a “Out of space, delete everything” kind of error. Once again, smart!

Network Disk

Your time machine will show up in the Shared section of the left sidebar. Click on it and authenticate using the parameters you setup with the AirPort Utility, and there will be a share called Data by default. Double-click it and if you bacup using Time MAchine, you will see a .sparsebundle there. You can now utilize that HUGE hard drive in there to save stuff on. Just click and drag any file into the Data share of your Time Capsule in finder to store it on the 1-2TB hard drive. Sweet!

The Time Capsule is available at a 1TB version for only $300 and a 2TB version for $500.

Homepage

Store Page

Altec Lansing expressionist ULTRA

Disclaimer: All opinions in this post are only my own and were not influenced in any form by employees or representatives of Altec Lansing.

I have quite a thing for Altec Lansing speakers. I had a pair of extremely old speakers which were working beautifully, and I could pump them pretty loud. But then I was introduced to these. Thanks quite a lot to Altec Lansing for sending me these speakers to review and for keeps. I really enjoy ’em!

Design

These speakers are quite elegant, and feature a beautiful glass design that leaves absolutely no impression of these speakers being “sub-standard”, in fact quite the contrary.

Geometrically simple glass with 3" drivers and 1" tweeters

The large sub shared the same geometry as the other speakers, elegantly linking them.

Another quite interesting aspect of the system is the control unit.

Cool controller design!

To change the volume, simply twist the middle section of the control unit. You can determine your level of volume using the lights that appear. Also, while playing music, the lights flash in some cool patterns that you are unlikely to find anywhere else. Press the Treble and Bass buttons to control the levels of, well, treble and bass. On the side you will find a headphone jack and an AUX input, both very convenient!

But in this side of the review I came across a pretty minor problem. The cables for the sound system had an incredibly hard time stretching across my three monitor array and back down under my desk. I was barely able to squeeze the cables to fit, but I eventually did accomplish that. This may not be an obstacle for all persons, but if you have a huge multiple yard monitor array to stretch across, you may need to find some kind of workaround (try putting the subwoofer on the desk!).

Sound

I must say that as far as speakers go, these deliver crisp, separated, clean sound. The large subwoofer delivers bass that can literally shake the ground. The best thing about the system is that you can hear each range of sound incredibly clearly. It doesn’t seem to merge them together, almost as if every range was being played from a different speaker. This thing can get up to quite a bit of decibalage… How much, I have no idea as I don’t have one. But I’d bet it’s pretty high! The sound is really amazing even when at full blast. At full blast there is no muffling or distortion. You may go deaf (EXPRESSION!), but other than that it’s quite a remarkable sound system. You really just can’t describe the sound that this amazing system emits. On bass rich songs, you can literally feel the bass drum hit you (almost). The ground shakes and it just about literally emits a shock wave of sound that will hit you with force (literally!). You might as well just be at the concert itself.

Yet I have come across a problem. When there is no music pumping through the system, you get a fair amount of quite annoying background noise. Like a hissing kind of sound… No, this is not a particular manufacturing defect, I have heard of it on many forums online.

But I actually think of it as a reminder to turn the speakers off to save energy, as that may benefit the cause of this high energy bill; after all, 200 watts is quite a bit of power sucking, plus I’m starting to get worried about the structural integrity of my floor, and I hope that I won’t be falling through anytime soon.

Conclusion

Here is a basic list of pros and cons:

Pros:

  1. Rich, deep sound
  2. Can blast right through the floor (almost)
  3. Clean elegant design
  4. Bass rich, but not too much!
  5. Real glass, not cheap plastic
  6. 200-watt power

Cons:

  1. A fair bit of background noise
  2. Cables a bit short for multiple monitor arrays

I’m not going to count that last con as very few will encounter this same problem, and as I said, this can be worked around by putting the sub on the desk, which may result in an investment in a new desk after the sub blasts right through it (almost).

So the average score averages out to 8.7/10… OR FOUR [point 3] OUT OF FIVE STARS!

The Altec Lansing expressionist ULTRA system sells online for $199.95, which I think is a great price for this quality.

Once again, thanks a lot to Altec Lansing for sending me this speaker system for free to review and keep!

For more info and purchases, visit the links below!

Altec Lansing homepage

expressionist ULTRA

Tweetie for Mac

Looking for a balance between the minimalistic Twitterific and the feature rich TweetDeck?

Well, you have found you match, and it’s name is Tweetie.

Tweetie is a simple yet feature rich free app for Mac. The free app is ad supported, but DON’T WORRY! The ads appear in-line with tweets, and use the same format, and don’t flash at all! The ads are provided by Fusion, and I’m sad to say that I’ve actually clicked on many of the ads because they looked interesting, and I actually bought an iPhone app that was being advertised.

Start out by looking at the interface.

Sleek, simple, stylish interface!

As you can tell, these are simply the tweets of people I follow. In the left you can click the variety of icons, that are self explanatory [but just in case, @= replies, the envelope=DMs, the magnifying glass=search].

If you look at the replies (@ symbol), you can see there is a blue dot above it. This indicates that there is a tweet in that category that I have not read. Once I have read the tweet the dot disappears.

Lets take a look at the replies tab [just click on the @ to get there].
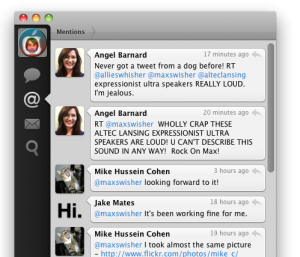
Same sleek interface, but filtered everything but replies.

You can reply to a tweet at anytime by clicking the curvy arrow at the top right of each tweet. You can also repost (AKA retweet) a tweet by right clicking on a tweet ad clicking repost. You can set if it does ______(via @_____) OR RT @_____: _________ I prefer the RT @____:__ because it is more commonly used. You can change that in the preferences.

The DM (envelope) tab is quite interesting.
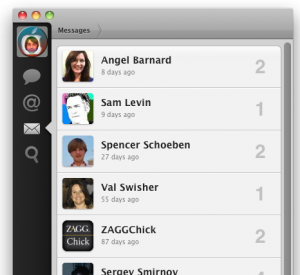
As you can tell, DMs are sorted into conversations with each tweeter (tsk-tsk) you have sent and received DMs with. Click on a user to see your conversation with them.

Almost like iChat!

You can click the big reply button in the top right to DM someone back.

The search function is also very interesting.
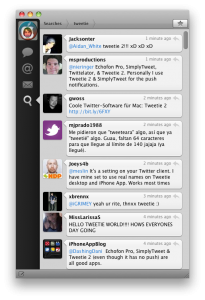
Search for Tweetie by entering tweetie on the previous screen and pressing return!

To search, click on the magnifying glass. In the search box that appears in the top right, enter a term (in this case it was tweetie), and press return. the box will disappear and tweets for your search will appear in the window. Visit any other tabs and come back to the search and the search term will disappear!

Another great cool feature of search is having multiple searches in different windows.
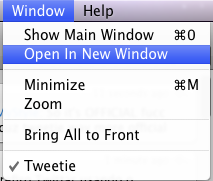
This function only available in searches.

After you open it in a new window, go back and enter another term. The window will remain with the same search terms, and you can open as many windows (which means as many searches) as you want.
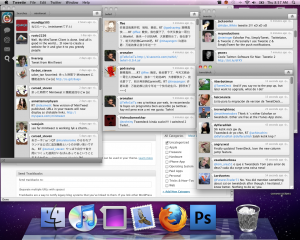
Plenty of searches for popular twitter clients!

Also, did I mention you can use boolean search terms with the search (such as AND or OR)?

Wow, I almost forgot

1 to create a tween, just press Command-N. a small window will open where you can type anything. Type in a URL and press Option>Command>S to automatically shorten it. Then, just press command>return and the tweet will be off. You can also get a bookmarklet for your browser so on any page, you can click on the bookmarklet and a tweet will open with the URL in it. Cool! Also, you can even assign a global hot-key so in any app, anywhere, you can press this key sequence and the new tweet window will open, and not bring all of the other tweetie windows with it. Awesome!

Among all of these great things there are a couple of extra things that Tweetie does.

Tweetie has seamless support for multiple accounts, so you can have it look like this:

Click on the other icon to see replies, dms, etc. for that account!

Also, you can enable a small menubar icon which does one simple thing: indicate when you have unread tweets. When you have unread tweets it looks like this:

Click on the icon to show the tweetie window!

But when you have no unread tweets it looks like THIS:

Blends in fine!

I hope you enjoy tweetie, and for $20 you can disable ads, which by the way look like this:

Simple, interesting, in-line ads.

Ad-supported Download

Registration Homepage

Homepage

Review: GelaSkins for Laptops

As you may know, I recently attended the Macworld Expo, which I sadly thought was a bit of a letdown [link].

But I did get something cool, and that would be a Gelaskin. Thanks to Macworld, I was able to get mine at HALF PRICE!’

I got the Gelaskin with a piece of artwork called Cohabitations by Philip Straub, and here’s what it looks like on my Mac:

Stylish!

One of the great things about this thing is that the surface is scratch resistant. Yay!

There are so many great aspects of this, and because of my 100GB of hosting space at mediatemple, I’ll happily list all of them.

The adhesive is sticky, but not gooey, which gives easy removal. Yay!

It’s not bulky at all, its very thin. Yet it is quite durable!

As you may tell by that picture up there, there is a border of aluminum around it (actually it’s the lid of my MacBook which the skin dosn’t [and isn’t supposed to!] cover up). This makes it so it’s easier to put on, it shows of the “still-aluminum-ness” of my MacBook, and it doesn’t have to be aligned completely perfectly. This also makes it less prone to waring at the edges.

I must say, this is a great way to get “protection with style, not bulk” for your iPod, phone, laptop, and so on. GelaSkins makes custom cuts for a large array of devices. You can even make your own Gelaskin using your own image and text. Cool!

Gelaskins range from $15-$30, depending on your device.

Get your own at gelaskins.com!

Blue Snowflake

This was yet another goodie I got for free at TeensInTech, but this one I won in a raffle.

Blue is known for their amazing high quality sound products, and I don’t think that the small budget snowflake is any exception. It has amazing quality sound, and  you can listen to a recording here: Snowflake Recording

Yet I did in fact encounter a problem. It seems that when it came, it was not assembled correctly, and I took it apart and turns out the motherboard with the microphone was not properly connected to the motherboard with the USB slot. After removing the bracket so it could connect properly, the thing finally worked. and as you can tell by that recording, this microphone can capture some REALLY good sound, but it does a great job capturing background noise

Sadly, the Snowflake is USB, so I can’t connect it to my (soon to arrive) Kodak Zi8, but after all, this thing was a freebie.

Overall, the Blue Snowflake is a high quality microphone great for chatting and some recording, but it is definitely not studio grade, and the price of $80 is questionable compared to what I’m getting here, with the failed factory assembly and the background noise.

Snowflake Webpage

Altec Lansing OrbitM

I recently attended the TeensInTech conference, which was quite fun. But they also gave out so maby goodies, that I paid $35 to go and came back with more than $100 of free stuff and I got to meet Steve “The Woz” Wozniak. Worth it? Ya. One of the things they gave away was the Altec Lansing OrbitM portable speaker. And it’s worth far more than the money I paid for it.

The design is overall very simple and elegant.

As you can tell, it is very small and cylinder shaped. It plugs in through a standard 3.0mm jack on and iPod or mp3 player. It also comes with an adapter to plug it into the 2.5mm Jack on a cell phone. It runs on 3 AAA batteries and even comes with this convirnient carrying case, complete with caribiner.

The unit comes with a slip of paper that says to turn off all base or treble enhancement settings. I must agree with them!
The sound is full and deep. The tiny little thing can go really loud too! The sound is just simply pleasing, and you don’t need a small speaker preset to get great sound out if this thing.

Basically, this is probably one of the best speakers of it’s size in current existence. It usually runs for $40, but they were given out fir free at the Teens In Tech Conference, held annually. This speaker totally rocks, and I got it for free!

Special Thanksgiving How-to: Floppy Disk Notepad

Everyone knows what floppy disks are. They mark the real beginning of the evolution of data storage, which meant smaller space and more capacity.

Yet, now they remain useless, as they only hold 1.44MB. I can’t even put a song onto that much.

But after you think about it, you can see that floppy disks are very versatile – in the same way as duct tape.

In fact, you could almost definitely make a floppy disk wallet.

But the thing that I really want to show you is a floppy disk NOTEPAD!

Floppy Notepad!

I must say, making it was simple.

Here’s what you’ll need:

  • 2 Floppy disks with lock switches (more on that later)
  • A small stack of the paper of your choice
  • Scissors
  • A hole punch (preferably 3 hole)
  • A Pencil
  • Zip ties

First things first- Your floppy disk needs to have a lock/unlock switch. This is so 2 holes on the same side are exposed to put the zip tie through, as shown below:

Two Holes!

After, trace the outline of a floppy disk on a stack of no more than 4 sheets of your preferred paper (I used graph paper). Next, cut about 1/4 cm. inside from the lines you traced and cut out the square. After cutting out one stack, you can make another outline and do the same thing somewhere else on the paper(s).

Cutting...

After you should have a nice stack of papers.Split the stack into shorter stacks that can be done by a hole puncher. On the top paper of each stack put your floppy on it and trace the inside of the litle holes that are on the floppy disk.

Tracing the holes...

Next, go at the stacks with the hole puncher. Punch as close as you can to exactly centered to the tracings you made from the holes on the floppy (exactly centered might have you cutting through the edge of the paper). After, line all of the stacks and floppies up (one floppy on top, the stacks, then one floppy on the bottom). put the zip ties through the holes on the floppies, then the holes in the stac, then the other floppy. loop it around and tighten until it is VERY LOOSE!! You don’t want it tight or else it won’t be able to open or close! You should be able to have the two floppies open side by side with a little space in between, as shown below.

You need space between the disks!

Now you’re done! Trust me, everybody will be JEALOUS of how awesome it is.

Now go off and write…well…whatever needs to be written!

Go write... well...whatever needs to be written!

***I hope you enjoyed this special how-to, with “special” images. I’ll do something special for most of the major holidays in the future.***

Wireless Magic Mouse

Remember this post [link] (hover over link to see without opening a new page!)?

Remember this picture [link]?

Well, it’s all changed. The new Magic Mouse is slimmer, more sleek, more responsive, and multi-touch.

Visual Aspects

Below is a picture of the old Mighty Mouse.

Old Mighty Mouse...

Here is a picture of the new Mouse.

Sleek Magic Mouse!

As you can see, there are definitely some changes in the design.

  • Slimmer!
  • No more scroll wheel
  • Aluminum not plastic
  • No more side sensors
  • Apple logo is under the outer shell instead of an imprint

Also, the edges are a sharp (not too sharp) after the top of the shell, unlike it’s predecessor which was round all around.

The bottom also got a new look.

Bottom

Aluminum!

Ya. Aluminum. Also, the laser tracker is much smaller, but it seems to not make a difference at all.

Here is my own comparison.

Use

Yes, although it has nothing on it, it still clicks scrolls, and then some.

You can use it as a normal point and click mouse. Just put your finger on the left or right of the shell (both fingers are thought of as one) and push down towards the front. The whole outer shell will pivot forward with a mouse-like click (I wonder why). You can configure the mouse to be lefty or righty. No discrimination for dominant hands!

Scrolling

Wheels (and spheres) are now a thing of the past. The new Magic Mouse uses the touch-sensitive shell to take scrolling to a whole new level.

To scroll, just move one finger across the shell. Scrolling is 360º, so you can scroll left, right, and diagonally.

Another cool new feature about scrolling with the Magic Mouse is that it scrolls with momentum. If you scroll quickly and lift your finger off the mouse it will continue for a short amount of time and quickly scroll to a stop. Below is a screen capture of what it looks like.

[youtube=http://www.youtube.com/watch?v=UUGws9tkSnE]

Pretty awesome.

Multi-touch gestures

Well, they have to make everything multi-touch.

Sorry guys, but the only multi-touch gestures that it uses are 2 fingers left and right to go forward or back in safari and between pictures in iPhoto and Preview

Versatility

This is what it says on the Apple Website:

“Magic Mouse uses powerful laser tracking that’s far more sensitive and responsive on more surfaces than traditional optical tracking. That means it tracks with precision on nearly every surface — whether it’s a table at your favorite cafe or the desk in your home office — without the need for a mousepad.”

Well, I don’t know. But I don’t want the little pads on the bottom to ware out, so I use a mousepad. But yes, it does work on pretty much every surface. I had a problem with my Mighty Mouse on glass tables, but I haven’t tried that with the Magic Mouse.

Ergonomics

This is the first time I have ever done an ergonomics view on a piece of hardware.

This analysis is done by Vivienne Fleischer, Co-founder and president of Performance Based Ergonomics (A.K.A. PBErgo).

This is what she had to say:

[youtube=http://www.youtube.com/watch?v=gUfiB61wqt0]

Conclusion

Five Stars!!! *****

Pros: Multi-touch, wireless, sleek, thin, ergonomic, made by Apple

Cons: Doesn’t work with PC. Wait… That shouldn’t be there. No cons!

Magic Mouse homepage

Green Screen for under $5!

Check out the video below.

[youtube=http://www.youtube.com/watch?v=OFiBMA2HsZ8&hl=en&fs=1&]
Other than the camera, light, and software, I only paid five bucks for this.
Ya.
So here is a picture of it with no green screen effects.

So as you can see it is small, but it does the job for just one person.
So what’s the secret for this only costing five dollars?
Poster board.
A about one dollar each, in a close-up you can see the creases.

But the software doesn’t see it!

So, how did I put it together?
There’s tape on the back.

So to make the green screen videos I use Adobe After Effects, with the Keylight plug-in. After Effects comes with built in effects for doing things like the fading shown above.

But the only problem is that After Effects doesn’t play any sound, So to find when you should fade in that picture of that next-door neighbor you hate (or whatever) you need to open the video in Quicktime (or whatever) and remember the time you want to queue it and go into After Effects and add in that picture at that mark.
So to record my videos simply with my Flip, which gives me good enough quality.

But if you are going to use a green screen with a flip and After Effects, BEWARE!
You need to export the videos from FlipShare into Quicktime format before using it with after effects or it will be shaky, there will be no sound, or the video will have horrible quality. It took me a few attempts (and failures) to figure THIS one out.

For lighting, I use two White Lightning X1600 with modeling at -2.5f.

So $115 green screens are a thing of the past. Hello cheap DIYs!

Did you make any green screen videos using this?
Upload them to YouTube and comment with the link!

If you want to have your questions answered in front of THAT green screen on a podcast, just send your questions to podcast@goodmorninggeek.com!!

Then, just click on THIS LINK (requires iTunes, click here to download) and download the podcast with your question.