 Well, you got your shiny iPad. It does everything as advertised. But it can do even more. You can turn it into a secondary display for $9.99!
First, on your iPad, download an app called Air Display for $9.99.
Next, connect your Mac (sorry PC users, this won’t work for you) and iPad to the same WiFi network (if you don’t have any available create an AdHoc network on your mac). Then, open the Air Display app on your iPad. It will give you detailed instructions on how to download and install the plugin for your Mac (free). I’ll walk you through it anyway:
First, download the plugin at avatron.com/ad. Then, install the package and restart your computer. Make sure your iPad is awake and Air Display is open. Click on the Air display icon on your mac’s menubar and select your iPad from the list. Your screen will turn blue, then your iPad should be connected. By default, your iPad is configured to be on the left. So drag a window off of the left side of your main screen and it will appear on the iPad. cool! You can also touch on the iPad like a mouse (no right click though).
Now that you have your Air Display configured, lets personalize it.
Open System Preferences and click Displays. You will see a window show up on each of the displays. But the one we really want to use is the one on the main display (the main display is the one with the Menubar at the top). You will see that on this display there is a window that has an arrangement tab at the top. Click Arrangement and here you will see two screens: the smaller one is your iPad. You can click and drag you iPad to a different side of the main display depending on the physical position. You can also drag the menubar to the iPad to make it the main display.
Now this is cool and stuff, but a really cool use is that you can finally run flash on an iPad! the fps is less then 30, but it will do for the most of us.
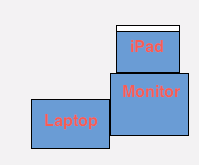
Now if you have a physically plugged in external display, this means that you could have 3 screens without having to buy something like the viBook for $120. Here’s how I set it up with the Air Display:
As you can tell, I have the Macbook to the left of my monitor. I then put my iPad on top of my monitor and am using my iPad as my main display;. This eliminates desktop clutter, and when working in photoshop all of my tools don’t get in the way so I can work on a pretty big image.
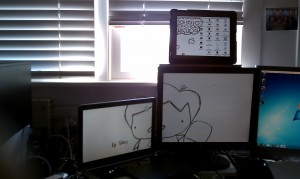
Here’s how it looks in real life:
As you can tell, it looks similar right? All of my icons are on my iPad along with the menubar, allowing more room on the main display. Sadly, the wallpaper doesn’t span across all of the monitors automatically, it just takes a lot of cropping in photoshop so you get three different pictures that eventually come together as one image. Also, cool picture right? It’s a portrait of me drawn by one of my friends. If you look on the iPad, you’ll see a thought bubble with binary.
Sadly, you need to add the iPad as a display with the menubar icon every time you restart your computer. Also, it’s hard to use it while the iPad is syncing.
There’s a cool way to impress your friends!
[ad code=1]


