If you’ve been reading much about security recently, you know that everyone is saying to never reuse any passwords, and to use a password manager to keep track of all of them. 1Password is definitely the most recommended password manager of them all, as it supports categories, cross-platform syncing, and browser extensions.
But it’s $40.
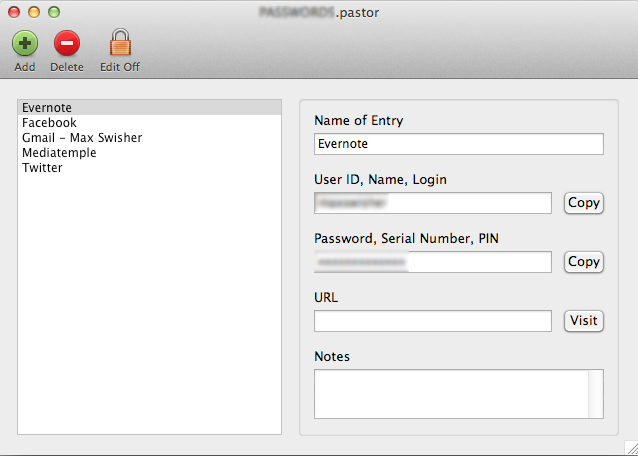
Ladies and gentlemen, enter Pastor. I’m going to say now that Pastor doesn’t have any of the fancy features that 1Password has, but it has the essentials: password storage and encryption.
The interface is beautifully simple: You can add an entry that contains a title, username, password, URL, and a note. The database is then saved as an encrypted .pastor file using a master password of your choice.
To see your passwords, open the file, type in your password, and you’re there. You can copy a password to the clipboard for use, or hover over the password to see it.
It also has a built-in password generator.
The app is donation-ware, so donations are encouraged. I don’t usually ask people to donate for donation-ware apps, but this app is so simple and useful that I think it’s definitely worth more than nothing. So if you use this app, please donate something!
An 19 year-old student and her uncle were at an Apple Store shopping for an iPad and iPhone at a mall in Georgia. They were talking in Farsi, and when an Apple employee overheard she said “I just can’t sell this to you. Our countries have bad relations.”
Leave it to Apple to discriminate not only against other platforms, companies with similar home screens, or any other firm that dares to threaten their authority, but also against people from different parts of the world.
Apparently, this isn’t the first time that this has happened at an Apple store. Another customer, Zack Jafarzadeh, went with his friend to a different Apple Store and received similar treatment. “We never talked about him going back to Iran or anything like that. He was just speaking full-fledged Farsi and the representative came back and denied our sale,” said Jafarzadeh to WSBTV. “I would say if you’re trying to buy an iPhone, don’t tell them anything about Iran. That would be your best bet.”
It gets better. An Apple Store manager told a news team from WBSTV about their policy, which said the exportation, sale, or supply of Apple products from U.S. to Iran is not allowed without prior authorization by the federal government. The manager explained Apple Stores have to “rely on customers to be honest.”
And here’s the best part. An Apple Store employee apologized and recommended that they buy their products online. Hah!
So when a US citizen and her uncle come into an Apple store speaking Farsi, they aren’t allowed to buy anything and are basically instructed to purchase the products as long as no Apple employees need to look at them.
This is how Apple rolls, everybody. I could be annoyed at the employees, or the manager, or the Store, but really, Apple is to blame. The same thing can happen anywhere in the US, as long as Apple decides that selling an iPad to a US citizen that speaks Farsi is breaching a US law stating that it is illegal to enter Iran with “laptops or satellite cellphones” without U.S. consent.
So Apple had some fun at the WWDC Keynote this year.
Siri did stand-up comedy to open.
No really, I’m excited about the new Samsung. Not the phone, the refrigerator.
I must admit, that was pretty funny.
First of all, Apple updated its notebooks. The MacBook Air finally got a speed boost, the MacBook Pro got a speed boost, and the 17″ MacBook Pro bid farewell.
Apple also announced their next generation MagBook Pro, which is almost as thin as an Air, has a retina display, and a new Magsafe Port. Great.
All of these computers have gotten upgrades to USB 3, which is nice for those people who actually have devices that can take advantage of that.
Then, our friend iOS got an update.
Finally, iOS has turn by turn navigation. Siri is available on the new iPad, and has supposedly gotten a bit better. Facebook is now integrated as much as twitter. FaceTime is available on cellular networks. Photo streams can be shared. A new app called Passbook allows you to store tickets for planes, movies, and stores. There’s also a few other things that aren’t worth mentioning.
Mac OS X Mountain Lion didn’t get anything new from what we knew already, except thatdictation will be available in any text field. For many people, this will definitely come in handy.
Some people were unhappy with the absence of an iPhone 5. But I think we should be content with iOS 6, and expect the new iPhone this fall – along with the public release of iOS 6.
I’ve been playing around with iOS 6, and so far it works well. Siri works just as expected, and the Facebook and twitter integration is also very handy.
The MacBooks that were updated are available now, but iOS will be available in fall. Mountain Lion will be available this July.
A lot of people are saying that the iPad can easily replace a laptop. When you’re sitting on your couch, just woke up in the morning, or traveling around, can’t the iPad do everything a laptop can? I mean, why take a laptop with me when I’m just going around town, when I can take an iPad instead?
I’ve thought about this a lot. In a post I wrote a year or two ago (wow, that long ago?), I said that the iPad could easily replace a MacBook. The one thing that it really didn’t do was flash.
But recently, I got a new MacBook Air, and it seems that I prefer to use it over the iPad.
The iPad can basically do everything that the MacBook can. There’s only two big problems.
First of all, the keyboard. Touchscreen keyboards work for typing quick messages to people, but for typing an entire blog post, it gets a bit annoying. The other problem with the keyboard is that it absolutely SUCKS for coding. I mean, it takes three taps to insert a <, /, or >. And when writing something as basic and simple as HTML, it’s a complete pain.
I can hear all of you saying “Wait a sec, you can connect a bluetooth keyboard! Heck, you can connect a USB keyboard using the Camera Connection kit!” But come on people, why carry around an iPad and a keyboard when you can just carry around a MacBook? I mean, doesn’t having to bring a keyboard with you everywhere prove my point even further?
Next, there’s the lack of a windowed operating system. That’s the really nice thing about Macs: you can have multiple things going on at once.
Okay, now I can hear all of you saying “Wait a sec, iOS 4 brought multitasking in! You CAN do multiple things at once!” But, once again, come on people, it’s painful to switch between different apps. What if you have something in one application that you need to read and get information from while typing in another? This will requite quite a lot of four-finger swiping back and forth between apps. With a windowed operating system, I can have multiple applications and pages open, and see what’s going on in each. Heck, I can watch a movie while scrolling through my twitter feed. The flexibility of a windowed operating system is unmatched to the multi-tasking interface on an iPad.
Then, there’s power. Sure, the iPad has a dual-core A5 chip. But the time that it takes for a video to be rendered on an iPad is easy to compare to the speed of a dual-core hyper-threaded i7 in my MacBook air.
And this brings me to my very last point – availability , flexibility, and power of applications. The iMovie available for the iPad is quite handicapped to the iMovie on my MacBook. In fact, it’s that way with every single application available for both the iPad and the Mac. Then, of course, there’s port options. I can’t plug an external hard drive into my iPad and transfer my files to and from it. It’s all very closed off, as the iPad only has the proprietary Apple 30 pin connector and a headphone jack.
And that, people, is why I enjoy taking my MacBook places more than my iPad.
Less than a year ago, apple released OS X Lion. It added a ton of very very very handy features.
Now, Apple has just announced Mac OS X Mountain Lion. It features iPad-like features such as iMessages, Reminders, Notes a Notification Center, Twitter integration, Game Center, and even AirPlay mirroring.
These are some shiny new features that are similar to the Leopard to Snow Leopard upgrade – not that big, but may still come in handy.
Mac OS X Mountain Lion is going to be released to the public this summer. In the meantime, you can download the Messages beta app and start iMessaging your friends from your mac.
One of the conveniences of Mac is that applications come in packaged files ending in .app. For this reason, they are usually said to be easy to uninstall – just delete the .app file from your applications folder and it’s gone.
True, this will get rid of most of the files, but often there’s still some application metadata gunk left laying around in hidden folders.
That’s why AppCleaner is so handy.
Drag in a .app file, and it will find all of the supporting files and allow you to delete them. This allows you to get a completely clean uninstall of an application on your mac.
Did I mention it’s free? Pick it up from FreeMacSoft using this link. Enjoy!
Unfortunately, this is necessary with the LTE version of the galaxy nexus. It can be a little bit risky at times and is said to void your warrantee, but you can always undo this part.
First, plug in your Galaxy Nexus to your Mac and hold down the power button to turn the phone off.
Now, hold down both the up and down volume buttons at the same time and hold down the power button. You should be greeted with a screen that looks like this (if not, shutdown and try again):
If you’re having a lot of trouble with this, here’s a video that I made showing you how:
You should see a prompt on your Nexus’ screen asking if you want to unlock the bootloader. Press the volume up key followed by the power key. You’re done!
Once you’re back at the android-open-thing screen, hit the power button to start the phone.
Now, it should boot up and start cycling through the boot animation. It may do this for a good ten minutes – whatever you do, DO NOT PULL THE BATTERY! (I learned this the hard way).
Eventually your Nexus will boot up, and you’ll be safe and sound in your little Ice Cream Igloo.
2. Root
Now it’s time to ROOT!
Put your phone back into fastboot mode plugged into your computer.
It may hang on the Google logo for a while – If this happens, wait about 10 minutes and pull and replace the battery. Turn it on and it should cycle through the boot animation for a few minutes.
Once your phone boots up, you’ll be completely rooted! Enjoy!
The iPhone can take some pretty dang good pictures. In fact, many different phones can take mind-blowing shots. But your little phone can do even more if you treat it to these mini-lenses from Photojojo!
Contents/Installation
There are three lenses available from Photojojo: 2X telephoto, 180 Fisheye, and a 0.68x wide/macro lens. I won’t go over individual pricing, but the whole pack is $50.
Installing the lenses is painless. In your package you’ll get a few tiny, metal magnetic rings. Undo the plastic on the adhesive side and stick it around the lens of your device. If you have an iPhone, however, you should probably put the ring on a case; the sleek glass doesn’t play well with their adhesive.
Now to use the lenses, you just attach the lens to the metal ring and it magnetically locks on. Neat!
2x Telephoto
For those times when you want to get closer to your subject, the 2x telephoto lens will do exactly what you’d expect. Unfortunately it will cause a tiny bit of distortion, but not enough to make a big difference.
Without, With
As you can tell by that comparison, the lens does a nice job of zooming in, but has a bit of distortion (visible near the door handle).
Fisheye
This lens I believe is my favorite. It can capture just about everything you can see without turning your head. If you want to really capture an entire scene, this is exactly what you need.
Without, With
Pretty cool, right? Unfortunately, this lens causes a particularly noticeable amount of vignetting, but I think that it adds a nice effect. If you want to get rid of it, you can always crop it with whatever application you desire, however you’ll end up losing a bit of the image.
Wide Angle / Macro
This lens confuses a lot of people. Is it wide angle or is it macro?!
Alone, the magnetic part of the lens is just Macro. However, there’s an adaptor that screws in to the macro lens to convert it to a wide angle lens.
The macro lens doesn’t zoom in at all. It just allows you to focus WAY closer to objects. Here’s a comparison – remember, I took the first picture as close as I could while staying in focus, then I took the second as close as I could while staying in focus. This lens does NOT zoom.
Without, With
Pretty cool, right? You can get ridiculously close to capture textures that previously went unnoticed. On the second picture, I’m holding my iPhone a tiny bit less than an inch away from the keyboard.
The wide angle addition to this lens isn’t very fancy, it just makes the picture a tiny bit wider. It will cause some straight lines to bend in odd ways, but it still comes in handy when wanting to capture wide shots without going crazy with the fisheye.
Without, With
Doesn’t that doorway look kind of round? As you can tell, it makes the picture a bit wider but can’t capture the amount (and distortion) of the wide angle lens.
Cool uses
Yup, these work great with a phone camera. But there’s one use that I recently found – your webcam! It’s a small camera, just about as small as the one in an iPhone. Take a metal ring and stick it around, and you can use these lenses while video chatting! I personally have an LED cinema display, and although it makes my screen look a little funny, the results are totally worth it.
Here’s the display:
Ha! By the way, those things on top of my monitor are dinosaurs; you’ll get one with every photojojo order! I’ve ordered two things from Photojojo, so that’s why I have two dinosaurs.
Here’s what it looks like straight on:
Pretty cool, right?
Here’s the results:
Sweet! You can even see my keyboard!
Conclusion
These lenses are quite handy, and because they work with anything you don’t have to worry about compatibility. The whole set of lenses is $50, and if you’re interested click here to be redirected to the photojojo store!
OS X Lion removes the need for any kind of media for the installation. That’s nice, because there’s no disk for you to lose!
However, if something terrible happens to your computer, you’ll end up installing Snow Leopard, then upgrading to Lion once again. Thankfully, Apple has made a utility that allows us to easily and painlessly create a bootable USB Lion Recovery Disk. Unfortunately, you must have either the MacBook Air or Mac Mini Mid 2011 for this to work. This is because those are (currently) the only computers with the Lion Recovery Partition.
1. Download
Click here to download the Recovery Disk Assistant from Apple. Once downloaded, open the Disk Image and launch the Application.
2. Create
Now would be a good time to plug in a USB disk. Plug it in and continue through the installation. There’s nothing for you to configure, so this is extremely straightforward.
3. Use
If your computer stops booting, or you get a new hard drive, it’s time to use this disk. Plug it in to a slot on your computer, then boot holding the alt/option key. In the menu that appears, select the recovery disk. Now you can download and install Lion right back on to your computer!
The MacBook Air is a great computer. However, sometimes it’s nice to have a bigger display. That’s an easy task if you have an external monitor.
Okay, so now you have two displays. Cool! The only problem with this is that it can sometimes be confusing and/or distracting to deal with two displays at a time. Okay, simple enough, just close the lid to the MacBook Air and use an external keyboard and mouse. That was easy.
This would be the answer to all of our problems, however a closed computer does take up quite an amount of valuable desk real-estate. That’s why the BookArc is here to save us.
As you can tell, it is really just a stand for the Air that holds it up sideways. The stand is made of solid aluminum, and has rubber inside so that you don’t scratch or in any way damage your beloved MacBook Air. It also has a small indent in the side to manage any cables you might have, and was designed to fit the cable from an LED Cinema/Thunderbolt Display quite well.
This saves a ton of desk real estate, and can really come in handy. But the fun doesn’t stop there!
Usually laptop cooling requires some fancy advanced stand that usually doesn’t even work well. Well, here’s my personal cooling system.
Yeah, that’s it. I have the MacBook Air and a desk fan pointed at the bottom. This will keep your Mac nice and cool, so you won’t have to worry about heating issues ever again. Nifty!
The BookArc is a simple, elegant stand that serves its purpose quite nicely. If this stand were any more, it would be too complicated and much less attractive. It saves you a ton of desk real estate, and at the same time you can cool down your computer!
As you may have read in a previous post, my beloved MacBook of three years has finally bit the dust. That MacBook treated me well, and with an SSD and upgraded RAM it was able to work wonders.
Now, however, it is time to move on. And as you may be able to tell by the title, I have decided to continue my Mac collection with the newfangled MacBook Air.
Which one did you get?
One of the big reasons I wanted the MacBook Air was because of its portability and the offering of an 11 inch version. Due to this, I got the 11 inch MacBook Air with a 1.8 ghz Core i7, 256GB flash storage, and 4GB of ram.
I can hear a lot of you saying “Isn’t 11 inches a little small?” Why yes, it is. However, when I’m at home, I have an LED Cinema Display to hook it up to – no lack of pixels over here.
Design
The design of the MacBook Air does NOT fail to amaze. It feels so thin and light in your hands, but at the same time it feels incredibly solid. Because it’s a “unibody” MacBook, it was manufactured from one single piece of aluminum – it’s strong. Tapering from 0.68 inches down to 0.11 inches, you can bet your bank account it’s thin. Thanks to this, I can finally accomplish my dream of slipping my computer into a manilla envelope. The one problem with this pencil-thin design, however, is that on the whole computer you get a total of five ports. On the left side, we have a MagSafe power adapter, USB port, and microphone/headphone jack. On the right side we have a thunderbolt port and a USB port. Sorry, disc lovers!
Upon opening the computer, you get some more goodies.
The first thing you’ll notice is the screen. It’s bright and, well, beautiful. It packs a very nice DPI, featuring a 1366 by 768 resolution squeezed into 11.6 inches of glossy glory.
Next, you’ll notice the keyboard. The keyboard is full-size, featuring every key you’ll find on that thick MacBook Pro. In addition to being full-size, the keyboard is also backlit – a feature that was definitely missed on the previous version of MacBook Air.
The next thing you’ll notice is the giant trackpad. This trackpad resembles that of the MacBook Pro, although on the 11 inch version of the MacBook Air it’s a tiny bit thinner. The glass surface is a cinch to move your fingers across, and is extremely responsive to say the least.
Last and, well, least, would be the FaceTime camera embedded in the bezel of the screen. Apple decided not to put in one of the new FaceTime HD cameras, and will probably bring it back in the next version of the MacBook Air. Nonetheless, it’s still a standard functional webcam that is definitely a good addition.
Performance
In addition to being quite the looker, it gets a high score in the area of performance as well. As far as processing goes, the 1.8ghz hyper threaded dual-core i7 works wonders. The 256GB SSD performs at ~250mbps Read/Write speeds. The 4GB of RAM is sufficient.
For comparison, I’ll test the performance of the Air versus a pro using Geekbench. I first ran it on my mother’s MacBook Pro (Late 2009), which features an intel Core 2 Duo and 8GB of ram. It scored a Geekbench score of 3002. Not bad.
Then I ran it on the Air. It scored a whopping 5200 – which is a 70% increase from the pro, in 30% of the space.
The one setback of the Air’s performance would be graphics. It’s running an Intel HD 3000 chip, which is integrated so it doesn’t boast the same performance that you might get with an nvidia card. Although it might not be on par with an nvidia, it’s still a perfectly good graphics card nonetheless.
Watch out!
If you’re thinking of buying one of these, there’s one thing that you might be at risk of. The SSDs in the Airs are provided both from Toshiba and Samsung. This would be no problem, however the Toshiba SSDs are about 100MBPS less than the Samsungs. Yeah, that’s a big difference.
Here’s a video to find out if your Air boasts a samsung or a toshiba:
Conclusion
The MacBook Air combines the two most wanted/needed components of a notebook computer: power and portability. The powerful processors and fast memory give it some meaty specs, and then the 0.68 to 0.11 inch body makes it a lean, mean, working machine. I definitely recommend this computer to everyone, whether you’re a professional video producer or an under-appreciated artist living in a college dorm.
No, I’m not talking about the white one (post here).
I bought an aluminum MacBook in 2008, and it has lasted me until today. I loved it, it was reliable, and has lasted through three software versions. I have used it for three years straight, rarely skipping more than 8 hours without using it.
And today, it has finally left us.
I’m not getting rid of this computer, as it was my first real computer and has signatures of apple engineers on the bottom.
You’ll get to find out what computer I get next when I write a post about it. 🙂

 If you’ve been reading much about security recently, you know that everyone is saying to never reuse any passwords, and to use a password manager to keep track of all of them. 1Password is definitely the most recommended password manager of them all, as it supports categories, cross-platform syncing, and browser extensions.