picplz

We all have twitter accounts.

What is twitter for? It’s for sharing what you are doing right then in less than 140 characters.

picplz is similar, but it uses pictures with tags and captions instead of just text.

Sorry guys, but the app is only available on android. 🙁

So here’s how it works:

Open up the app and you are instantly greeted with the view of your phone’s camera. Tap the camera button to take a picture. If you have foursquare configured, tap the venue that you are at. You can then tap someone/something to tag them in the photo. Then you can click edit details and enter a caption and decide which services you want to post it to (twitter and foursquare). Then click post and your picture will be posted! This is great because you can see which pictures you’ve taken at different foursquare venues. Your profile will be located at picplz.com/user/username. Check mine out here!

Tether your android device

As you know, I got my beautiful new HTC incredilble.

It comes with built in support for tethering, but another $30/ mo.??!! NO. Luckily, there’s an easier way: PDAnet.

It’s a free download from the android market and works without any extra charge.

Sadly, I can’t give you any screenshots due to android. 🙁

But it is simple enough.

First, open the app. You will be introduced with the option to turn on USB or Bluetooth tethering. The USB tethering requires an extra plugin to be installed, and my mac supports bluetooth DUN built in, so I just used that. Here’s a video on how I set it all up.

There you go! Sadly this does not work with the iPad, as DUN isn’t available quite yet.

Turn your iPad into display with Air Display

Well, you got your shiny iPad. It does everything as advertised. But it can do even more. You can turn it into a secondary display for $9.99!

First, on your iPad, download an app called Air Display for $9.99.

Next, connect your Mac (sorry PC users, this won’t work for you) and iPad to the same WiFi network (if you don’t have any available create an AdHoc network on your mac). Then, open the Air Display app on your iPad. It will give you detailed instructions on how to download and install the plugin for your Mac (free). I’ll walk you through it anyway:

First, download the plugin at avatron.com/ad. Then, install the package and restart your computer. Make sure your iPad is awake and Air Display is open. Click on the Air display icon on your mac’s menubar and select your iPad from the list. Your screen will turn blue, then your iPad should be connected. By default, your iPad is configured to be on the left. So drag a window off of the left side of your main screen and it will appear on the iPad. cool! You can also touch on the iPad like a mouse (no right click though).

Now that you have your Air Display configured, lets personalize it.

Open System Preferences and click Displays. You will see a window show up on each of the displays. But the one we really want to use is the one on the main display (the main display is the one with the Menubar at the top). You will see that on this display there is a window that has an arrangement tab at the top. Click Arrangement and here you will see two screens: the smaller one is your iPad. You can click and drag you iPad to a different side of the main display depending on the physical position.  You can also drag the menubar to the iPad to make it the main display.

Now this is cool and stuff, but a really cool use is that you can finally run flash on an iPad! the fps is less then 30, but it will do for the most of us.

Now if you have a physically plugged in external display, this means that you could have 3 screens without having to buy something like the viBook for $120. Here’s how I set it up with the Air Display:

System Preferences Arrangement

As you can tell, I have the Macbook to the left of my monitor. I then put my iPad on top of my monitor and am using my iPad as my main display;. This eliminates desktop clutter, and when working in photoshop all of my tools don’t get in the way so I can work on a pretty big image.

Here’s how it looks in real life:

By default the wallpaper won't span

As you can tell, it looks similar right? All of my icons are on my iPad along with the menubar, allowing more room on the main display. Sadly, the wallpaper doesn’t span across all of the monitors automatically, it just takes a lot of cropping in photoshop so you get three different pictures that eventually come together as one image. Also, cool picture right? It’s a portrait of me drawn by one of my friends. If you look on the iPad, you’ll see a thought bubble with binary.

Sadly, you need to add the iPad as a display with the menubar icon every time you restart your computer. Also, it’s hard to use it while the iPad is syncing.

There’s a cool way to impress your friends!

[ad code=1]

Droid Incredible: First impressions

You may have read the post about me getting a new phone. Well I got it, and after about a day of use I’ve gathered some opinions. First of all, the thing is high off of a 1 ghz snapdragon processor. Even with widgets and widgets running, the thing is still extremely snappy. Another great thing is HTC sense, which allows a cool interface with some added features. HTC also packed in their own keyboard instead of the defaultandroid keyboard and it allows easier typing. Only thing I don’t like is the haptic for the keyboard because if you type really fast you have a buzzer in your hands. Another thing I love is the notification system. It makes a sound and buzzed but unlike the iPhone the notifications are at the top if the screen and you can continue doing what you are doing. Another big plus is the built in gps with turn by turn navigation. Sweet! And that adds geotagging to the 8 megapixel camera with dual led flash. It is now officially my only camera. You can also broadcast live to ustream with it.

Although there us so much good, there is one big bad. Although it’s the Droid incredible, the battery life is not so incredible. I want to get an extended battery but $80? I don’t think so. I’ve never made it a full day even with it off for most of it. The battery life is indeed a failure.

Good phone, camera, gps, and more, but not so good battery life.

Expect more in depth reviews is everything mentioned above!

P.S. I wrote this using the incredible. Sorry for typos!

Offline Pages for iPad

Over 1,000,000 iPads have been sold, and I just got the WiFi version. But I know many went for the 3G version because they could browse the internet anywhere (that is, if you’re in Texas of course). But what if you don’t want to pay the $30 for unlimited, or just have the WiFi version? Offline Pages is a free app that allows you to download pages and view them on your iPad even when you don’t have an internet connection.

And It’s actually quite easy. First, open the app on your iPad. The interface is simple. At the top there is a URL bar where you can browse to the page you want to save. Once you’ve found it, you can tap the button directly to the right of the URL bar (the down arrow into the box thing) to save it for viewing later. A small red badge will appear over the button to the left of the URL bar indicating that it is being saved. After the badge has disappeared, you can safely close the app and go anywhere knowing that you still have the webpage.

To view the webpage, just tap the button directly to the left of the URL bar (the box with the papers in it) and your saved pages will be listed. Tap on one to see it.

But there is one problem with this method: What if you are browsing pages in Safari with an internet connection and you find a page you want to save for when you are on the road? You’d have to copy and paste the URL, then go into Offline Pages, open the page in offline pages, and save it. Oy Vay!

But these people are amazingly smart. They know that, so they created a bookmarklet to do it for you. To install the bookmarklet, just go into the options and under general there is a selection to install the bookmarklet.

This will bring you into a webpage in safari, and amazingly you can install the bookmarklet to another iPad or computer!

Tap which ever one you want to do and it will give you step-by-step instructions to install the bookmarklet.

After you’ve done so, just browse to a page in safari, tap the bookmarklet, click save to iPad, and Voila! Just open Offline Pages and the page will be saved for offline viewing. Great if you are going on an airplane without WiFi!

Even better, the app is free and for iPod, iPhone AND iPad! Bravo! [Applaud]

Click here to be redirected to iTunes.

WeatherBug for iPad

If you just got that new shiny iPad, it may be a great tool for checking the weather, in fact, there’s an app for that!

So I have tried the weather channel, but similar to their iPhone app it is quite buggy. But luckily i found weatherbug which has a very nice interface and is very functional.

When you open the app, you are greeted with a radar map and a bar on the top.

The bar on the top has multiple squares with current conditions, live cameras, a forecast, and if you slide the bar left it acts like a page. You a then shows hourly forecast, active alerts, and a video thingy. You can tap the different boxes to see a more detailed view.

On the map, you can click on map settings to change the view to temperature, pressure, humidity, wind speed, infrared satellite, visible satellite, and radar. Cool!

You can also press the play button in the bottom left to see a time-lapse of the radar images.

The app is free from the app store as well. Yay!

Pictures of some of the features are shown here.

[ad code=1 align=left]

Are you a typist?

I know you can type.

In fact, pretty much everybody can. But are you a typist?

A typist is someone who is a skilled typer. Basically, it means you can type really fast.

Pretty much everybody in my family is!

But are you?

Here’s something you can have a little fun with. It’s called typeracer.

Typeracer is a site where you have to type a paragraph perfectly as fast as you can against your friends, yourself, or even other people on typeracer. Don’t worry, you all have to type the same paragraph. If you mess up, you have to correct the mistake before moving on!

Another cool thing is that it will tell you your words per minute (5 characters/word) and rank you on their own scale depending on your speed.

Depending on how tired I am, I can hit up to 77. I call above 65 a typist.

Don’t worry, typeracer is free online and really fun. Only problem is if you look at your keyboard while typing and make a mistake, you won’t realize it until you look up to see the typing box red and you have to start over!

Also, typing speed can depend on if you are tired.

If you just drank three caffeinated pepsis and a jittery, it is likely that you will make a lot of mistakes and get a low score.

If you are tired, you will be less aware and type slower just because your reflexes are slowed down. But if you are just fine and had a good night’s sleep, then you have no excuses!

To play typeracer, just go to play.typeracer.com. You can create an account to keep track of your speeds and levels as well (free of course).

Once you’ve started typing and you have made your account, comment and tell me what your level is. Im a typemaster. You can find this out by looking in the top right to the left of your words per minute. If it is really low, then do a few more races! Your WPM up there is the average of your last ten races, and your skill level is based off of that average.

But don’t try to typerace on an iPad! Every time you hit the space bar it turns on the shift key, which will make a mistake unless you press the shift key to disable it. That means slower typing, which means slower average, which means lower skill level!

Have fun and comment your skill level! 😀

Play Typeracer!

[ad code=1 align=left]

New Phone!

It is time.

You may have noticed that I got an enV2 a little while ago.

It’s not a bad phone, and even after dropping it in a creek along with my iPod touch and HD camera it lived (unlike the others). The thing is incredibly durable but all it does is text and phone.

But now that I’ve saved up a bit of money, it’s time for an upgrade.

Sadly, I’m not upgrading to the new iPhone thanks to AT&T’s exclusive agreement with apple that says that the iPhone can’t be carried on any other carrier until 2012.

SOOO,

I’m getting the htc droid incredible.

This thing is running android 2.1, with ht.’s sense UI. It has a dual led flash with an eight megapixel camera (pretty good if you ask me).

I’m also gong to be getting a data plan with it, and I should be able to broadcast live from it (when I do, you can check out the feed by clicking live up there ^^^).

The phone only costs two hundred bucks with a two year contract (the cancellation fee is more than the costs of the phone itself) on verizon. Many deem it as the best verizon smartphone and is the one to get instead of the nonexistent iPhone on verizon.

Apple isn’t telling us everything…

We all know that apple doesn’t tell anybody anything.

But you’d think theyd tell you SOMEWHERE (maybe on the web?) everything about a product that was already released, right?

Think again.

We all know that apple made an array of accessories for it’s new baby the iPad.

One of which happened to be the camera connection kit. This costs $29 and comes with two things: A little dongle that plugs into the bottom of your iPad with an SD card slot, then a similar one with a USB slot.

We all thought that the USB slot was for plugging in your camera. And it is! But…

So many people have told me that they can’t use any keyboard other than apple’s. WRONG! You can plug a keyboard into the USB slot!

You can also plg in USB headphones, microphones, headsets, and probably more. You can even connect your iPhone to get the photos off it, so you no longer have an excuse for no camera an the iPad! I mean, you took them on the go, and they are on your iPad, am I right?

But why didn’t apple tell any of us? Comments welcome.

MOO

Are we suddenly switching to farming poetry?

No, my friends. I mean moo minicards.

What?

Yup, moo mini cards.

I love them so much, I’m doing a review of em!

So what are they?

Business cards. But these are greets business cards. You can print in full color for only $20 for a hundred of em!

These business cards are full color and printed on thick high quality paper. They were founded in London but if you are in the us they are printed in rhode island.

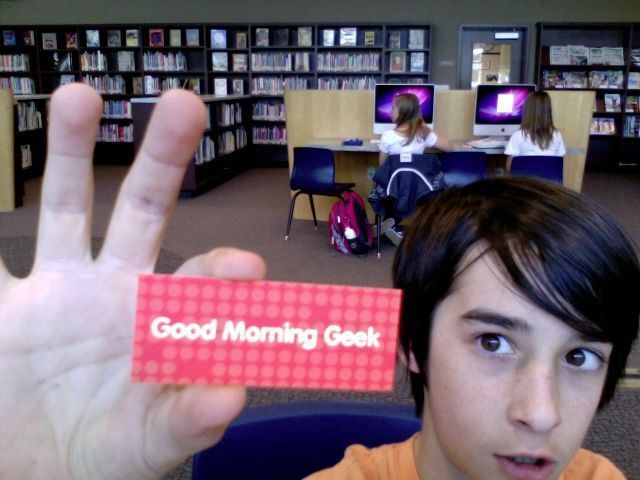
For one side, you can either upload a picture or you can use their textomatic to create one out of text (which is what I did). A picture is at the bottom. Notice it is orange, but over the whole stack of 100 they change in rainbow (sweet!). Pardon the location, im at my school library with nothing to do.

If you use the textomatic, everything is easily configurable. You can change the font, color, and pattern of the image (my pattern was set to dots). 🙂

For the front, you can add six lines of text plus an image. But beware, if you are using a circle, you’ll have to cut off an edge of the image to make it reasonably sized. This is shown in the other photo at the bottom, but I think it kooks cool if you cut it off at a good place.

You can also change the font and make things bold and underlines on the back. Your picture can also be in full color!

And a I said, only $20 for 100 of em.

But other than the great prices and great USA made quality, I love the service. Everything is in lower case. When you get the cards they come with coupons for 15% off promotionally (only works if it’s your first order). The whole thing seems pretty personal, and even the box you get the cards in asks you if you are excited in their nice lower case font.

You can also get some other cool things.

I got a holder for five bucks, because these business cards are a little on the smaller side if you didn’t notice from the picture down there.

You can also get a leather holder if you are really on the fancy side when it comes to the containment of your business cards….?

But the really funny thing is the mini card mosaic holder.

You heard what I said.

This holder can keep 30 mini cards in a picture frame with special slots for each one. Lol.

For business cards, I would definitely recommend these to anybody.

For putting in a picture frame, though, I think not.

Get them for yourself at… You guessed it, moo.com (win!).

Cockpit

I got Cockpit for free at macbuzzer, and how about I get straight to the point: I don’t know why anyone would pay for this app.

I’m mobile, so i can’t put in any screenshots. 🙁

Basically, cockpit is an app controller. For example, you can click buttons for forwards, backwards, volume, play, pause, etc. To get to this, you just click the icon in the menubar and the little window pops up. You can drag the window anywhere on your screen.

Sadly, the applications it can control is limited. It comes with built-in support for keynote, mail, iTunes, and a couple of other things. You can create your own controls and submit them for download on cockpit’s site, but there are only two available right now.

The app costs $15, being the money saver I am, it’s not worth it. You could pay 15 to access iTunes controls through your menubar, or you could just click the dock icon in the same amount of time for free. If I see you using this, I just might have to kick you for wasting your money. However’ you’ve pretty much kicked yourself for wasting the money anyway. 😉

Overall, the idea isn’t too bad. But being so new and unheard-of, it’s not going to become a hit anytime soon.

As someone at the teens in tech conference said, your idea needs to be new and useful, or do something else better, or else it will fail.

The idea has been heard of for long: I mean, since the history of iTunes right? Those play buttons? And it’s not very useful especially for fifteen buckaroos.

I’m sorry, but this is one of the few bad app reviews ill do. 😉

You can check it out (I don’t recommend getting it) at cockpitapp.com.

Calling all tech teens!

Are you a teen?

Are you (almost) obsessed with technology?

Then I’d like you to be in a project I’m doing.

Teens are kind of the future. When you’re not around, the teens will be: and they will probably be one of the most successful generations ever. They are also one of the smartest when it comes to technology because they’re minds are fresh and have never listened to a landline or used dial-up before (well it depends, but you get the point).

I’vew been looking around the interwebz for a technology blog only by teens. I’m currently unsuccessful, so I decided I would just start my own.

If you are interested, please email me at max@maxswisher.com. No, you don’t have to pay anything, but just some time to write blog posts every once and a while about technology (you decide the rest!).

Currently, I don’t have a name for the site until I find a good domain (I have a list, I might do a poll to see what you guys think), but I have codenamed the project teengather.

If you know any teens that are technologically skilled (more than the ability to go on facebook for 14 hours straight), please tell them about teengather.

Thanks!

Max Swisher