New in iOS 7 Beta 4: Snapchat Screenshots

What has the world come to when I’m posting about the ability to take screenshots in Snapchat?

I need to get out more often…

In the release notes of iOS 7 Beta 4, there was this sentence:

Active touches are no longer canceled when the user takes a screenshot.

This means easy screenshots with snapchat, or any other app that shields the truth when you try to take a screenshot.

In the past, snaps would close upon trying to take a screenshot. No longer!

For you iOS 7 Beta users, you can take screenshots of your snaps by holding your finger on the snap and using another hand/fancy finger-work to hit both the home and power buttons simultaneously.

And for all you snapchatters out there, beware of the snapshotting possibilities.

(P.S. I really haven’t been posting enough lately. I need to decide whether I want to write long and analytical posts every once in awhile, or keep a stream of less interesting but still relevant news articles coming through. Hmm.)

Pastor: Free, Simple Password Management for Mac

PastoriconIf you’ve been reading much about security recently, you know that everyone is saying to never reuse any passwords, and to use a password manager to keep track of all of them. 1Password is definitely the most recommended password manager of them all, as it supports categories, cross-platform syncing, and browser extensions.

But it’s $40.

Ladies and gentlemen, enter Pastor. I’m going to say now that Pastor doesn’t have any of the fancy features that 1Password has, but it has the essentials: password storage and encryption.

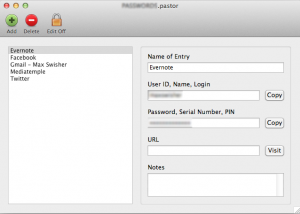
pastor

The interface is beautifully simple: You can add an entry that contains a title, username, password, URL, and a note. The database is then saved as an encrypted .pastor file using a master password of your choice.

To see your passwords, open the file, type in your password, and you’re there. You can copy a password to the clipboard for use, or hover over the password to see it.

It also has a built-in password generator.

The app is donation-ware, so donations are encouraged. I don’t usually ask people to donate for donation-ware apps, but this app is so simple and useful that I think it’s definitely worth more than nothing. So if you use this app, please donate something!

Enjoy!

Pastor Homepage

How-to: Turn the Chrome Omnibox into a Feeling Lucky Box

“I’m Feeling Lucky” is one of the most underused Google Search services in existence. For those who don’t know, I’m Feeling Lucky simply redirects you to the first search result for whatever you enter. For example, if you go to google.com, type in Good Morning Geek, and hit “I’m Feeling Lucky,” it will bring you straight to goodmorninggeek.com. If you type in “Llamas Wikipedia” and hit “I’m Feeling Lucky,” it will bring you straight to the wikipedia page for Llamas. This is convenient because it usually gets you where you want to go without the need to have the search page middleman.

In Google Chrome, the top bar serves as a URL bar and a search bar – referred to as the “OmniBox.” Typically, you can enter any google search into that bar and it will take you to the search page. Here’s how to turn it into an “I’m Feeling Lucky” box, so that if you type Good Morning Geek into the bar, it will take you straight to GMG!

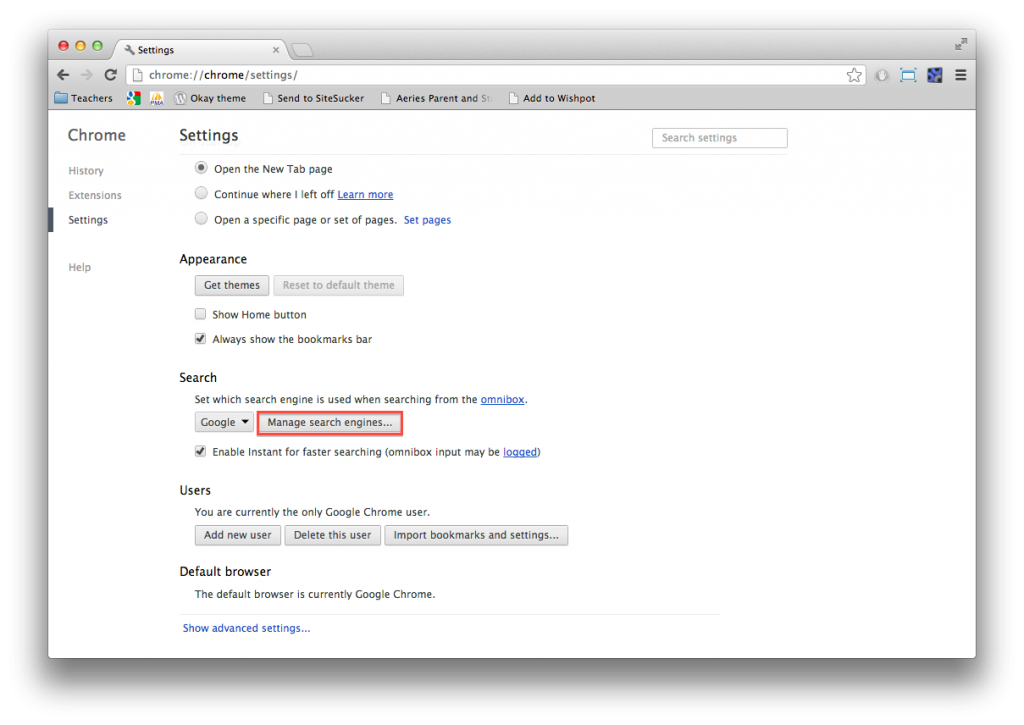
1. Go into Chrome’s Preferences and click “Manage Search Engines.”

2. Scroll to the bottom and click “Add New.” In the first field, type “lucky”, in the second field type “lucky”, and in the third field copy and paste (without the quotes) “http://www.google.com/search?q=%s&btnI”, then hit okay.

3. Open “Manage Search Engines…” again and find the lucky search engine that you just made. Hover over it and click the box on the right that says “Make default.”

4. Hit Ok at the bottom, and enjoy! Try it out: type “ostrich wikipedia” in the search bar and hit enter, and marvel at how it magically redirects you!

If there isn’t a result with enough in common to be sure, Google will just redirect you to the search page.

If you want to do just a normal google search, just type in “google” then press tab, and enter your search.

Enjoy!

Apple Says Things at WWDC

So Apple had some fun at the WWDC Keynote this year.

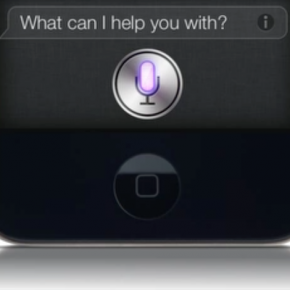
Siri did stand-up comedy to open.

No really, I’m excited about the new Samsung. Not the phone, the refrigerator.

I must admit, that was pretty funny.

First of all, Apple updated its notebooks. The MacBook Air finally got a speed boost, the MacBook Pro got a speed boost, and the 17″ MacBook Pro bid farewell.

Apple also announced their next generation MagBook Pro, which is almost as thin as an Air, has a retina display, and a new Magsafe Port. Great.

All of these computers have gotten upgrades to USB 3, which is nice for those people who actually have devices that can take advantage of that.

Then, our friend iOS got an update.

Finally, iOS has turn by turn navigation. Siri is available on the new iPad, and has supposedly gotten a bit better. Facebook is now integrated as much as twitter. FaceTime is available on cellular networks. Photo streams can be shared. A new app called Passbook allows you to store tickets for planes, movies, and stores. There’s also a few other things that aren’t worth mentioning.

Mac OS X Mountain Lion didn’t get anything new from what we knew already, except thatdictation will be available in any text field. For many people, this will definitely come in handy.

Some people were unhappy with the absence of an iPhone 5. But I think we should be content with iOS 6, and expect the new iPhone this fall – along with the public release of iOS 6.

I’ve been playing around with iOS 6, and so far it works well. Siri works just as expected, and the Facebook and twitter integration is also very handy.

The MacBooks that were updated are available now, but iOS will be available in fall. Mountain Lion will be available this July.

MacBook Pro

Macbook Air

iOS 6

Mountain Lion

How to Wirelessly Transfer Files to a Galaxy Nexus

As you may know, the Galaxy Nexus does not have an option for USB Mass Storage. To transfer any files directly from a computer to the phone, it is necessary to plug it in with a USB Cable and open Google’s proprietary Android File Transfer application.

But what if you don’t have a cable? What then?

There’s a couple things you could do. Email works for smaller files, however for larger files things may go slowly and fall apart.

If you have a server or CloudApp or Puush account, you could upload it and then email  the link to yourself. This would work usually, however the Galaxy Nexus’s download manager often will download most of it, then suddenly fail at the end.

There’s also Bluetooth, which is often unreliable. I can’t transfer any files between my Mac and my Nexus over bluetooth, as it gives me a random warning which is just not worth trying to figure out.

There’s really only one good way: DROPBOX.

In case you don’t know, Dropbox is a service that allows you to have a folder on all of your computers that constantly stay in sync. When one file is added on one computer, it magically appears in the Dropbox folder of all of the other computers too. You have 2GB of space, and the real important part is that they have an Android app as well.

Simply open your Dropbox folder, transfer the file in, and wait a few moments for it to upload to the cloud. Then, open the free app on your Nexus. Tap the file that you just uploaded from your computer, and it should download and open. Voila, that’s how to wirelessly transfer a file from your computer to your Nexus without using bluetooth, servers, or anything else that’s ridiculously unreliable and confusing.

Download Dropbox for your Computer

Download Dropbox for Android

Spotify for Android gets Overhauled

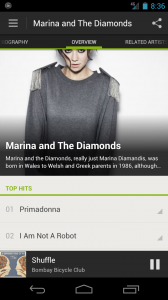
Pretty new artist page

Spotify is by far the best music service I have ever come across. For $10 a month, I get all of the new songs streamed to my computer and phone. For the price of one album a month, I can have as many songs and listen to all of them as many times as I want without any ads or issues. It’s magical!

The only problem is the the android app. It really lacks – the interface is a little bit hard to use, it doesn’t offer as much functionality as the desktop app, and the graphics are quite low resolution.

Well, not anymore. Spotify has released a preview of their new app, which features facebook- and twitter-like slide-out menus, cleaner, easier graphics, and a nicer, more refined playing menu. The interface is also a lot faster in general.

A nice new player interface

The application isn’t available on Google Play quite yet, as they’re working on adding a few more features like Last.fm scrobbling, folders, and more. However, if you’d like to update now, you can still download the preview of the new app.

First, you’ll need to open Settings > Applications and check the box that allows you to install applications from unknown sources. Next, open this post on your phone and tap here. The apk file should download. Next, pull down the notifications and tap the downloaded file. Follow the steps and in a few taps you’ll be enjoying the new spotify interface!

I’m excited that spotify is finally cleaning up their Android app – it was getting a bit, well, old.

Typecast

I was recently interviewed by a reporter about my love of typewriters.

Yes, I have a bit of a thing for typewriters, film cameras, and flower print. I currently own two lovely typewriters: an IBM Selectric II, and a Brother Charger 11.

The reporter told me about typecasting, and I was immediately hooked.

Typecasting is similar to a blog, except instead of text, it’s scans of something typed on a typewriter. Not image-to-text conversion; just the images of what you typed.

It’s nice for three reasons: Firstly, you get the joy of typing on a typewriter. After all, computer keyboards are overrated for typing – the tactile feedback and instant gratification of a typewriter keyboard will never be matched. Secondly, it’s more personal. The little bleed or empty spots of the letters from the typewriter show up, and it’s much less perfect refined. Thirdly, you are actually typing on a typewriter, not just in a typewriter font. Typewriter fonts try to replicate the little errors and blank spaces in the letters of typewriters, but they’re just never right; with a typewriter, the letters follow the curves and crevices in the grain of the paper, and it’s all just so beautiful.

The day before, I decided that I should make a personal blog: One about me, not the stuff I like. I installed wordpress and added a post, but it was all just so…. normal. Another blog. zzzzzz…..

The night after the reporter came and interviewed me, I knew that I should convert my personal blog to a typecast. However, nobody had created a platform for it yet.

So being my ingenuitive self, I decided to create the platform myself. With the help of my glorious friend Amit Eyal, we toiled through the night. (Correction: because he lives a 10 hour time difference from where I do, I went to sleep right when he left for school, then woke up when he came back.) What we had was beautiful: A simple, usable CMS for nothing but uploading images.

Here’s the section on how it works – computer-illiterate, you may want to skip to the next paragraph. It has a hash database with one auto-increment column called ID, and another called file. There is a password-protected admin page with a file upload link. When you upload the image file, it will move the image to the img folder and add the filename to the database; at this point, it will also add the auto-increment the id to the next number. Now, on the homepage, it will call all of the database values with the id descending (this orders it reverse-chronologically). Then it echoes the img and a tags with the correct image file (which it got from the database) and Voila, you have yourself a typecast.

I would ultimately like to make it free and open source for anyone to start his own typecast. Also, it isn’t necessary to have a typewriter – you can just handwrite a note, scan it, and post that instead.

Click here to check out my new personal blog, which is our original typecast.


Instagram Bought by Facebook for $1 BILLION

Remember Instagram, the fun little quirky photo sharing service that just released an Android application?

As you may know, they’ve been growing in size since their launch and Instagram has become an extremely large and popular service.

Because of this, it was inevitable that they would eventually be purchased by an extremely large company… and who better than facebook?

First of all, $1,000,000,000 is a lot of money. A LOT. I didn’t really think that Instagram could be worth that much.

Second, a little note to Zuck and the whole facebook crew: Please, please, please, please don’t screw this up. Please don’t force it to be built in to the facebook interface. Don’t try to stick instagram into facebook, you’d be doing everybody a disservice. Also, don’t just get rid of the entire thing to eliminate competition.

We will have to see what Facebook is hoping to do with this photo-sharing giant, and I honestly hope that they don’t screw it up.

Instagram for Android

Finally. At long, long, long, long, long, long, long last. Instagram has released their official Android Application.

In case you don’t know, Instagram is a photo-sharing platform which incorporates different fun-style effects and third party sharing into the mix. It’s been available for the iPhone since late 2010 and has collected over 30 million users. Yeah. Whow.

There were many speculations of an Android App over the past while, but no confirmed release date.

Now that Instagram has released their Android version, they are well on their way to a giant user base. After all, Android does have more of a market share than the iPhone.

As far as the application goes, it’s the exact same as the iPhone with one important exception: The android application does not have the tilt-shift function, a popular option among Instagrammers. (Tilt-shift is where a selected part of the photo is in focus and the rest is not.)

If you are an android user longing for some instagrammal love, click here to download the free app for android. Enjoy!

Google Ditches Android Market for Google Play

Play logo

Android Market, the typical android counterpart to iOS. Widely used, known, and enjoyed.

Recently, Google added Movies, Music, and Books to the Market. Thanks to the general nature of the word Market, no name change was necessary.

All of your music showed up in the separate Google Music app. Your movies in the Google Movies app. Simple enough, right?

Google disagrees.

Google has completely ditched that entire scheme around a new name: “Google Play”. Google Play is the new name for the Android Market, while the Google Music app has changed to “Google Play Music” and movies changed accordingly to “Google Play Movies.”

Honestly, it’s nice that they’re congregating all of their purchases under one name, however “Google Play Movies” sounds like someone with awful grammar trying to say Google Plays Movies. I think they just need a semicolon – Google Play: Movies… actually, no. They just should have gone with something other than Play.

The new logo and name are all that has changed – the general interfaces are still identical, so nobody needs to freak over yet another interface change. However, it’s still a bit annoying that Google decided to mix everything up – all at once – and will probably manage to confuse a lot of people in the process.

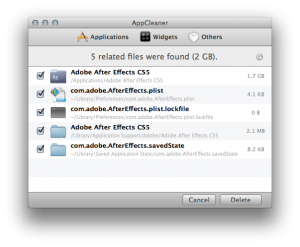
AppCleaner: A Thorough Uninstallation

One of the conveniences of Mac is that applications come in packaged files ending in .app. For this reason, they are usually said to be easy to uninstall – just delete the .app file from your applications folder and it’s gone.

True, this will get rid of most of the files, but often there’s still some application metadata gunk left laying around in hidden folders.

That’s why AppCleaner is so handy.

Drag in a .app file, and it will find all of the supporting files and allow you to delete them. This allows you to get a completely clean uninstall of an application on your mac.


Did I mention it’s free? Pick it up from FreeMacSoft using this link. Enjoy!

Bananapress: a super-simple CMS

WordPress is wonderful. People love to use it, and some extremely beautiful and large sites implement it as their backend.

But then there’s those who get tired of wordpress. It works, well, yes. But it is a bit heavy, it can be a bit slow, and it’s not the lightest thing in the world.

So you try our Drupal, but that’s just disgusting – the interface is impossible to use, it has high requirements, and the error messages are nearly indecipherable.

There’s plenty of other CMSes, but they’re all a bit blech. So I decided hey, why don’t I just make my own?

That’s why I made bananapress. It started as just for personal use, then I realized that I could easily create an installation script and make it open source for all of you to use.

Bananapress is a bare-bones simple CMS. It only requires PHP v5.2 and a MySQL Database. Unzip the file, put it in the root of your domain, then go to http://yourdomain.com/install. It will give you instructions on editing the config.php file (I’m hoping to make that webpage be able to edit the configuration file, but I’m not familiar with write and reading text files in PHP). Put in your database information in the config file, then click next on the install page. It should configure a database for use with your site.

Now, you can go to http://yourdomain.com/login.php, enter the password that you entered in the config file, and write and save your first post. Voila, it should show up on your homepage.

And that’s it! I’m working on getting an editing page and some more documentation for it, but it’s a work in progress. So far the feedback has been good.

Feel free to check it out for yourself by going to http://bananapress.co.cc !