Tutorial for Everyone: LaTeX

There may be times in your life where you need to make a mathematical figure or equation on your computer.

For me, as a high school student, this occurs often in both math and biology. There is no easy way to create a fraction that looks nice in word. Most people use awkward line spacing and tabulation to make fractions, but isn’t there an easier way?

Yup. It’s called LaTeX. LaTeX is basically a markup language that is often used to draw equations.

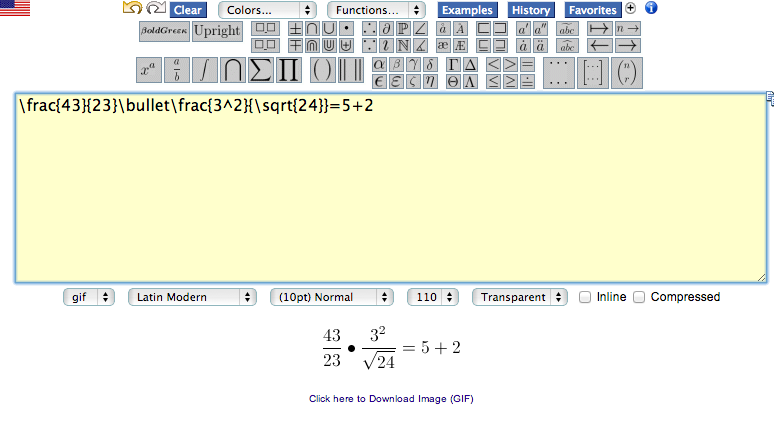
Start out by going to The Codecogs Equation Editor.

Up above you’ll notice a giant bank of mathematical symbols and templates.

Click one of these and you’ll get some markup in the text box with some empty brackets. Stick some numbers in the brackets and see what happens below the box.

Screen Shot 2013-10-08 at 11.43.46 PM


Look at that, you’ve created a mathematical figure!

To extend your equation, just keep adding symbols and they’ll fill from left to right. You can also nest these items within each other, so you can have a fraction within a fraction, a number with an exponent within another symbol, and so on.

Screen Shot 2013-10-08 at 11.46.24 PM

Using this, I bet most of you will be able to figure out how to write some great and useful equations just by playing around with it.

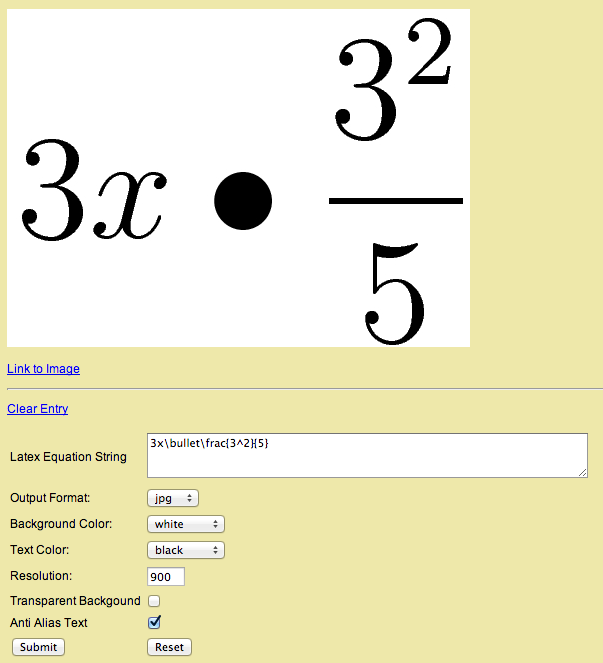
Once you’re satisfied with your equation, you can click the “Click here to Download Image (GIF)” link and a GIF of your equation will be downloaded. It won’t be very high resolution, but if it’s resolution you want I recommend copying your completed LaTeX markup from the Codecogs editing website and pasting it into Roger’s Online Equation Editor. Here you can put in a giant resolution and download an image in some other format.

Screen Shot 2013-10-08 at 11.52.11 PM


Another use I’ve found for LaTeX is in my high school chemistry class. As we discuss radioactive decay, it is necessary to notate isotopes and decay equations on a computer. Luckily, LaTeX is here to save the day.

Lets say that you have an Iodine-131 atom on the left which decays into a Xenon-131 atom and a beta particle. This can be notated in LaTeX with

_{53}^{131}\textrm{\textbf{I}}\rightarrow_{54}^{131}\textrm{\textbf{Xe}}+_{-1}^{0}\textrm{\textbf{e}}

You can probably figure out what all of those things relate to in the result:

eqn8694

So there’s your primer on the basics of LaTeX. Enjoy!

New in iOS 7 Beta 4: Snapchat Screenshots

What has the world come to when I’m posting about the ability to take screenshots in Snapchat?

I need to get out more often…

In the release notes of iOS 7 Beta 4, there was this sentence:

Active touches are no longer canceled when the user takes a screenshot.

This means easy screenshots with snapchat, or any other app that shields the truth when you try to take a screenshot.

In the past, snaps would close upon trying to take a screenshot. No longer!

For you iOS 7 Beta users, you can take screenshots of your snaps by holding your finger on the snap and using another hand/fancy finger-work to hit both the home and power buttons simultaneously.

And for all you snapchatters out there, beware of the snapshotting possibilities.

(P.S. I really haven’t been posting enough lately. I need to decide whether I want to write long and analytical posts every once in awhile, or keep a stream of less interesting but still relevant news articles coming through. Hmm.)

Axis: App Shortcuts on your Lockscreen!

App Shortcuts from your Homescreen!

App Shortcuts from your Homescreen!

One of the cool features of the iPhone is the camera button on the lock screen. The camera is just a swipe away from the lockscreen, meaning you won’t miss anything while fumbling for your Camera app.

Well, here’s a jailbroken tweak that will allow you to add more shortcuts to your homescreen just like the Camera shortcut for any app you so desire.

The app is called Axis, and it is available from Cydia for $0.99. This means that you need a jailbroken device.

Once installed, open the Settings app and find the Axis settings pane. Change around which shortcuts you want to do what, and the next time you unlock your iPhone you’ll notice that… it looks the exact same. What?

thing3Now put your finger on the little Camera shortcut. You’ll see the “slide to unlock” slider is replaced by all of your shortcuts. Slide your finger over one of them and swipe up to open it.

And don’t worry about your passcode – Axis will request your passcode before you open up an app.

Personally, I like to have my Phone, Messages, Spotify, and Google Maps at my fingertips. You can play around with the Axis settings and customize the shortcuts to any app of your desire. Enjoy!

How-to: Install Facebook Home on Any Android Device

Screenshot 2013 04 14 22 08 09

In case you missed the news, Facebook recently announced Facebook Home, a home screen replacement for android. In a nutshell, when you hit your Android device’s home button, it will bring you to a home screen where you can scroll through and interact with your friends’ posts.

Facebook announced that it would be available on the Google Play Store for a select few devices including the Galaxy SIII and HTC One X. But what about the rest of us?

Don’t fear! Where there’s a will there’s a way, and thankfully the guy with the will made the way easy enough for even the most basic of simpletons to accomplish.

Here’s how to get Facebook Home on any Android device.

First, open Settings on your android device and go to Security. Check the box that reads “Install applications from unknown sources.”

Second, go into Settings > Applications and find and uninstall any Facebook and Messenger app that you’ve already installed.

Now, go to this blog post on your Android device. To make it a little bit easier, just type in this short link: http://a.swsr.info/YouxEG

GMG TO ANDROID, DO YOU READ ME?! Good.

Now, still on your Android device, click HERE, HERE, and HERE.

In your status bar, you should notice a little download icon. Install all three of the files that you just downloaded simply by clicking them and hitting install.

Next, look in your app drawer and you’ll find Facebook home. Open it and log in, and you’re done!


The success of this process has varied depending on your device, however I have it working wonderfully on my Nexus 7.

Enjoy!

Credits to Modaco founder Paul O’Brien for this patch.

Thank Goodness: Evasi0n Brings iOS 6.1 Jailbreak to All iOS Devices

Finally, the iOS haxing community has come through. Ever since the release of iOS 6, there has been no jailbreak available for any device past an A4 processor. Not any more! The Evad3rs Dev Team has brought us a Jailbreak for any iDevice running any version of iOS 6. This includes

-iPhone 5
-iPhone 4S
-iPhone 4
-iPhone 3Gs
-iPad with A6X chip (4th gen)
-iPad 3
-iPad 2
-iPad mini
-iPod touch 5
-iPod touch 4

The jailbreak is beautifully straight-forward and available for Windows, Mac, and Linux for an always beautiful $0. 

Read more and download here.

How-to: Turn the Chrome Omnibox into a Feeling Lucky Box

“I’m Feeling Lucky” is one of the most underused Google Search services in existence. For those who don’t know, I’m Feeling Lucky simply redirects you to the first search result for whatever you enter. For example, if you go to google.com, type in Good Morning Geek, and hit “I’m Feeling Lucky,” it will bring you straight to goodmorninggeek.com. If you type in “Llamas Wikipedia” and hit “I’m Feeling Lucky,” it will bring you straight to the wikipedia page for Llamas. This is convenient because it usually gets you where you want to go without the need to have the search page middleman.

In Google Chrome, the top bar serves as a URL bar and a search bar – referred to as the “OmniBox.” Typically, you can enter any google search into that bar and it will take you to the search page. Here’s how to turn it into an “I’m Feeling Lucky” box, so that if you type Good Morning Geek into the bar, it will take you straight to GMG!

1. Go into Chrome’s Preferences and click “Manage Search Engines.”

2. Scroll to the bottom and click “Add New.” In the first field, type “lucky”, in the second field type “lucky”, and in the third field copy and paste (without the quotes) “http://www.google.com/search?q=%s&btnI”, then hit okay.

3. Open “Manage Search Engines…” again and find the lucky search engine that you just made. Hover over it and click the box on the right that says “Make default.”

4. Hit Ok at the bottom, and enjoy! Try it out: type “ostrich wikipedia” in the search bar and hit enter, and marvel at how it magically redirects you!

If there isn’t a result with enough in common to be sure, Google will just redirect you to the search page.

If you want to do just a normal google search, just type in “google” then press tab, and enter your search.

Enjoy!

Fotoclips

Ah, photography. The practice of capturing moments in a still representation of the world, then bringing them back to life with just a glance.

Photographs are awesome. We take cameras and photos for granted, as we can capture a moment of our lives at anytime and anywhere thanks to phone cameras. Really, photos are something that our lives wouldn’t be complete without. What if you never had that picture of your boss wearing a party had upside down (didn’t think that was possible, did ya!)? Or of your cat standing up?! Or of that lizard licking your friend’s nose?!

There are some things that we just can’t keep in our mind in full detail. We can’t remember moments exactly as they happened (unless, of course, you have photographic memory), so we have photos to help us. They’re captures of our world that can be stored and recalled to bring back memories that we may always treasure.

Once we take these magical photographs, we can do one of a few things with them.

One option is to leave them on our phone to be scrolled back to when showing something to someone.

Or you could upload them to facebook to share that magical moment with all 1,500 of your closest friends.

I like to do something else with my photos – something that is unfortunately hard to find these days, but it’s still a practice that we will never be able to replace:

PRINTING.

Yes, like with paper. And ink. (gasp)

Printing is this amazing practice where you get a physical copy of your photo which will exist without electricity and without the internet. It’s a magical thing that people really aren’t wont to doing anymore.

And there’s another benefit to printing your photos: You get to display them wherever you desire. With a printed photo (and maybe a little bit of tape), you can put that memory wherever you please and you’ll always be reminded.

This is often done with a picture frame. Honestly, I have nothing against the picture frame. You get your photo with a border of sorts behind a piece of glass standing up wherever you want it, or nailed to a wall. It’s a great idea, the picture frame, that will always be prominent (at least around people who actually print some of their photos). But I think that we could be a little more creative. We are the world’s artists, the world’s craftsmen – so we should build something for our photos that really makes the world – and our walls – a better place.

Ladies and gentlemen, I introduce fotoclips.

Yup. That’s it. That tiny little plastic clip.

But with simplicity comes possibility. With this clip, two photos can be joined together.

With two clips, you could conjoin three photos.

Imagine what you could do with 100 of them, hmm?

Fotoclips are the super simple way to make awesome things out o

f your photos. These turn your photos into building blocks, and the rest is up to your imagination.

One pack of Fotoclips comes with 100 of those 2D clips, and 10 orange clips. These magical clips transport your photos into a new dimension – THE THIRD ONE!

These orange clips let you make corners – meaning that your photos can turn into amazing things like boxes and rectangles!

Fotoclips take your memories and make them even more creative than they were in the first place.

Imagine the possibilities!

In the past, fotoclips have been used to make wall murals, hats, lamp shades, and even dresses. A photo dress – now that’s what I call creativity!


Fotoclips are also awesome because they involve no glue and don’t damage your beautiful snapshots at all. If you ever get bored of your creation, just take it all apart and build something new. It’s that simple.

One of the most popular things to do with fotoclips is to make wall murals.

That’s a mural that I made out of the first prints off of my Lomo LC-A+. Each fotoclip has a little hole drilled out in the middle where you can stick a nail, or a thumbtack, or anything else you desire – but due to the condition of the wall, I just put some painter’s tape on the back of each photo to hold it up.

Want to make your own photographical compositions? It’ll only cost you about ten buckaroos over at the Lomography shop. The possibilities are only your lunch money away!

Fotoclips at the Lomography Online Shop

How Secure is Your Password?

I was doing internet-type things and stuff when I stumbled across this clean, simple, and useful website:

http://howsecureismypassword.net

It’s simple. You type in your password and it estimates how long it would take a standard desktop PC to guess your password based on the length, words, characters, and numbers that you’ve entered.

Even better, it tells you what you should fix. It will say if it’s too short, or if you need more characters, or if it shouldn’t be based off of a word. It tells you how secure your password is then tells you how to make it even more secure.

It also has a database of the most common passwords that it compares to. So if your password is under that category, you might want to seriously reconsider your online security situation.

These are all nice, but there’s one part that I absolutely love: The background. If you put in a super awesome, secure password, it will turn green. It does this by checking the password against the database, and if it’s good, it returns it to javascript which then changes the background color. The background color change is a nice, even fade thanks to CSS3 transitions, and they even bothered to add in entries for webkit, mozilla, and opera. Oh how I love CSS transitions.

And their font is nice.

http://howsecureismypassword.net


How-to: Change iOS Signal Bars to Number

This little hack allows you to view your signal as a dB rating instead of bars. It will show as a negative number, and the closer you are to 0 the better the signal you have. This is handy because it offers you more insight into your service beyond a 1-5 bar scale. 

1. Open the Phone application from your home screen. 

IMG 0391

2. Go to the dialer and enter *3001#12345#* followed by Call.

IMG 0392

3. An application called Field Test will open. You will notice that your signal bars have now changed to a number. Press and hold the power button until you see the “Slide to Power Off”, then press and hold the home button until you are back home.

IMG 0393 

That’s it! To change between the bars and the number, go to the home screen or the lock screen and tap the signal indicator. 

IMG 0394

Enjoy!

MightyText: Desktop SMS through your Phone

Over the years, there have been many different solutions to texting through your computer.

A couple of carriers would allow you to text over their web interface, but it was usually very unreliable and, well, bad.

Google Voice allowed you to get a phone number that could be used through your computer, phone, or any other internet connected device – but this required you to get a completely different phone number.

iMessage allows you to text from your computer if you have an iOS Device, but this only works for Macs and iOS.

Well, there’s finally a solid solution for us android users: MightyText.

It’s really simple. Install the free app on your android device, install a browser plugin, and you’re good to go.

The entire system works through the cloud. When a text is received on your phone, it pushes the information to the MightyText servers, which then push it back down to your computer. This means that the system will work even if you aren’t anywhere near your phone, as long as your phone and your computer are both connected to the internet.

The computer interface is web-based, and the browser plugin allows notifications to pop up when you receive a new text. The interface isn’t half bad, and if you decide to sync your contacts with Google, then you can get all of the names in the text interface as opposed to all of the phone numbers.

As I said, it’s completely free, and all that you need is an android phone running 2.2+ and an internet connected computer.

Get it on Google Play

Install Browser Plugin (Firefox, Chrome, Safari, and IE (but hopefully not))

Koush Brings us Root Free Tethering

Koush, you have improved the lives of android users once again.

In case you don’t know, Koush is the creator of ClockworkMod, the custom recovery that is used by rooters worldwide.

Koush has now brought us a root free USB tethering solution, for all of you who are either having problems with rooting (like if you have a rooted Galaxy Nexus and you updated to 4.0.4 OTA and your root is gone and no matter what you do you can’t get it back, *cough* *cough*) or if you don’t want to root your phone out of fear of destroying it.

It’s an extremely simple application. On your phone, you download the app for free from the android market Google Play. The free app is a 14 day trial, but you can buy the full version as an in-app purchase for $4.99 (worth it!).

Once you’ve downloaded the app on your phone, you just need to get the drivers for your computer. Now, you’re probably going to be downloading this app because at the time you don’t have internet, and Koush has thought of that as well. In the android app, you can download the app files onto your phone then transfer them onto your computer for installation. Genius!

The small connection application is available for Mac, Windows, and even Linux. Ubuntu users rejoice!

Once you’ve installed the driver, you’re ready to go. Tap the USB icon on your phone, click start on your computer, and in a few seconds, your computer will be connected to the internet through your phone’s network. Easy as that!

If this comes in handy for you, I highly recommend that you buy the app. Koush has created some amazing things for android, and without him flashing ROMs would be nearly impossible.

Thank you Koush for all of your contributions to Android!

Click here to download the app for Android.

Why I like old stuff

I have a bit of a thing for vintage stuff. Typewriters, film cameras, vinyl records, I like these old everyday items. Here’s why:

Typewriters

IBM Selectric II, Brother Charger 11

Typewriters are nice mostly because there’s no printing. You press the key, the letter appears. You’re done. That’s it. Also, they often don’t require electricity, meaning you don’t have to worry about running out of battery juice. And even if you have an electric typewriter and it loses power, your work is not going to disappear. After all, typewriters have letter-by-letter autosave! How hi-tech!

Also, typewriters are very palpable and mechanical. You touch something which directly affects something else and causes someting else to happen which eventually stamps a letter onto paper. It’s a direct, tangible connection to what you do and what happens.

Film Cameras

From top left to bottom right: Polaoid OneStep Rainbow, Polaroid M80, Polaroid OneStep express, Sprocket Rocket, Diana F+, Pentax K1000

Film cameras are fun partially because of the surprise aspect. You never really know how the final product will turn out until you develop the film. In addition, you never run out of battery – one roll of film and you’re good for 24 (or 36) shots, whether they’re taken all in one second or all in one year.

Similarly to the typewriter, film cameras are palpable. It’s a direct reaction between the light coming in through the lens and how the strip of film under it reacts. It’s a direct connection between what is seen and what is captured.

Another little benefit to film is that the resolution is very high, and is usually dependet on the highest possible resolution of your scanner. A square inch of film has way more silver hallide crystals on it than a camera’s sensor.

Vinyl Records

Vinyl records are known for their sound quality and natural, warm tones. Because vinyl records are analog, they skip the digital conversion into 10100010100100010101010101 (binary) and are straight from analog sound to analog etchings into vinyl to analog sound.

In addition, vinyl records are touchable, tangible, existing things. You can actually hold the music itself, as opposed to some imaginary sequence of 101010101010101011000 (binary).

Conclusion

All of the above items have a couple of things in common. First of all, advantages to digital counterparts. Typewriters don’t need electricity and auto-save on a letter-to-letter basis. Film cameras don’t need electricity and have very very very high resolution. Vinyl records do need electricity, however they have outstanding sound tone and no digital conversion.

The other thing that all of them have in common is their direct palpability. No electrical signals, 101001010110001111, encodings, or digitization; nothing but direct, easy-to-understand cause and effect.

I understand that many may disagree with me, and I would love to hear about that in the comments below.

side-note: feel free to check out my new personal blog http://swsr.me, and follow me on twitter/instagram: @maxswisher on twitter, @maxswisher on instagram). Also, if you enjoy my writing, please please PLEASE make a small donation towards the cause!