Cortex App

No matter what we all browse the web. That’s how you got here in the first place. And one of the most popular things to do while browsing the web is to share different web sites with other people over facebook, twitter, and even tumblr (in this case). And sometimes you will come across an article that you want to save to read a bit later. Cortex lets you do all of those, but extraordinarily quickly.

Cortex is a chrome extension, which gives it cross-platform flexibility along with a super easy installation.

Once you have installed cortex, you need to connect your accounts by clicking on the pretty circle on your menubar then clicking connect accounts.

Connect your accounts here

As you can see, it can link to twitter, facebook, tumblr, and instapaper. Each of them use their own authorization system, and if things aren’t working right then try restarting your browser or waiting a few hours then restarting your browser.

Now, you have to pick your facebook friends. Sadly, you cannot post to your news stream. But you CAN post to other people’s walls, and click pick friends to select which friends you want to be able to share with.

Once you have accounts set up, it is time to start sharing.

To share a webpage it’s pretty simple: click and hold your mouse anywhere on the webpage. You should see something like this show up around your mouse:

Now when this shows up, keep your mouse held down and hover over which service you want to share the page with. Once you are on the letter/section, let go of your mouse and the link to the webpage will be instantly shared.

For facebook however it is a little bit more complicated.

When you hover over the f, another wheel will appear that has the profile pictures of the friends you selected up here.

Now, move your mouse over which friend you want to share it with, and now you can let go.

Although it may sound like it will take a long time, here’s proof otherwise:


I made that video when I was bored. 😛

To get cortexapp, you have to go to cortexapp.com and sign up for the beta then cross your fingers that you get an email back. 🙂

Rent an iBook?

Apple has been boasting about their iBooks app featuring the iBookstore. I’m soon going to be taking a trip to Japan, so i’d like some books to read on the way there. So instead of csarrying around books I’d love to just take my beautiful thin iPad.

But all of the books in the store are about $15 (varying on the book). I could just go down to my local library and get it for free and just give it back when I’m done.

So woultn’t it be great if there was an iLibrary instead? How about you can download the book for free, but just like rented movies it could only be on one device. How about you could send it to someone else if they want to read it? And how about there’s a due date, and you can renew it 2 times before it needs to be sent back to the library. And if you don’t want to send it back or you are saving it, you could just buy it?

Now as good as this sounds, I doubt that the publishers would be in much favor. After all, the iLibrary wouldn’t be paid for by taxes.

But how about the libraries offer books in ePub format, and you can rent them and sync them to your iPad? Apple would have to add support for rentals, but they wouldn’t have to deal with the publishers.

Sounds good eh?

Hopes and dreams…

Turn your iPad into display with Air Display

Well, you got your shiny iPad. It does everything as advertised. But it can do even more. You can turn it into a secondary display for $9.99!

First, on your iPad, download an app called Air Display for $9.99.

Next, connect your Mac (sorry PC users, this won’t work for you) and iPad to the same WiFi network (if you don’t have any available create an AdHoc network on your mac). Then, open the Air Display app on your iPad. It will give you detailed instructions on how to download and install the plugin for your Mac (free). I’ll walk you through it anyway:

First, download the plugin at avatron.com/ad. Then, install the package and restart your computer. Make sure your iPad is awake and Air Display is open. Click on the Air display icon on your mac’s menubar and select your iPad from the list. Your screen will turn blue, then your iPad should be connected. By default, your iPad is configured to be on the left. So drag a window off of the left side of your main screen and it will appear on the iPad. cool! You can also touch on the iPad like a mouse (no right click though).

Now that you have your Air Display configured, lets personalize it.

Open System Preferences and click Displays. You will see a window show up on each of the displays. But the one we really want to use is the one on the main display (the main display is the one with the Menubar at the top). You will see that on this display there is a window that has an arrangement tab at the top. Click Arrangement and here you will see two screens: the smaller one is your iPad. You can click and drag you iPad to a different side of the main display depending on the physical position.  You can also drag the menubar to the iPad to make it the main display.

Now this is cool and stuff, but a really cool use is that you can finally run flash on an iPad! the fps is less then 30, but it will do for the most of us.

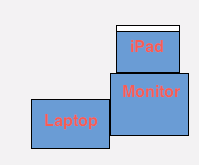
Now if you have a physically plugged in external display, this means that you could have 3 screens without having to buy something like the viBook for $120. Here’s how I set it up with the Air Display:

System Preferences Arrangement

As you can tell, I have the Macbook to the left of my monitor. I then put my iPad on top of my monitor and am using my iPad as my main display;. This eliminates desktop clutter, and when working in photoshop all of my tools don’t get in the way so I can work on a pretty big image.

Here’s how it looks in real life:

By default the wallpaper won't span

As you can tell, it looks similar right? All of my icons are on my iPad along with the menubar, allowing more room on the main display. Sadly, the wallpaper doesn’t span across all of the monitors automatically, it just takes a lot of cropping in photoshop so you get three different pictures that eventually come together as one image. Also, cool picture right? It’s a portrait of me drawn by one of my friends. If you look on the iPad, you’ll see a thought bubble with binary.

Sadly, you need to add the iPad as a display with the menubar icon every time you restart your computer. Also, it’s hard to use it while the iPad is syncing.

There’s a cool way to impress your friends!

[ad code=1]

Offline Pages for iPad

Over 1,000,000 iPads have been sold, and I just got the WiFi version. But I know many went for the 3G version because they could browse the internet anywhere (that is, if you’re in Texas of course). But what if you don’t want to pay the $30 for unlimited, or just have the WiFi version? Offline Pages is a free app that allows you to download pages and view them on your iPad even when you don’t have an internet connection.

And It’s actually quite easy. First, open the app on your iPad. The interface is simple. At the top there is a URL bar where you can browse to the page you want to save. Once you’ve found it, you can tap the button directly to the right of the URL bar (the down arrow into the box thing) to save it for viewing later. A small red badge will appear over the button to the left of the URL bar indicating that it is being saved. After the badge has disappeared, you can safely close the app and go anywhere knowing that you still have the webpage.

To view the webpage, just tap the button directly to the left of the URL bar (the box with the papers in it) and your saved pages will be listed. Tap on one to see it.

But there is one problem with this method: What if you are browsing pages in Safari with an internet connection and you find a page you want to save for when you are on the road? You’d have to copy and paste the URL, then go into Offline Pages, open the page in offline pages, and save it. Oy Vay!

But these people are amazingly smart. They know that, so they created a bookmarklet to do it for you. To install the bookmarklet, just go into the options and under general there is a selection to install the bookmarklet.

This will bring you into a webpage in safari, and amazingly you can install the bookmarklet to another iPad or computer!

Tap which ever one you want to do and it will give you step-by-step instructions to install the bookmarklet.

After you’ve done so, just browse to a page in safari, tap the bookmarklet, click save to iPad, and Voila! Just open Offline Pages and the page will be saved for offline viewing. Great if you are going on an airplane without WiFi!

Even better, the app is free and for iPod, iPhone AND iPad! Bravo! [Applaud]

Click here to be redirected to iTunes.

WeatherBug for iPad

If you just got that new shiny iPad, it may be a great tool for checking the weather, in fact, there’s an app for that!

So I have tried the weather channel, but similar to their iPhone app it is quite buggy. But luckily i found weatherbug which has a very nice interface and is very functional.

When you open the app, you are greeted with a radar map and a bar on the top.

The bar on the top has multiple squares with current conditions, live cameras, a forecast, and if you slide the bar left it acts like a page. You a then shows hourly forecast, active alerts, and a video thingy. You can tap the different boxes to see a more detailed view.

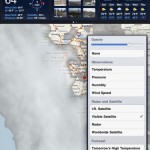
On the map, you can click on map settings to change the view to temperature, pressure, humidity, wind speed, infrared satellite, visible satellite, and radar. Cool!

You can also press the play button in the bottom left to see a time-lapse of the radar images.

The app is free from the app store as well. Yay!

Pictures of some of the features are shown here.

[ad code=1 align=left]