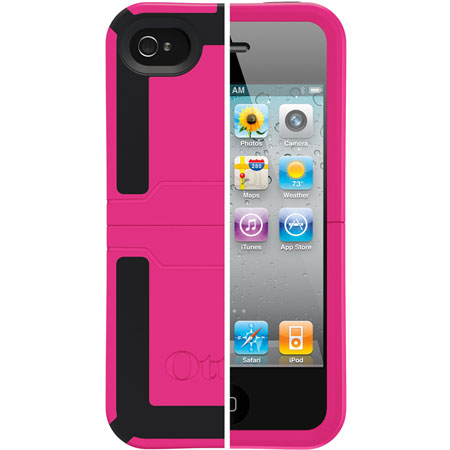
Otterbox Reflex Series for iPhone

Otterbox is well known for their amazingly stylish yet rugged cases. The Reflex series is a new case from otterbox, and it boasts a whole new design.

Here’s how cases work: When there is a shock in one part of the case, it is absorbed by the rest of the case, usually by a form of flexibility that causes shock absorption. This is sometimes accomplished by rubber, the flexing of plastic, or other various materials.

What the Reflex series does is brings a hard plastic shell, but in places of the shell there is flexible rubber that crumples and flexes to absorb the shock. This design was inspired by the crumple zone of a car, and from the result of shock on the case it works very well.

The other feature that Otterbox is known for is style. The Reflex Series comes in a variety of colors, all of which have nice, even, black rubber highlights where the crumple zone is. Instead of hiding the crumple zone, otterbox has used it to enhance the style of the case. Genius!

A new feature of the case would be that the bottom half slides off for docking access. In the past, you had to completely remove the otterbox cases to accomplish this, but thanks to the innovation in this version full case removal is no longer necessary.

The Reflex Series is available only for the iPhone at the moment, but in the future will be available for the BlackBerry Curve and iPod Touch (4th Generation). You can purchase it by clicking here for about $45.

[Thanks to Otterbox for sending this to me for review! You guys make awesome cases! :D]

CyanogenMod 7

Of all of the ROMs floating around out there, Cyanogen is by far the most established custom after-market ROM available.

CyanogenMod 6 brought froyo features to 2.1, and was later updated to 2.2 It was then very similar to a basic 2.2 ROM, so it became outdated. But CyanogenMod 7 brought us a loaf of gingerbread this time around. This has put it much higher up.

In addition to the new faster and cleaner base operating system, CyanogenMod brought some new interesting features to the table.

Lockscreen Gestures

The name says it all. On the lockscreen, you are able to perform gestures that will do different actions, including enabling the flashlight, unlocking the phone, opening a shortcut, or opening an application.

DSPManager

I have really found no use for this quite yet, but others might. It allows you to modify your sound outputs. You can modify headset, speaker, and bluetooth separately, and in each pane you get options for a bass booster, and you also get a nice equalizer that is quite easy to modify. I don’t exactly know why you might need this, but I guess some audiophiles on a higher degree than me might appreciate it.

Themes Support

The operating system comes with a built in theme chooser and three themes. You can download new themes online on many different forum sites (such as xda-developers) and easily install them. One package includes the theming for the WHOLE operating system, including home screen, highlights, menubar tweaks, etc.

Incognito Mode

This feature is rarely used, but I guess could come in handy. Identical to the incognito mode in Google Chrome, this will prevent your phone from saving cookies, history, cache, or anything.

Installation

Installing this ROM was fairly simple, however it doesn’t come with Google Apps built in.

First, go to http://cyanogenmod.com and select your phone, then download the ZIP for your phone and put it on your SD card. Open up ROM Manager and select “Install zip from SD card.” Select the zip of CyanogenMod, then check the box that says “Wipe Data” and the box that says “Backup current ROM.” Continue with your installation and you will be greeted with CyanogenMod. You may notice, however, that there is no Market, YouTube, Gmail, etc. To install those, download the zip for your phone here and then flash it. To do this, transfer the Gapps zip onto your SD card and boot into recovery by booting while holding the down volume button. In the menu that comes up, select Recovery, and wait for it to boot. In the next menu, select “Install ROM from SD card,” select the Gapps ROM, and let it install. Then, reboot your phone, and you will be greeting with a Gapps enhanced CyanogenMod. Enjoy!

[For more info on installing ROMs and rooting, read my full guide here.]

How-to: the Ultimate Laptop Upgrade (RAM and SSD)

Your laptop has a few mainly functioning parts. The hard drive, the RAM, and the CPU. The CPU, unfortunately, cannot be replaced, as in Macs they are soldered on to the logic board. however, you can upgrade  the other two things. Lets start with the hard drive.

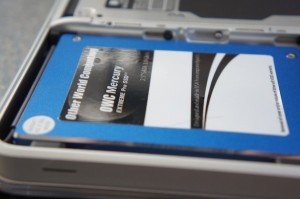
Ultimate Hard Drive Upgrade: OWC Mercury Extreme Pro SSD

When you write and read data from a computer, you write/read from a hard drive. This is a small metal box with a few spinning disks inside and a needly thing that writes the data across.

An SSD looks (on the outside) just like a hard drive. It has the same connections and the same dimensions. But a peek inside reveals lots of chips, and a lack of moving parts.

That’s because SSD stands for Solid State Drive, because they are just that: Solid state.

But one of the biggest advantages to that would be the speed. I can write/read from this thing at a blazing 3GBps. Also, it holds a world record for fastest internal SATA II Drive. What does this mean for the user?

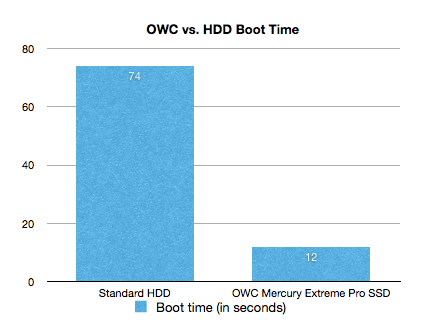
Lets look at some in-house tests.

With a standard hard drive: 1:14 to boot.

With this OWC Mercury Extreme Pro SSD: 00:12.

That’s enough proof for me.

And as far as apps go, they launch FAST. I can launch 6 applications and have them all open and running in less than 4 seconds.

This means that when you open things, they take less time to open. Enough said.

If you’re looking to upgrade your computer, this is probably one of the first things you should upgrade. Even though you might want a faster processor, it won’t speed up how long it takes for something to go from your hard drive to your screen.

The OWC Mercury Extreme Pro SSD comes in many sizes. I purchased the 115GB drive for approximately $230, and you can find this series here.

The ultimate RAM upgrade: Crucial 4GBx2 Kit

When you’re interacting with applications, a buffer of everything is stored in RAM. This is Random Access Memory, and it is made so that you can randomly access it. It’s extremely fast, which is what allows things like pop-up menus to instantly drop down. It’s also what keeps the base operating system going, and if you have so many applications running that your RAM is full, everything becomes hard drive base. Translation: things freeze, slow down, and crash. The easiest solution to this is to get some more RAM.

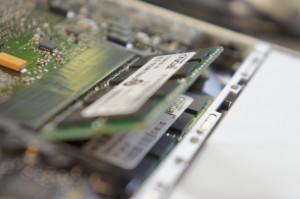
I ordered crucial’s 8GB RAM kit, as it wasn’t too expensive and seemed like it would work well. Most laptops have two RAM slots, so my 8GB kit came with 2 4GB chips. The amount of RAM that your computer supports varies. If you have an older Aluminum MacBook, then you can fit 8GB in there. However, the current MacBook Pros only support up to 6. Search for your model on crucial.com to find exactly what RAM you need.

Installation is fairly simple. Just take off the bottom of the laptop with a screwdriver, and move out the tabs next to those flashy green RAM chips. Then, smoothly slide out the chips, and replace them with the new and bigger RAM you got. Seal up that wound on the bottom of your computer, and voila, you have more RAM! No drivers necessary. If you have the MacBook 5,1, click here to get 8GB of RAM. If not, click here to go to the crucial site and find what RAM will work in your model of computer.

The result

Your compter will boot faster. Things will open faster. Things will run faster. Things won’t freeze. Things will crash less. In general, things will be faster and more stable. Enjoy!

Using AirPort express for AirPlay alongside a Time Capsule

You may remember that a long time ago I reviewed the Time Capsule. It’s a wonderful wireless AP, and all of my data is totally safe.

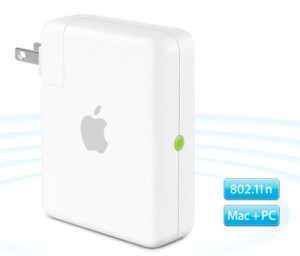
But the Time Capsule doesn’t have AirPlay. On AirPort extremes and expresses, there is a headphone jack, and when connected, you can wirelessly stream your music to your speakers from your iDevice.

I’ve had an airport express for a long time, but I stopped using it when I got my time capsule. After hearing about the AirPlay improvements, I decided to break the thing out.

The AirPort Express creates its own WiFi network, and if I’m connected to that then I won’t be able to backup to my time capsule. Luckily, it is now possible to plug the AirPort Express directly into the Time Capsule, and have them both work as the same wireless network. This means that I can stream music AND backup at the same time!

With this all settled, you will now see the AirPlay icon appear on all of your devices. From this point on, it’s all extremely easy. Just tap the icon and up pops a menu of all AirPlay devices on the network. Tap the speaker system you wish to stream to Voila, we have wireless music!

If you’re on a computer, however, you can only stream your music from iTunes. That is, of course, unless you have an app called AirFoil.

This allows any application on your computer to output sound to your AirPlay speakers.

However, there’s a small issue.

There is a two second delay between when you cause the sound to happen and when it actually comes out of your speakers. On the iDevices, the movies are in sync because they are decoupled 2 seconds back. When you change the volume on your computer, you will see the small notification popup, yet you won’t hear anything for two seconds. Quite annoying.

For videos, AirFoil has included the “AirFoil Video Player.” I don’t know if it’s very good, as I can’t even get it to work without freezing and crashing.

In general, this system is simple and functional. But if you’re trying to stream content from your computer, you will notice an extremely distinct delay. It’s not like that audio quality isn’t good, so all audio (including pandora and other streaming services) work fine.

AirPort Express

AirFoil

Plugable USB 2.0 USB Graphics Adapter

Monitors are an increasingly popular thing. They increase productivity, allow more room for multitasking, and prices are rapidly decreasing.

The poweruser knows:

I can buy a computer with a graphics card with multiple ports on it so I can plug in multiple monitors.

But I hear:

I am going to buy a large bulky computer that i$ really expen$ive $o I can plug in multiple monitors.

So what about the people who get a laptop, and use an external monitor with it, but want more?

That would be me.

There’s only one monitor port on my computer, which was already taken.

So for my third monitor, I used an old Mac Mini that I had lying around.

But the problem with this is that it was a totally different computer, so all of the logins were different, I had to use a network based mouse and keyboard sharing system, it was just terrible. And worst of all, all of the files on each of the computers were different. So when I wanted to open a document on my third screen that was on my first computer’s hard drive, it wasn’t possible without moving around the file first.

Alas, there is now a solution. And the title of this post says it all.

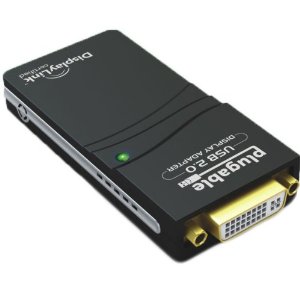
The Plugable USB UGA (Usb Graphics Adapter I’m pretty sure) works just like it should.

In the box

  • Plugable UGA
  • DVI to HDMI Adapter
  • DVI to VGA Adapter
  • Mini USB cable

Setup

Lucky for you, setup is fairly easy.

Before you do anything else, you need to go to the displaylink site and download the Mac drivers. Luckily, there is only one option for a driver, so you don’t have to make that half-minded decision on which one will actually do the trick.

After you have installed the driver and restarted your computer, you can start plugging things in.

As expected, use the mini USB cable to plug the UGA (the biggest piece) into your USB port. Then, plug in your monitor cable, using any adapters if necessary. If your monitor is DVI, then you won’t need any adapters and you can plug your cable straight into the UGA.

If your monitor is VGA, then you can just add the DVI to VGA adapter on top of the UGA, then plug your monitor into that.

Voila, it should start working. Your screens should turn blue and another wallpaper should appear on your USB Monitor.

For further configuration, just go into your System Preferences, click Displays, and click Arrangement. You can arrange your monitors so that they are extended displays and you can move your windows across all of them.

Speed and Usage

As stated in the owner’s manual, when there is nothing happening on the screen, the device itself is refreshing the display. This means that your computer isn’t working to refresh the display.

You can tell that only the device is refreshing when the green light on the UGA itself is solid. When it is flashing it usually means that something is moving on the screen. This means that your CPU is working to move every pixel over to the USB monitor. Because of this, you probably don’t want to run too heavy graphics on the display, as you will most likely overload your CPU.

Besides the CPU load, the speed isn’t perfect. It’s a tiny bit laggy, but not enough to be too concerned about. It works perfectly fine for things like facebook, browsing, spreadsheets, word processing, all that usual stuff. However, don’t try to use it for anything that involves games, videos, or a ton of pixels being constantly rendered.

However, you can’t be too disappointed. It’s not enough lag to make you not want to use it anymore (and I’m very sensitive about my lag, so that’s really saying something). Anyways, it’s going over USB 2.0 for god’s sake! It’s running a whole monitor off of two connectors (there’s four connectors in a USB port, 2 for data 2 for power).

One other thing I noticed was that the device got quite a bit hot when running. I don’t know if it was out of it’s operating range, but it was still quite a bit warm. It worried me a little bit, but it doesn’t seem to lower in performance even when warm, so I don’t think this should be too much of a concern.

And if you want more monitors, this isn’t just the end. You can have up to 6 of these connected to your computer at once (hopefully your CPU can handle it), which means that if you have a laptop with a monitor port built in (which would make two screens), then you can have up to eight screens running off of nothing but a laptop! (You can plug the UGAs into a hub, as you probably don’t have six USB ports on your computer.)

Conclusion

If you want more monitors but don’t have the graphic cards, this is the best way to do it. The resolution and color renders perfectly, and even though it uses some CPU when rendering, it works perfectly for spreadsheets, word processing, and other basic tasks. What it doesn’t work for is heavy graphics rendering, such as video and gaming. Use a directly connected display for those.

These are compatible with windows and linux in addition to mac, so you mac haters are in luck.

They are for sale on amazon for $65, and you can find that here.