 Monitors are an increasingly popular thing. They increase productivity, allow more room for multitasking, and prices are rapidly decreasing.
The poweruser knows:
I can buy a computer with a graphics card with multiple ports on it so I can plug in multiple monitors.
But I hear:
I am going to buy a large bulky computer that i$ really expen$ive $o I can plug in multiple monitors.
So what about the people who get a laptop, and use an external monitor with it, but want more?
That would be me.
There’s only one monitor port on my computer, which was already taken.
So for my third monitor, I used an old Mac Mini that I had lying around.
But the problem with this is that it was a totally different computer, so all of the logins were different, I had to use a network based mouse and keyboard sharing system, it was just terrible. And worst of all, all of the files on each of the computers were different. So when I wanted to open a document on my third screen that was on my first computer’s hard drive, it wasn’t possible without moving around the file first.
Alas, there is now a solution. And the title of this post says it all.
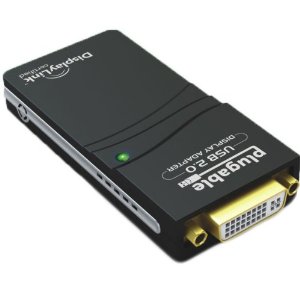
The Plugable USB UGA (Usb Graphics Adapter I’m pretty sure) works just like it should.
In the box
- Plugable UGA
- DVI to HDMI Adapter
- DVI to VGA Adapter
- Mini USB cable
Setup
Lucky for you, setup is fairly easy.
Before you do anything else, you need to go to the displaylink site and download the Mac drivers. Luckily, there is only one option for a driver, so you don’t have to make that half-minded decision on which one will actually do the trick.
After you have installed the driver and restarted your computer, you can start plugging things in.
As expected, use the mini USB cable to plug the UGA (the biggest piece) into your USB port. Then, plug in your monitor cable, using any adapters if necessary. If your monitor is DVI, then you won’t need any adapters and you can plug your cable straight into the UGA.
If your monitor is VGA, then you can just add the DVI to VGA adapter on top of the UGA, then plug your monitor into that.
Voila, it should start working. Your screens should turn blue and another wallpaper should appear on your USB Monitor.
For further configuration, just go into your System Preferences, click Displays, and click Arrangement. You can arrange your monitors so that they are extended displays and you can move your windows across all of them.
Speed and Usage
As stated in the owner’s manual, when there is nothing happening on the screen, the device itself is refreshing the display. This means that your computer isn’t working to refresh the display.
You can tell that only the device is refreshing when the green light on the UGA itself is solid. When it is flashing it usually means that something is moving on the screen. This means that your CPU is working to move every pixel over to the USB monitor. Because of this, you probably don’t want to run too heavy graphics on the display, as you will most likely overload your CPU.
Besides the CPU load, the speed isn’t perfect. It’s a tiny bit laggy, but not enough to be too concerned about. It works perfectly fine for things like facebook, browsing, spreadsheets, word processing, all that usual stuff. However, don’t try to use it for anything that involves games, videos, or a ton of pixels being constantly rendered.
However, you can’t be too disappointed. It’s not enough lag to make you not want to use it anymore (and I’m very sensitive about my lag, so that’s really saying something). Anyways, it’s going over USB 2.0 for god’s sake! It’s running a whole monitor off of two connectors (there’s four connectors in a USB port, 2 for data 2 for power).
One other thing I noticed was that the device got quite a bit hot when running. I don’t know if it was out of it’s operating range, but it was still quite a bit warm. It worried me a little bit, but it doesn’t seem to lower in performance even when warm, so I don’t think this should be too much of a concern.
And if you want more monitors, this isn’t just the end. You can have up to 6 of these connected to your computer at once (hopefully your CPU can handle it), which means that if you have a laptop with a monitor port built in (which would make two screens), then you can have up to eight screens running off of nothing but a laptop! (You can plug the UGAs into a hub, as you probably don’t have six USB ports on your computer.)
Conclusion
If you want more monitors but don’t have the graphic cards, this is the best way to do it. The resolution and color renders perfectly, and even though it uses some CPU when rendering, it works perfectly for spreadsheets, word processing, and other basic tasks. What it doesn’t work for is heavy graphics rendering, such as video and gaming. Use a directly connected display for those.
These are compatible with windows and linux in addition to mac, so you mac haters are in luck.
They are for sale on amazon for $65, and you can find that here.
