Who here tweets, IMs (or “Chats”), or emails?
Yah, that’s what I thought.
Sometimes I know I like to send people files. But if you are on IM it can take a long time and isn’t very compatible between different clients.
So instead, how about you put the photo in the cloud and send them a link?
Usually this would take a server and FTP access. But CloudApp makes it much easier.
Once you open cloudapp, you’ll notice this in your menubar:
This is what I like to call “The cloud” (I think you understand why…).
To upload a file, just drag and drop it over the cloud:
You will then see it change to this icon to indicate uploading progress:
Once it has uploaded, you will see this icon indicating it is finding the URL and pasting it to your clipboard:
And once the file is done uploading, you will see this icon:
Depending on the size of the file, that shouldn’t take long.
But where’s the file?
The answer is on your clipboard. Literally.
Now you can just paste into the chat window and a link to the file will be sent. Cool! Opening the link will have different results: If it is an image, it will just be displayed in the window. If it is another file, there will be a download link so they can download the file.
And that’s all there is too it. Just drag and drop, wait a few seconds, and paste the link. Now it’s easy to share files over twitter!
Also, I know that some of you may just want to take a screenshot and upload that. I know I like to do that alot because I can show anybody what is on my screen without any confusing file conversions or prints.
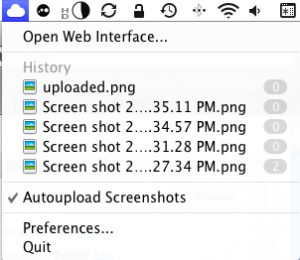
CloudApp makes this particularly easy by adding a Autoupload screenshots feature in the menu:
This means that it will automatically upload a screenshot right after it is taken. Cool!
So you take a screenshot, wait a few seconds, and paste into the tweet or chat window.
Now if you look up at that screenshot you will notice numbers next to the different files.
Those files are my recently uploaded files, and those numbers indicate how many time each on has been viewed.
Clicking Open Web Interface… will… well… open the web interface. There, you can delete uploaded files and more.
Now let me warn you, getting the app is also a process.
First, go to http://getcloudapp.com and click sign up. Then enter your email and desired password. Check your email and open the activation link. At the screen that appears, click on tools in the top left and the first item there will be CloudApp. Click Download to download the application. Once you’ve downloaded the app and moved it to your applications folder, open it up. You will see that cloud in your menubar. However, you need to activate it first. Just click on it and click Preferences. Then, click the accounts tab, and enter the email and password you used on your CloudApp account. Close the window and you are ready for uploading!
Once you have downloaded the app and moved it to your applications folder, open up the app.


