You may know about the long lasting line of Google’s special Google Phone called the Nexus. There was originally the Nexus One, then the Nexus S recently. Both of these were manufactured by Samsung, but Samsung’s name wasn’t really placed on it – just on the very bottom of the product pages.
But Samsung has taken a different approach this time – They’ve released a new Nexus phone that they are calling the Galaxy Nexus, following their popular like of Galaxy S phones.
Other than the new name, the Galaxy Nexus follows Google’s standard path of some great upgrades.
As far as hardware goes, it’s just like the Nexus S – but better. The Galaxy Nexus features a slimmer body, more vibrant screen, and a very nice camera – although specific megapixels are not supplied.
But the real upgrades are in the software. The Galaxy Nexus features the purest of pure Android 4.0 – which is a nice relief considering all other phones in the Galaxy S line are skinned by Samsung, causing them to be painfully slow and unresponsive.
Among Android 4.0’s new features (other than the painfully idiotic name of “Ice Cream Sandwich”) are Face Unlock, which allows you to unlock your phone with face recognition; Android Beam, which uses NFC to send websites, photos, contacts, and more to other phones; and your usual fixing of extra eye candy.
The Galaxy Nexus doesn’t have any pricing or supported networks, however a bit is given away with the following line:
Galaxy Nexus runs at 4G (LTE or HSPA+) speeds
Verizon is the only provider that currently has an LTE network, which means that the Galaxy Nexus will be on Verizon for the first time.
I’m definitely excited for this phone, and anyone in the Android market should definitely look at this phone.
Instagram is an amazing iPhone application that can transform your normal iPhone photos into interesting, old-ish photos. Unfortunately, your iPhone doesn’t have the best camera that you could put your hands on.
Here’s two applications that will give you Instagram-like photo effects and filters, but you can supply your DSLR’s pictures!
Focus
Focus is an application available from the Mac App Store for $5. The app basically allows you to add tilt-shift effects to your photo. It’s a very straightforward application, and I think I can basically sum up the controls in this screenshot.
First, open a picture in the app. Then, click “Place” in the bottom left corner. This will allow you to rotate, crop, and align your photo to your liking. Then, click on one of the options that are shown. I personally don’t understand why they had to add a bunch of options – I mean, why couldn’t they have just added a button for circular, a button for linear, and a slider for Vividness? The world may never know.
After you’ve selected one of those options, you can click and drag the focused area around and rotate it to your liking. Once you have it in a place you like, hit File > Export and save it as a JPEG. Now you have a tilt-shifty photo!
Lomo Express
Now that we have the tilt-shifty part of your photo complete, we need to add some filters. This will be done with another app from the Mac App Store that is available for a painful $13 – worth it I think so.
This is as bare-bones as you can make this application, as you open up your photo then choose what effect you want – then save it. Here’s what the app looks like:
There are 12 awesome filters to choose from, and it’s as easy as clicking on the one you’d like and bam, there’s your new photo.
When you’re done and you like the results, go to File > Save As and save it as a JPEG.
That’s it!
Conclusion
Your final picture will look like an instagram shot, but higher quality and resolution!
To go even farther, you can print them out on nice paper and post them around, like I did with instagram photos in this post.
Even though this will cost you $19, if you’re really into editing photos with tilt-shift and Lomo effects, this is the way to do it!
The iPhone can take some pretty dang good pictures. In fact, many different phones can take mind-blowing shots. But your little phone can do even more if you treat it to these mini-lenses from Photojojo!
Contents/Installation
There are three lenses available from Photojojo: 2X telephoto, 180 Fisheye, and a 0.68x wide/macro lens. I won’t go over individual pricing, but the whole pack is $50.
Installing the lenses is painless. In your package you’ll get a few tiny, metal magnetic rings. Undo the plastic on the adhesive side and stick it around the lens of your device. If you have an iPhone, however, you should probably put the ring on a case; the sleek glass doesn’t play well with their adhesive.
Now to use the lenses, you just attach the lens to the metal ring and it magnetically locks on. Neat!
2x Telephoto
For those times when you want to get closer to your subject, the 2x telephoto lens will do exactly what you’d expect. Unfortunately it will cause a tiny bit of distortion, but not enough to make a big difference.
Without, With
As you can tell by that comparison, the lens does a nice job of zooming in, but has a bit of distortion (visible near the door handle).
Fisheye
This lens I believe is my favorite. It can capture just about everything you can see without turning your head. If you want to really capture an entire scene, this is exactly what you need.
Without, With
Pretty cool, right? Unfortunately, this lens causes a particularly noticeable amount of vignetting, but I think that it adds a nice effect. If you want to get rid of it, you can always crop it with whatever application you desire, however you’ll end up losing a bit of the image.
Wide Angle / Macro
This lens confuses a lot of people. Is it wide angle or is it macro?!
Alone, the magnetic part of the lens is just Macro. However, there’s an adaptor that screws in to the macro lens to convert it to a wide angle lens.
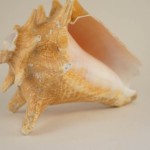
The macro lens doesn’t zoom in at all. It just allows you to focus WAY closer to objects. Here’s a comparison – remember, I took the first picture as close as I could while staying in focus, then I took the second as close as I could while staying in focus. This lens does NOT zoom.
Without, With
Pretty cool, right? You can get ridiculously close to capture textures that previously went unnoticed. On the second picture, I’m holding my iPhone a tiny bit less than an inch away from the keyboard.
The wide angle addition to this lens isn’t very fancy, it just makes the picture a tiny bit wider. It will cause some straight lines to bend in odd ways, but it still comes in handy when wanting to capture wide shots without going crazy with the fisheye.
Without, With
Doesn’t that doorway look kind of round? As you can tell, it makes the picture a bit wider but can’t capture the amount (and distortion) of the wide angle lens.
Cool uses
Yup, these work great with a phone camera. But there’s one use that I recently found – your webcam! It’s a small camera, just about as small as the one in an iPhone. Take a metal ring and stick it around, and you can use these lenses while video chatting! I personally have an LED cinema display, and although it makes my screen look a little funny, the results are totally worth it.
Here’s the display:
Ha! By the way, those things on top of my monitor are dinosaurs; you’ll get one with every photojojo order! I’ve ordered two things from Photojojo, so that’s why I have two dinosaurs.
Here’s what it looks like straight on:
Pretty cool, right?
Here’s the results:
Sweet! You can even see my keyboard!
Conclusion
These lenses are quite handy, and because they work with anything you don’t have to worry about compatibility. The whole set of lenses is $50, and if you’re interested click here to be redirected to the photojojo store!
OS X Lion removes the need for any kind of media for the installation. That’s nice, because there’s no disk for you to lose!
However, if something terrible happens to your computer, you’ll end up installing Snow Leopard, then upgrading to Lion once again. Thankfully, Apple has made a utility that allows us to easily and painlessly create a bootable USB Lion Recovery Disk. Unfortunately, you must have either the MacBook Air or Mac Mini Mid 2011 for this to work. This is because those are (currently) the only computers with the Lion Recovery Partition.
1. Download
Click here to download the Recovery Disk Assistant from Apple. Once downloaded, open the Disk Image and launch the Application.
2. Create
Now would be a good time to plug in a USB disk. Plug it in and continue through the installation. There’s nothing for you to configure, so this is extremely straightforward.
3. Use
If your computer stops booting, or you get a new hard drive, it’s time to use this disk. Plug it in to a slot on your computer, then boot holding the alt/option key. In the menu that appears, select the recovery disk. Now you can download and install Lion right back on to your computer!
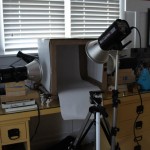
The MacBook Air is a great computer. However, sometimes it’s nice to have a bigger display. That’s an easy task if you have an external monitor.
Okay, so now you have two displays. Cool! The only problem with this is that it can sometimes be confusing and/or distracting to deal with two displays at a time. Okay, simple enough, just close the lid to the MacBook Air and use an external keyboard and mouse. That was easy.
This would be the answer to all of our problems, however a closed computer does take up quite an amount of valuable desk real-estate. That’s why the BookArc is here to save us.
As you can tell, it is really just a stand for the Air that holds it up sideways. The stand is made of solid aluminum, and has rubber inside so that you don’t scratch or in any way damage your beloved MacBook Air. It also has a small indent in the side to manage any cables you might have, and was designed to fit the cable from an LED Cinema/Thunderbolt Display quite well.
This saves a ton of desk real estate, and can really come in handy. But the fun doesn’t stop there!
Usually laptop cooling requires some fancy advanced stand that usually doesn’t even work well. Well, here’s my personal cooling system.
Yeah, that’s it. I have the MacBook Air and a desk fan pointed at the bottom. This will keep your Mac nice and cool, so you won’t have to worry about heating issues ever again. Nifty!
The BookArc is a simple, elegant stand that serves its purpose quite nicely. If this stand were any more, it would be too complicated and much less attractive. It saves you a ton of desk real estate, and at the same time you can cool down your computer!
As you may have read in a previous post, my beloved MacBook of three years has finally bit the dust. That MacBook treated me well, and with an SSD and upgraded RAM it was able to work wonders.
Now, however, it is time to move on. And as you may be able to tell by the title, I have decided to continue my Mac collection with the newfangled MacBook Air.
Which one did you get?
One of the big reasons I wanted the MacBook Air was because of its portability and the offering of an 11 inch version. Due to this, I got the 11 inch MacBook Air with a 1.8 ghz Core i7, 256GB flash storage, and 4GB of ram.
I can hear a lot of you saying “Isn’t 11 inches a little small?” Why yes, it is. However, when I’m at home, I have an LED Cinema Display to hook it up to – no lack of pixels over here.
Design
The design of the MacBook Air does NOT fail to amaze. It feels so thin and light in your hands, but at the same time it feels incredibly solid. Because it’s a “unibody” MacBook, it was manufactured from one single piece of aluminum – it’s strong. Tapering from 0.68 inches down to 0.11 inches, you can bet your bank account it’s thin. Thanks to this, I can finally accomplish my dream of slipping my computer into a manilla envelope. The one problem with this pencil-thin design, however, is that on the whole computer you get a total of five ports. On the left side, we have a MagSafe power adapter, USB port, and microphone/headphone jack. On the right side we have a thunderbolt port and a USB port. Sorry, disc lovers!
Upon opening the computer, you get some more goodies.
The first thing you’ll notice is the screen. It’s bright and, well, beautiful. It packs a very nice DPI, featuring a 1366 by 768 resolution squeezed into 11.6 inches of glossy glory.
Next, you’ll notice the keyboard. The keyboard is full-size, featuring every key you’ll find on that thick MacBook Pro. In addition to being full-size, the keyboard is also backlit – a feature that was definitely missed on the previous version of MacBook Air.
The next thing you’ll notice is the giant trackpad. This trackpad resembles that of the MacBook Pro, although on the 11 inch version of the MacBook Air it’s a tiny bit thinner. The glass surface is a cinch to move your fingers across, and is extremely responsive to say the least.
Last and, well, least, would be the FaceTime camera embedded in the bezel of the screen. Apple decided not to put in one of the new FaceTime HD cameras, and will probably bring it back in the next version of the MacBook Air. Nonetheless, it’s still a standard functional webcam that is definitely a good addition.
Performance
In addition to being quite the looker, it gets a high score in the area of performance as well. As far as processing goes, the 1.8ghz hyper threaded dual-core i7 works wonders. The 256GB SSD performs at ~250mbps Read/Write speeds. The 4GB of RAM is sufficient.
For comparison, I’ll test the performance of the Air versus a pro using Geekbench. I first ran it on my mother’s MacBook Pro (Late 2009), which features an intel Core 2 Duo and 8GB of ram. It scored a Geekbench score of 3002. Not bad.
Then I ran it on the Air. It scored a whopping 5200 – which is a 70% increase from the pro, in 30% of the space.
The one setback of the Air’s performance would be graphics. It’s running an Intel HD 3000 chip, which is integrated so it doesn’t boast the same performance that you might get with an nvidia card. Although it might not be on par with an nvidia, it’s still a perfectly good graphics card nonetheless.
Watch out!
If you’re thinking of buying one of these, there’s one thing that you might be at risk of. The SSDs in the Airs are provided both from Toshiba and Samsung. This would be no problem, however the Toshiba SSDs are about 100MBPS less than the Samsungs. Yeah, that’s a big difference.
Here’s a video to find out if your Air boasts a samsung or a toshiba:
Conclusion
The MacBook Air combines the two most wanted/needed components of a notebook computer: power and portability. The powerful processors and fast memory give it some meaty specs, and then the 0.68 to 0.11 inch body makes it a lean, mean, working machine. I definitely recommend this computer to everyone, whether you’re a professional video producer or an under-appreciated artist living in a college dorm.
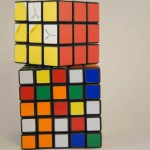
We all wish we could have studio-reminiscent photos for our blog posts, etsy listings, ebay items, etc.
Well, you can always buy a lightbox like this one, but that’s $2000!
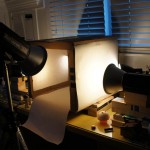
Here’s how to build an extremely functional lightbox using things that you probably already have around the house. I built this one out of stuff that I had laying around, so for you it might be as low as $0!
Materials:
Cardboard box
Large paper (the thinner the better)
Cutting tools
Some desk lamps and/or flashes
Instructions
1. Cut three holes in the cardboard box
Tape up the ends so you have the box, then cut out big windows on three of the sides of the box. Leave only about 1.5 inches from the edges of the window to the edges of the sides.
I wish I could have a picture for you, but I already built mine! You can look at the final picture at the end of this post and you’ll probably get an idea of where you need to cut.
2. Get out the paper
I had a huge roll of white paper laying around, and the thickness was just the same as my lightbox’s windows.
You’re going to want to cover two opposite sides of your box with paper, as the third you will be taking pictures through.
Take your paper and cut it so it is barely bigger than the windows you cut in your box, then tape them so they completely cover the two opposite windows.
3. Add the back
Now it’s time to add the backdrop. I cut a strip of my roll of paper, but you might have to take some pieces of paper together – unfortunately that might mean that you have some pieces of tape in your photos.
Take the paper and tape one end to the back top edge of your box. Push the paper inside the box so you get a nice, smooth curve at the back bottom edge.
4. Add lights, finish up
The front window still has an edge at the bottom, which will probably get in the way of your shooting. Cut that little edge off so the front window is open.
Now, you just need to add some light. I have some photography modeling lamps around, so i propped those up and put them on each side. In addition, I got a desk lamp for each side and put in 100w bulbs. For the final touch, I put a light right in front so that the front was filled in as well.
5. Shoot!
You’ll probably want to set your camera on manual, then put it in a tripod. I’m using as wide as an aperture as possible, as low as an ISO as possible, and change the shutter speed so that you get the right light.
This will give you the smallest depth of field and littlest amount of grain, and as long as your camera is on a tripod the long shutter speed won’t blur anything. If possible, set the white balance on your camera by finding the setting for white balance and set it to custom, then take a picture of your white backdrop. Most DSLRs have this feature, but if your camera doesn’t then just set the white balance to Incandescent.
You’ve been using Instagram, the social network of quirky and cool pictures.
So now you have a profile with all these awesome pictures with comments, and all this other techy stuff.
But sometimes it’s nice to convert all that cool digital stuff into something analog.
And that’s why today, I’m going to show you how to make photo booth reminiscent photo strips.
You will need:
An instagram account with pictures
Photo paper
Photo printer
Rotary cutter, paper cutter, or at least scissors
Step 1: Get your photos
The first part of this project is to make strips of all of your photos.
Start out by going to http://instaport.me and downloading all of your pictures to your computer as a zip. Instaport is a simple service that allows you to download all of your instagram photos as JPGs for free.
Once you have a zip saved and you can view your instagram images, you might want to go through deleting the ones that you don’t want to be included in your photo strips.
Step 2: Print your Photos
The next step is to open all of them up in preview. Go into the instagram folder (the folder containing all of the JPG images from instaport) and press Command A. This will select all of your instagram photos. Then just double click anywhere in the window and you will eventually get a preview window with all of your images open.
Next, press File>Print and configure the settings to look like so:
If possible, try to print borderless – your printer may or may not support this feature.
Next, hit the big Print button and let the magic happen. In a few minutes, you should have a few pages of instagram photos.
Step 3: Cut your Photos
Get out your rotary cutter / paper cutter / scissors and cut them into even strips horizontally (so that you have strips of four). Here I’m using a rotary cutter to to cut the strips evenly and cleanly.
Step 3: You’re done!
Once you’ve done that, you’ll have a ton of cool instagram photo strips.
Step 3.5: Do stuff with them
Well, now you have these cool strips! There’s tons of things you can do with them. Use them as bookmarks, give them to friends, collect them, hang them, use them as business cards, or my favorite: start an instant photo wall!
Also, feel free to follow me in instagram! My username is maxswisher.
Usually, I use an application like VIM. VIM is a command-line based application that shows you syntax and if your quotes are in the right places. Helpful, compared to Notepad/TextEdit.
If you’ve ever coded Java then you know about Eclipse. If not, Eclipse is a free java development environment that includes auto-fill, error highlighting, manual libraries, and more.
It’s the same thing with Objective C in Xcode; there are manuals, auto-correct, and error highlighting.
Finally, we have PHP in NetBeans. Netbeans brings all of the features of Eclipse/Xcode to PHP, HTML, and CSS coding. It provides auto-fill, error highlighting, manual libraries, and more.
I was recently working on a fairly large project that includes PHP, HTML, CSS, and MySQL. Watch what happens when I have a partially typed PHP function:
There you have it. As I type, it gives me live suggestions and the manual for the top most relevant function right there.
I can hit enter and it will automatically fill it in and put my cursor in the parenthesis. It’s like having the familiar Eclipse shortcuts – but for PHP.
HTML and CSS are the same way. Type an opening ” and it will automatically fill in the second for you. It also has all of the CSS/HTML documentation and auto-fill.
The other main feature with NetBeans would be error detection.
Lets say I forget to put a semicolon at the end of a PHP line.
There you have it. You immediately get the error underlined, a notification in number bar, and when hovered over you get what the syntax error is.
Now, what does all this mean for a developer?
1. You can type a lot less and no longer need to look up functions in google so much
2. You don’t need to upload your files to see if they have errors
3. You can save a lot of time between error detection and auto-completion
This is the magic of NetBeans – but it doesn’t end there.
It’s free.
Yeah. Free. Completely.
It’s open-source, cross-platform, and available to anyone who wishes to download it’s magical amazingness.
The truly sad part about this is that few developers know about NetBeans. It’s sad how they end up wasting so much time and effort due to things that NetBeans could easily fix. If you’re a web developer, this application is a MUST HAVE. And it’s free – you really have nothing to lose.
For the longest time, if you wanted to get to your information about your computer, you used System Profiler. The interface was clunky and confusing, obviously aimed at more advanced users.
Although it’s not advertised much, there is a new app replacing System Profiler called About This Mac, introduced in Lion.
Unlike system profiler, About This Mac is easy to use, and makes the more important things stand out. It also uses graphics to make explanations easier to understand.
As you can tell by the above picture, it’s a very easy to understand and streamlined interface.
Displays
The Displays Pane is simple and easy to understand.
As you can tell, it’s quite easy to understand.
It gives you a graphic of the display, and the name of the display. Then, in smaller text (indicating that it’s probably less important to you) it tells you the dimensions, size, and graphics card.
If it’s an Apple monitor, it will even give you a link to the user manual – handy!
Storage
The storage pane gives you some quite-welcome insight into what’s taking up your disk space. It may seem similar to something you’ve seen in iTunes.
It’s definitely handy that it gives you this info.
It also lists other volumes that you have mounted/installed, such as your CD/DVD Drive and any USB drives.
Memory
Memory, the easier term for RAM, is crucial to your computer. If you didn’t have any Memory installed, you would have an EXTREMELY slow computer. The Memory Pane gives you an easy explanation using graphics and easy to understand english.
It gives you a simple box telling you how much total memory you’ve installed in your computer. It then tells you how many slots your computer has, and tells you the specifications for what Memory modules can go in .
Then it gives you an easy to comprehend graphic telling you how much Memory is in each slot. So easy to understand, even your grandpa can understand it.
In case it needed to get even more useful, they added a link to the Memory Upgrade Instructions – just in case you want to add some more, and don’t want to go around fishing online. Handy!
Support
The support pane just gives you links to different online Apple support resources.
Service
This is definitely an extremely useful pane. Use this pane to clearly understand your warranty information, and get more information about the AppleCare support plan.
In addition to giving easy to understand repair descriptions, it also gives you links that you can use to check the status of your current warranty. It will send your serial number to Apple, then you will get a page telling you about the warranty status of your computer.
About This Mac is definitely a welcome replacement to system profiler, especially because it brings easier to understand graphics and descriptions, all in basic english. This will definitely be a big help for Mac users who need to learn more about their computers, but aren’t rocket scientists.
About This Mac can be found under the Utilities folder in the Applications Folder.
Google+ is Google’s stab at facebook that has some great new features that really puts it in the competition (read more here). The Android app was available immediately; the iOS app was supposed to come a few weeks after.
Well, it’s here. Unfortunately, it’s not worth getting.
You are greeted with a front page where you can view your stream, profile, huddles, circles, etc. Everything works until you hit stream; that’s where it crashes. It will give you a spinner saying that it’s loading… then it will keep spinning… and spinning… and spinning… and when you’re sick and tired of it, you just hit the grid to go back to the home screen. But it doesn’t go. So you hit it again. Same result. So you start frantically hitting buttons, but it’s not going to respond. Then, there’s the crash.
For now, this is all you’ll get. Jailbroken or not, iOS 5 or 4. The app is just a crasher.
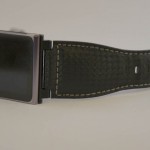
When I first got my iPhone 4, the screen seemed really durable. Through the first couple of weeks I didn’t have a single scratch. I wasn’t worried or careful about it, and that still hasn’t proved a problem.
However I was definitely sick of all the smudges and fingerprints, and how if there was enough fingerprints on the screen it would get difficult to even move my finger across the screen.
I didn’t think I would benefit from any kind of screen protector until I was at a class and tried a friend’s. The anti-glare cover made it much easier and smoother to run my finger across the screen. It also didn’t attract fingerprints. Cool!
I got one of these for myself, and I’m quite happy with it. As I said, it doesn’t attract fingerprints, and makes it much easier to move my finger across the screen – two things you will benefit from every time you take the phone out of your pocket.
It all sounds good, right?
Well there’s only one drawback: having the screen protector will make your screen the tiniest bit blurry.
No, it’s not terrible – you can still easily read the text, and it doesn’t make much of a difference. But if you are picky about super sharp edges on everything, this may cause a problem to arise.
Sometimes people have a VERY hard time installing the protectors, usually because of lint and air bubbles.
Well, this screen protector has something new: a sticky, clingy sticker thing that you press against the screen and remove, bringing all of the dirt and dust with it.
However, if you’re buying this at an Apple store, you can usually get around all of that. They will install it for you, and they’re pretty good at it, too. They know all of the tips and tricks, and actually installed my screen protector FLAWLESSLY. Yes, there’s not a SINGLE SPECK of dust under that screen protector, and it lines up perfectly.
If you’re looking for a screen protector, this is the way to go. However, if you’re picky about your sharp lines, you should look into a crystal style screen protector, which, in addition to providing sharper edges, attracts more fingerprints.
The Power Support Anti-Glare Film Set (a pack of two) is available online here and at most Apple Retail Stores for only $15.

 You may know about the long lasting line of Google’s special Google Phone called the Nexus. There was originally the Nexus One, then the Nexus S recently. Both of these were manufactured by Samsung, but Samsung’s name wasn’t really placed on it – just on the very bottom of the product pages.
 Among Android 4.0’s new features (other than the painfully idiotic name of “Ice Cream Sandwich”) are Face Unlock, which allows you to unlock your phone with face recognition; Android Beam, which uses NFC to send websites, photos, contacts, and more to other phones; and your usual fixing of extra eye candy.