A Few New Little Features in OS X Lion

Yes, there’s those few big announcements that Apple made at Back to the Mac and are constantly being advertised. But here’s a few little features that people don’t really take note of.

Change Background on Desktop Right Click


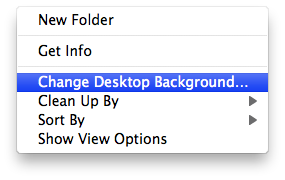
In the past, to change your desktop background you had to open System Preferences and open Desktop & Screensaver to change your Desktop Background. Now, you can simply right click anywhere on the desktop and there is a selection to change your background.

Different Backgrounds for Different Spaces

It used to be that you could have different wallpapers on different displays, but now you can also have different wallpapers on different spaces. Just go to the space for which background you would like to change, then right-click and select “Change Desktop Background.” Make sure you quit System Preferences every time you change the background on a Space.

Web Search in Spotlight

Spotlight is a great way for you to find files, look up definitions, and do basic arithmetic problems. With the update to OS X Lion, you can now also use it to search the Web or Wikipedia. Just type in your search and the Web and Wikipedia selections will always show up in the list.

Plus Button now Maximizes 

In the top left of every window, there are three distinct buttons: an x to close, a – to minimize, and a +. The + usually made the window some weird bigger size, and you could set it and toggle between them. It was so confusing that nobody really ever bothered to try and figure out how to use it. Now, however, it will actually make the window take up the screen (without using Lion’s full screen application feature).

With an External Display, closing the lid no longer sleeps

Previously, to use an external display with your MacBook’s lid closed you had to close the lid, wait for the computer to fall asleep, then use a bluetooth/external mouse to wake it up again. This is no longer the case; when you close the lid with an external monitor connected, your display will flash blue to adjust to the new display settings, but your computer will not go to sleep.

I hope you enjoyed this little guide on a few of the hidden features of Lion. They may come in handy someday, and they’re good to know. I’ll continue to post as I find others.

Magic Trackpad Getting Jumpy? Here’s a Weird Fix

As you may know, Lion recently came out. Lion relies heavily on multi-touch gestures to be taken full advantage of. So I decided to break out the magic trackpad and try it out.

I’ve had many problems with the magic trackpad recently, mostly with it jumping around the screen a lot – I would touch it, and suddenly it would be on the other side of the screen. This time was no exception.

So why does my trackpad keep doing this? I’ve replaced the batteries, cleaned it off, and even tried someone else’s.

After a bit of research, I finally found the problem:

Time Machine.

I don’t know why, but after I read this I noticed that Time Machine was backing up. Hmm…. I stopped the backup and Voilla, the trackpad is back to its normal, behaving self.

This is going to get in the way, considering that Time Machine likes to back up every hour; make sure you keep an extra USB mouse on hand just in case.

To tell you the truth, I have absolutely NO idea why Time machine causes a problem with the trackpad. Time Machine connects over WiFi, and the Trackpad connects over Bluetooth. They’re totally seperate antennaes – why are they interfering with each other?

Although there is no explanation to this solution, it’s still a solution. So remember – if your trackpad is acting up, check to see if Time Machine is backing up. (HEY THAT RHYMES!)

How-to: Make Your Dock REALLY Big!

Okay, this post is FAR from useful. But if you’re bored, or want to play a prank on someone, this is a cool visual effect.

If you go into System Preferences > Dock, you’ll be able to enable dock magnification. This will cause the dock icons to magnify when you hover over them.

But using this simple trick, you can make it even BIGGER!

Open Terminal (in Applications/Utilities) and type in:

defaults write com.apple.dock largesize -float 256.000000

You can change 256 to be even bigger or smaller, depending on how big or small you want your dock magnification to be.

Hit the enter key and, well, nothing will happen.

Next, type:

killall Dock

Your dock will disappear and reappear.

Now hover and enjoy!

To set it back, just type the same thing you did to activate it but replace 256 with 128.

This has absolutely nothing useful about it. But it’s fun if you’re really bored, or you’re just waiting for Lion to come out.


Mac OS X Lion is Right Around the Corner!

Mac OS X Lion was announced a while ago and brings new features like Launchpad, an iOS like App Launcher; Mission Control, which combines Spaces and Exposé into one, easy to view panel; and plenty of other new features.

The announcement stated that the update would be released in July 2011, and would be downloaded directly from the Mac App Store for $30.

Well would you like at the time, it’s July!

The Mac OS X Lion update is estimated to be released to the public in the next couple of weeks, according to my reliable sources.

There’s a few things you should probably do to make sure your computer is ready

  1.  Make sure you have some disk space available!

If you don’t, you’ll download the Lion update and your computer won’t be able to easily boot. Make sure you have at least 6 gigs of disk space free. If you don’t, you’re in trouble whether you’re installing Lion or not! Try an app called GrandPerspective (reviewed here) and delete the biggest files.

2. Say goodbye to PowerPC

Over the years, Intel machines have been compatible with PowerPC Apps through a bridge called Rosetta. Now, with Lion, Rosetta is no longer compatible. If you have any apps that run on Rosetta, it’s time to find Intel compatible alternatives.

3. Install all available updates

Go to the Apple Menu > Software Update… and install any available updates. After you’ve installed the updates, re-check for updates in case there are updates for the other updates.

As I said, OS X Lion should be available from the Mac App Store in the next couple of weeks for only $30.

How-to: Change fonts in iOS

Almost everyone is very used to the default iPhone font – Helvetica. It’s plain, simple, and easy to read.

People are usually just fine with Helvetica – but if you’re jailbroken, it might be a nice unique touch to change your font. And because text shows up EVERYWHERE in iOS, you’ll always get to enjoy your font change.

To change the font(s) on your iPhone, you’ll need an app called BytaFont from Cydia. Just open up Cydia, go to search, and type BytaFont and install it – no additional repos needed ;). If you have a Verizon iPhone 4, click here to read my post about 2 step jailbreaking.

After you’ve downloaded BytaFont, you can tap “Browse Fonts” to get a few options for browsing: Staff picks, most recent, most downloaded, most appreciated, alphabetical, and by category. Unfortunately it’s as hard to navigate as it sounds. The fonts under most appreciated are nearly impossible to read, and looking through a huge list of fonts (where all you see is the title of the font in Helvetica) doesn’t help me determine which font I’m looking for.

There are tons of fonts that are available for you to use (all for free, of course) from BytaFont. Some of them are basic, like Tin Birdhouse. Some of them are complex, like Halo 3 (which I simply just can’t read).

I decided that I liked the Ubuntu font. It’s clear and still easy to read, but it’s still different from boring helvetica. Here’s how it looks in a few situations on iOS.

Free WiFi Tethering with iPhone

You may have read my post on tethering with Android.

However, I did switch over to iPhone!

Now, you can tether using the iPhone by paying AT&T or Verizon, and you’ll get a portable hotspot.

But that’s extremely expensive!

Here’s an easier way: MiWi.

MiWi is an application available from Cydia (you need to be jailbroken, if you have a Verizon iPhone 4 click here) for $20. That may sound expensive, but it’s much cheaper than spending $20 each month! If you have read elsewhere about the Sinful repo, you can get it for free, but that’s cheating the developer out of what he has earned, so I don’t encourage it.

Installation

If you know how to get apps from Cydia, skip this paragraph. If you don’t, continue reading. To get MiWi, open the Cydia app from your homescreen, wait for all of the data to “reload,” and click search. Type in MiWi, and tap the result. Then, click “Install” in the top right corner, followed by “Confirm.” Let it install, and then click the big black button at the bottom. MiWi will now be on your homescreen.

Use

MiWi is an extremely simple app.

Upon opening it, you will be greeted with three tethering possibilities: USB, Bluetooth, and WiFi.

Bluetooth is advertised to use mainly with iDevices, however I don’t like bluetooth tethering as it is unreliable compared to USB and WiFi tethering.

USB Tethering only works with Laptops, and I had a terrible experience with it. Although it may boast a faster connection, you need to get it connected in the first place. That’s where I had my problems.

So that leaves WiFi. And let me just say, getting WiFi to work is painlessly easy.

You can easily setup a WiFi Password, change your SSID (network name), and even control which computers are on the network. Even better, you will get a notification bar at the top of your screen that tells you how much has been downloaded and uploaded. Handy!

The speed isn’t too shabby either! I was able to crank 1.0MB/s down, which isn’t too bad. It works great for email and basic web browsing, but I wouldn’t try to stream video over it.

Conclusion

MiWi works great for WiFi tethering. But I wouldn’t recommend it for USB or Bluetooth, as they are far less reliable.

Jailbreak iPhone 4 Verizon

Yes, I got an iPhone 4.

Do I support apple’s business ethics?

No.

Do I think the iPhone is pretty and shiny? Yes.

Now, don’t think that I’m immediately jumping on the Apple bandwagon.

The very first thing that I did with this was jailbreak it.

If you have one of these suckers and are looking to jailbreak, I’m about to make it WAY easier for you.

But JUST so you know how much easier I’m making it for you, here’s the traditional way of doing it.

Traditional

You’ll need a few things: PwnageTool 4.2, the original IPSW for the Verizon iPhone 4, and the Pwnage bundle for 4.2.8.

First, download everything mentioned above. Unfortunately, all of the links on every other website are all dead. That means you have to go on a search on the internet looking for all of the above.

Then, open the package contents for PwnageTool 4.2, go into Contents>FirmwareBundles and click and drag the Pwnage bundle for 4.2.8 in.

Next, open up PwnageTool and select advanced. Drop in the IPSW for the Verizon iPhone 4, And hit continue, continue, continue, wait for ten or so minutes. In the end you’ll have an IPSW that you need to use.

In PwnageTool, select Put phone into DFU Mode to put the iPhone 4 into DFU. It gives you step by step instructions on what buttons to press and for how long. Once you’ve put it into DFU, open up iTunes and it will tell you that it detects an iPhone in recovery mode. In iTunes, select your iPhone, then hold down the option key while clicking restore. It will give you a selection window, where you need to browse to find the custom IPSW that you made with pwnagetool. Then, let it work its magic. After the restore is complete, you will have a jailbroken iPhone!

Easier way.

Time to make this much easier!

I am going to give you the custom built IPSW and the download for PwnageTool. That means that all you have to do is the very last paragraph! 🙂

Download the files

Now that link right there will download a ZIP of the Custom built IPSW and a copy of PwnageTool.

Then, just follow these directions:

In PwnageTool, select Put phone into DFU Mode to put the iPhone 4 into DFU. It gives you step by step instructions on what buttons to press and for how long. Once you’ve put it into DFU, open up iTunes and it will tell you that it detects an iPhone in recovery mode. In iTunes, select your iPhone, then hold down the option key while clicking restore. It will give you a selection window, where you need to browse to find the custom IPSW that you made with pwnagetool. Then, let it work its magic. After the restore is complete, you will have a jailbroken

Disappearing Disk Space?! 10 Step Fix

Today, I left my Mac alone for a few hours. When I come back, I am confronted with messages telling me that I don’t have enough disk space left.

A quick check of my available disk space using Finder reveals that I only have 200mb of free space left on my 115GB SDD.

Wait, WHAT?! I left my computer and it had 50 GB free. How can 49.5GB just magically appear on my hard drive?!

I couldn’t even DOWNLOAD that much during the time I was gone.

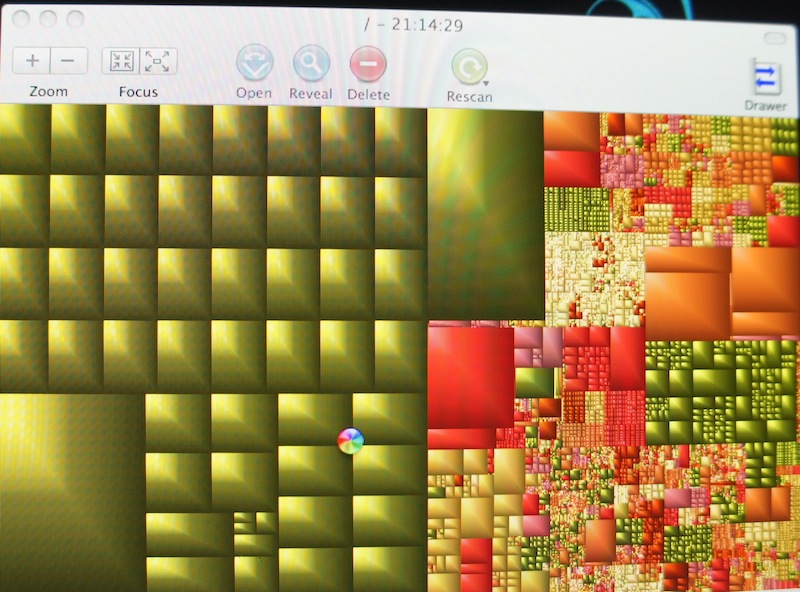
So I decided to find out what was taking up so much space using a wonderful free application called GrandPerspective (review here, what a wonderful app if I may say so myself) and decided to try and find out what was taking up so much space. Here’s what the result looked like:

WHOW THERE! What is all that green that’s taking up half of my hard drive?

A quick hover reveals that these are “swap” files that live in a hidden folder that’s reserved for system use.

Swap files are spaces where application memory/files is held. It’s like a less random access version of RAM. And somehow, my computer had 50GB of it.

Here’s the fix:

  1. Shut down your computer. If necessary, just hold down the power button and force shut it down.
  2. Hold down the shift key.
  3. Press the power button while still holding the shift key.
  4. When the apple logo appears on screen, lift your finger from the shift key.
  5. A loading bar will now appear. Wait a while and it will eventually show the login screen. It will let you know that you are booted into safe mode.
  6. Don’t log in!
  7. press the Back button on the login window, then press Shut Down.
  8. Press the power button without pressing any keys.
  9. Wait for the computer to boot.
  10. Enjoy your spacious computer!

There ya go! It’s a simple fix for a near catastrophic problem.

To prevent this from happening, restart your computer every couple of days. That was probably my problem, as I haven’t restarted in about a week. Oops!

When you restart, you don’t need to do the safe boot, as it will still clear a large amount of the swap files and cache. This is more proof that it’s a good idea to restart now and then, preferrably daily!

A reboot a day keeps the swap files away!

Finally, a good use for an iPod Nano!


You may remember that I wrote this post hating on the new iPod nano because of it’s size and the idiotic idea of a clip. Also, the size of it! You’d lose it in an instant!

Well, I’m changing my views on this. And it’s all thanks to one accessory called the iWatchz.

Basically, this turns the iPod Nano into a wristband. I thought that sounded stupid, until I tried it. I realized that as a wristband, the iPod nano opens up to a whole other world of possibility. The Nano can act as a stylish watch, which will surely show off your geekyness. But in addition, to have your wristwatch actually be a music player, photo viewer, and FM radio can all come in handy. You don’t have to worry about bringing your iPod with you – you already have all of your music on your wrist. Ha!

Having a wristwatch is something you’re probably already used to. So being able to have all of the iPod features with you EVERYWHERE without having to remember it or lose it? Handy!

The reason I really didn’t like the nano was because they asked you to clip it on to your shirt and proudly display what you’re listening to. You could lose it, it could fall off, and you’d probably forget about it fairly frequently.

Having it as a wristband solves all of the above problems, and allows you to be sure about where your iPod is and not worry about it falling off or losing it.

You can get the iWatchz here, and you can get yourself an iPod nano here. Together, it’ll cost ya about $200. In my opinion, it’s quite a genius combination.

CyanogenMod 7

Of all of the ROMs floating around out there, Cyanogen is by far the most established custom after-market ROM available.

CyanogenMod 6 brought froyo features to 2.1, and was later updated to 2.2 It was then very similar to a basic 2.2 ROM, so it became outdated. But CyanogenMod 7 brought us a loaf of gingerbread this time around. This has put it much higher up.

In addition to the new faster and cleaner base operating system, CyanogenMod brought some new interesting features to the table.

Lockscreen Gestures

The name says it all. On the lockscreen, you are able to perform gestures that will do different actions, including enabling the flashlight, unlocking the phone, opening a shortcut, or opening an application.

DSPManager

I have really found no use for this quite yet, but others might. It allows you to modify your sound outputs. You can modify headset, speaker, and bluetooth separately, and in each pane you get options for a bass booster, and you also get a nice equalizer that is quite easy to modify. I don’t exactly know why you might need this, but I guess some audiophiles on a higher degree than me might appreciate it.

Themes Support

The operating system comes with a built in theme chooser and three themes. You can download new themes online on many different forum sites (such as xda-developers) and easily install them. One package includes the theming for the WHOLE operating system, including home screen, highlights, menubar tweaks, etc.

Incognito Mode

This feature is rarely used, but I guess could come in handy. Identical to the incognito mode in Google Chrome, this will prevent your phone from saving cookies, history, cache, or anything.

Installation

Installing this ROM was fairly simple, however it doesn’t come with Google Apps built in.

First, go to http://cyanogenmod.com and select your phone, then download the ZIP for your phone and put it on your SD card. Open up ROM Manager and select “Install zip from SD card.” Select the zip of CyanogenMod, then check the box that says “Wipe Data” and the box that says “Backup current ROM.” Continue with your installation and you will be greeted with CyanogenMod. You may notice, however, that there is no Market, YouTube, Gmail, etc. To install those, download the zip for your phone here and then flash it. To do this, transfer the Gapps zip onto your SD card and boot into recovery by booting while holding the down volume button. In the menu that comes up, select Recovery, and wait for it to boot. In the next menu, select “Install ROM from SD card,” select the Gapps ROM, and let it install. Then, reboot your phone, and you will be greeting with a Gapps enhanced CyanogenMod. Enjoy!

[For more info on installing ROMs and rooting, read my full guide here.]

Fix: ClockwordMod won’t boot after update

***UPDATE: Go into Android Market and update the ROM manager to the latest version. It will fix this problem so you can update straight from 3.0.0.5 to 3.0.0.8.

So I recently went to backup using the ROM Manager on my phone. It notified me that there was a new version of ClockworkMod, and I was currently on 3.0.0.5, and should update to 3.0.0.8. So I update, and when I reboot into recovery nothing happens. It stays frozen at the HTC Incredible boot screen.

Luckily, you can still boot into Android.

Here’s the fix.

Go into ROM Manager and flash 3.0.0.6, one version up.

After it flashes, boot into the recovery and select “Clear cache partition.”

Then, reboot into Android. Open ROM Manager, and flash 3.0.0.7.

Boot into recovery, clear cache, reboot, and continue doing this until you are finally at 3.0.0.8. It should boot into recovery just fine. Enjoy!

Worried about your server? Get warned if it goes down.

Are you worried about the state of your server?

Maybe you have a website, and you’re worried if it’s always up and running, especially when you’re asleep and can’t fix it.

Well, I’ve written an extremely simple script that will solve this issue for you. Just plug your mac into the sound system where you sleep and crank it up to full volume. Whenever there’s a problem, your system default error will start going off every three seconds. That should wake you up! Then, you can go over and check the state of things.

The underlying command here is ping. I am using what you type as a simple variable, $website, and using -A to make it audible and ring, and -i to time the ping out so you don’t accidentally crash your server. In the end, the command is

ping -A -i 3 $website

And when you type in the website, $website is replaced with whatever that is.

It’s not a complicated or amazing script, but it helps to get things done easier and faster.

Download

To use it, download the script and navigate to it’s enclosing folder using Terminal. Then, type:

chmod+x

This will make the script executable. Next, type:

./makesure.sh

You will be greeted and asked to enter the URL (or IP address) of the site you want to keep track of. Type in the URL and press enter. You will see the ping output across your screen updating every three seconds. If ping stops responding, your computer will begin to make the system default error sound every time there is a request timeout. If you have the volume loud enough, that should be able to wake you up.

Enjoy!