How-to: the Ultimate Laptop Upgrade (RAM and SSD)

Your laptop has a few mainly functioning parts. The hard drive, the RAM, and the CPU. The CPU, unfortunately, cannot be replaced, as in Macs they are soldered on to the logic board. however, you can upgrade  the other two things. Lets start with the hard drive.

Ultimate Hard Drive Upgrade: OWC Mercury Extreme Pro SSD
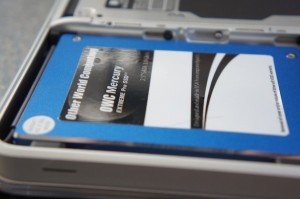
When you write and read data from a computer, you write/read from a hard drive. This is a small metal box with a few spinning disks inside and a needly thing that writes the data across.

An SSD looks (on the outside) just like a hard drive. It has the same connections and the same dimensions. But a peek inside reveals lots of chips, and a lack of moving parts.

That’s because SSD stands for Solid State Drive, because they are just that: Solid state.

But one of the biggest advantages to that would be the speed. I can write/read from this thing at a blazing 3GBps. Also, it holds a world record for fastest internal SATA II Drive. What does this mean for the user?

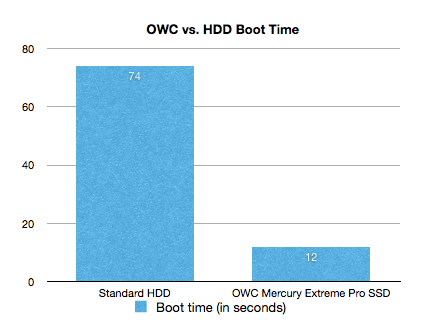
Lets look at some in-house tests.

With a standard hard drive: 1:14 to boot.

With this OWC Mercury Extreme Pro SSD: 00:12.

That’s enough proof for me.

And as far as apps go, they launch FAST. I can launch 6 applications and have them all open and running in less than 4 seconds.

This means that when you open things, they take less time to open. Enough said.

If you’re looking to upgrade your computer, this is probably one of the first things you should upgrade. Even though you might want a faster processor, it won’t speed up how long it takes for something to go from your hard drive to your screen.

The OWC Mercury Extreme Pro SSD comes in many sizes. I purchased the 115GB drive for approximately $230, and you can find this series here.

The ultimate RAM upgrade: Crucial 4GBx2 Kit
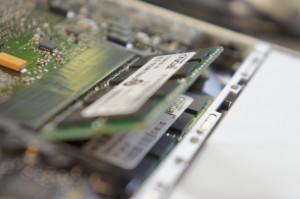
When you’re interacting with applications, a buffer of everything is stored in RAM. This is Random Access Memory, and it is made so that you can randomly access it. It’s extremely fast, which is what allows things like pop-up menus to instantly drop down. It’s also what keeps the base operating system going, and if you have so many applications running that your RAM is full, everything becomes hard drive base. Translation: things freeze, slow down, and crash. The easiest solution to this is to get some more RAM.

I ordered crucial’s 8GB RAM kit, as it wasn’t too expensive and seemed like it would work well. Most laptops have two RAM slots, so my 8GB kit came with 2 4GB chips. The amount of RAM that your computer supports varies. If you have an older Aluminum MacBook, then you can fit 8GB in there. However, the current MacBook Pros only support up to 6. Search for your model on crucial.com to find exactly what RAM you need.

Installation is fairly simple. Just take off the bottom of the laptop with a screwdriver, and move out the tabs next to those flashy green RAM chips. Then, smoothly slide out the chips, and replace them with the new and bigger RAM you got. Seal up that wound on the bottom of your computer, and voila, you have more RAM! No drivers necessary. If you have the MacBook 5,1, click here to get 8GB of RAM. If not, click here to go to the crucial site and find what RAM will work in your model of computer.

The result

Your compter will boot faster. Things will open faster. Things will run faster. Things won’t freeze. Things will crash less. In general, things will be faster and more stable. Enjoy!

Using AirPort express for AirPlay alongside a Time Capsule

You may remember that a long time ago I reviewed the Time Capsule. It’s a wonderful wireless AP, and all of my data is totally safe.

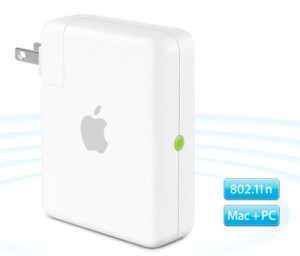
But the Time Capsule doesn’t have AirPlay. On AirPort extremes and expresses, there is a headphone jack, and when connected, you can wirelessly stream your music to your speakers from your iDevice.

I’ve had an airport express for a long time, but I stopped using it when I got my time capsule. After hearing about the AirPlay improvements, I decided to break the thing out.

The AirPort Express creates its own WiFi network, and if I’m connected to that then I won’t be able to backup to my time capsule. Luckily, it is now possible to plug the AirPort Express directly into the Time Capsule, and have them both work as the same wireless network. This means that I can stream music AND backup at the same time!

With this all settled, you will now see the AirPlay icon appear on all of your devices. From this point on, it’s all extremely easy. Just tap the icon and up pops a menu of all AirPlay devices on the network. Tap the speaker system you wish to stream to Voila, we have wireless music!

If you’re on a computer, however, you can only stream your music from iTunes. That is, of course, unless you have an app called AirFoil.

This allows any application on your computer to output sound to your AirPlay speakers.

However, there’s a small issue.

There is a two second delay between when you cause the sound to happen and when it actually comes out of your speakers. On the iDevices, the movies are in sync because they are decoupled 2 seconds back. When you change the volume on your computer, you will see the small notification popup, yet you won’t hear anything for two seconds. Quite annoying.

For videos, AirFoil has included the “AirFoil Video Player.” I don’t know if it’s very good, as I can’t even get it to work without freezing and crashing.

In general, this system is simple and functional. But if you’re trying to stream content from your computer, you will notice an extremely distinct delay. It’s not like that audio quality isn’t good, so all audio (including pandora and other streaming services) work fine.

AirPort Express

AirFoil

Plugable USB 2.0 USB Graphics Adapter

Monitors are an increasingly popular thing. They increase productivity, allow more room for multitasking, and prices are rapidly decreasing.

The poweruser knows:

I can buy a computer with a graphics card with multiple ports on it so I can plug in multiple monitors.

But I hear:

I am going to buy a large bulky computer that i$ really expen$ive $o I can plug in multiple monitors.

So what about the people who get a laptop, and use an external monitor with it, but want more?

That would be me.

There’s only one monitor port on my computer, which was already taken.

So for my third monitor, I used an old Mac Mini that I had lying around.

But the problem with this is that it was a totally different computer, so all of the logins were different, I had to use a network based mouse and keyboard sharing system, it was just terrible. And worst of all, all of the files on each of the computers were different. So when I wanted to open a document on my third screen that was on my first computer’s hard drive, it wasn’t possible without moving around the file first.

Alas, there is now a solution. And the title of this post says it all.

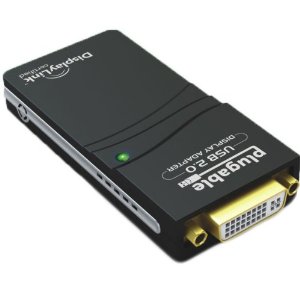
The Plugable USB UGA (Usb Graphics Adapter I’m pretty sure) works just like it should.

In the box

  • Plugable UGA
  • DVI to HDMI Adapter
  • DVI to VGA Adapter
  • Mini USB cable

Setup

Lucky for you, setup is fairly easy.

Before you do anything else, you need to go to the displaylink site and download the Mac drivers. Luckily, there is only one option for a driver, so you don’t have to make that half-minded decision on which one will actually do the trick.

After you have installed the driver and restarted your computer, you can start plugging things in.

As expected, use the mini USB cable to plug the UGA (the biggest piece) into your USB port. Then, plug in your monitor cable, using any adapters if necessary. If your monitor is DVI, then you won’t need any adapters and you can plug your cable straight into the UGA.

If your monitor is VGA, then you can just add the DVI to VGA adapter on top of the UGA, then plug your monitor into that.

Voila, it should start working. Your screens should turn blue and another wallpaper should appear on your USB Monitor.

For further configuration, just go into your System Preferences, click Displays, and click Arrangement. You can arrange your monitors so that they are extended displays and you can move your windows across all of them.

Speed and Usage

As stated in the owner’s manual, when there is nothing happening on the screen, the device itself is refreshing the display. This means that your computer isn’t working to refresh the display.

You can tell that only the device is refreshing when the green light on the UGA itself is solid. When it is flashing it usually means that something is moving on the screen. This means that your CPU is working to move every pixel over to the USB monitor. Because of this, you probably don’t want to run too heavy graphics on the display, as you will most likely overload your CPU.

Besides the CPU load, the speed isn’t perfect. It’s a tiny bit laggy, but not enough to be too concerned about. It works perfectly fine for things like facebook, browsing, spreadsheets, word processing, all that usual stuff. However, don’t try to use it for anything that involves games, videos, or a ton of pixels being constantly rendered.

However, you can’t be too disappointed. It’s not enough lag to make you not want to use it anymore (and I’m very sensitive about my lag, so that’s really saying something). Anyways, it’s going over USB 2.0 for god’s sake! It’s running a whole monitor off of two connectors (there’s four connectors in a USB port, 2 for data 2 for power).

One other thing I noticed was that the device got quite a bit hot when running. I don’t know if it was out of it’s operating range, but it was still quite a bit warm. It worried me a little bit, but it doesn’t seem to lower in performance even when warm, so I don’t think this should be too much of a concern.

And if you want more monitors, this isn’t just the end. You can have up to 6 of these connected to your computer at once (hopefully your CPU can handle it), which means that if you have a laptop with a monitor port built in (which would make two screens), then you can have up to eight screens running off of nothing but a laptop! (You can plug the UGAs into a hub, as you probably don’t have six USB ports on your computer.)

Conclusion

If you want more monitors but don’t have the graphic cards, this is the best way to do it. The resolution and color renders perfectly, and even though it uses some CPU when rendering, it works perfectly for spreadsheets, word processing, and other basic tasks. What it doesn’t work for is heavy graphics rendering, such as video and gaming. Use a directly connected display for those.

These are compatible with windows and linux in addition to mac, so you mac haters are in luck.

They are for sale on amazon for $65, and you can find that here.

INSTALLING ROMS ON YOUR DROID INCREDIBLE: FULL GUIDE

1. Background check and root

If you haven’t yet, click here to read the guide on rooting your droid incredible.

2. Find some ROMs

The first thing you need to install a ROM would be the ROM itself (go figure).

If you have a droid incredible, I highly recommend downloading the fusion ROM from this post. Fusion is an extremely well-done and compatible ROM based off of CyanogenMod7 (another ROM), so you’ll get the dimension-opening power of 2.3.2 gingerbread.

If you don’t want this ROM, you can always do a google search. Not too hard, eh?

2. Download the ROMs

With the example I’m using (fusion), there are two ROMs. It includes first the base gingerbread ROM, but on top of that it also has a ROM for the Android Market, Gmail, YouTube, and Maps applications, as they do not come by default on the Android base operating system.

For now, I am only going to discuss installing the base, but for other ROMs it is sometimes the same situation with the two seperate ROMs. So later on I’ll discuss installing the gapps (dev talk for Google Apps).

There are two ways you can get the ROM to your device.

The first one involves your computer. Download the ZIP file(s) onto your desktop, then plug in your phone and move the zip(s) onto the root of your SD card.

The second way requires an app called Root Explorer (I discussed it in the guide to rooting). On the phone itself, use the web browser to download the ZIP file(s). Then, open up root explorer and navigate to the downloads folder (probably on your sdcard). Then, tap and hold the zip and select move. Navigate to the root of the sd card and tap paste. (Do this with the second ROM if you have one).

3. BACK UP!

This is an extremely important step to this, because if you forget to backup then you will never be able to restore your phone to the condition it was in when you rooted. That means that the HTC sense operating system that came on your phone will be GONE.

So, you’ll need to boot into recovery and backup.

Turn off your phone and turn it back on while holding the down volume button. It will boot into HBOOT, a diagnostics screen. Once it is done checking for update images on the SDcard, use the volume and power buttons to navigate to and select RECOVERY in the menu that you see.

It will show the HTC booting screen, but then boot into recovery (with very small fonts, I might add).

In this screen, scroll down and select backups (you can now use the optical trackball to do this). Then, select create a backup (or something like that).

It might take a while, but eventually a backup should be made of all of your stuff on your phone. So we shall now proceed to the next step.

Install the ROMS

Now is the fun part.

Boot back into the recovery screen by holding the down key and the power button at the same time.

Then, hit Wipe Data/Factory Reset.

This will wipe all of the data off of the phone.

WAIT WAIT WAIT! I STILL WANT MY BACKUPS!

Calm your caps lock keys, wiping the data from the phone doesn’t wipe out the sd card, which is where the backups are.

Now, select install zip from SD card.

Select choose zip from SD card

then, select the zip that you either downloaded or transferred over.

Then, select the yes, and magically, the ROM will install.

Wait a while, and it should be installed and working!

Upon first boot it will take a very long time to load. It has to configure everything and get it working. But every time you reboot the device the reboot time should be less and less until it is less than 30 seconds.

Anything else?

You might have downloaded 2 zip files to your SD card which you downloaded from the site that gives out the ROMs. This is probably because one of them is a Google Apps zip.

Make sure that before you move the two zips on to the sd card, you name them so you can tell which one is the base OS and which is the Gapps. (if you have no idea what I’m talking about, you need to click here and read up on your background info.) Make sure that first you install the Base OS zip, then, after it’s done, select Install zip from sdcard once again and select the gapps zip. Make sure that you don’t hit wipe data/factory reset, because what that will do is wipe out the base OS so you only have gapps and nothing to run it on. Not too functional if I may say so myself.

Where to find these ROMs?

As I said, the best ROM for the Droid Incredible at the moment is the Fusion ROM.

But there’s other ROMS too.

One of the most popular is CyanogenMod. They’ve been releasing ROMs with upgraded features since the dawn of time (or android).

However, after a little mixup with google, they are no longer allowed to have Gapps on their OS. So you’ll have an android phone with…. no android market. Or gmail. Or youtube. Have fun!

One of the easiest ways to find ROMS for your droid incredible is to just google it.

If you google Droid Incredible ROMs, a large amount of different websites will show up. If you are too lazy, here’s a direct link to that google search for ya. You’re welcome.

ROOTING YOUR DROID INCREDIBLE: FULL GUIDE

1. Background Check

Please click here and read up all about what it means to root and install ROMs, then do step 2.

2. YOU NEED AN SD CARD!

Make sure you have an SD card in your phone. If you don’t then all hell will break loose and the universe will be sucked into an unknown dimension beyond the horizon of scientific knowledge. Or something along those lines.

3. Enable USB Debugging

On your Droid Incredible’s home screen, tap menu, select Applications, tap developer, and check the box that says USB Debugging.

4. Download unrEVOked

unrEVOked is the limera1n for all HTC android phones (hence the capital EVO in the middle).

Click here and select which operating system you own. The download will begin.

5. Plug in your device and root

The time has now come.

Plug in your Incredible to your computer over USB. You should see a notification that says USB Debugging is enabled.

Also, pull down the notification bar and select the USB connection (not the debugging, the other one). Then, select to have your phone as a Mass Storage Device or something like that (My phone has been screwed over so much that I no longer have the stock htc operating system installed, so I can only be so specific to my knowledge).

You should see TWO drives mounted on your computer, one for the internal phone storage and one for your SDcard.

Then, hit the reflash button and take cover.

Time will pass into another dimension beyond the human eye’s comprehension of life itself. Portals will contradict all possibilities of universal independence. Our very existence will tremble at the rip in the fabric of space and time.

Oh, and you’re device will be rooted. 🙂

6. Did it work?

After you’re device is rooted it *should* be able to boot into ANOTHER DIMENSION IN SPACE AND TIME…. wait…. into the standard 2.2 htc sense froyo you had before you rooted.

However, if you look in your applications drawer, you should see a new app called Superuser.

Congratulations, you’re rooted!

7. Get root apps

Now, you can run applications that require root access.

A few of my favorites:

Wireless Tether

If you’re on the road and want internet on your computer or iPad, then you’ll have to fork an extra $20 a month to verizon and suffer a 2GB limit.

But not if you have Wireless tether!

With Wireless Tether, you can create an encrypted wireless network with access control and everything, and the bandwidth limit is only that of your phone’s data plan.

You can find Wireless Tether by searching in the android market.

Root Explorer

If you keep getting warnings telling you that your SD card is full, then you’ll love Root Explorer. You can browse your android’s files, and even delete, rename, or move things around from both the SD card and the internal storage. You can delete those huge downloaded zip files, or all of the pictures you don’t want from the DCIM folder. Handy! This is available in the Android Market as well.

screenshot

If you ever do any kind of posting to a blog about android stuff, this application is a MUST. You can easily take a full resolution screenshot by just shaking the device. Then, you can plug it into your computer and transfer the screenshots off of your SD card.

8. Got ROMs?

One of the most amazing parts of having a rooted android phone is that you can install other operating systems. Want gingerbread? HTC hasn’t even released the update. But now that you’re rooted, you can install other operating systems without htc’s permission.

Here’s a full guide on how to install ROMs.

Better alternative to OMGB-6! HELLO FUSION!

OMGB-6 is great. It’s a simple, well made Gingerbread build for the droid incredible that worked really well.

But it had a couple problems.

First of all, it didn’t support google voice.

Also, many apps didn’t work. Twitter didn’t work, and the app I am doing testing for didn’t even work. Also, the version of the market was outdated.

Well, if you want a fuller and better and more supported phone, then say hello to the fusion rom.

Fusion is built on CM7, and has a base of 2.3.2. This gingerbread is tasting FRESH.

It boasts a newer version of the android market, FULL app support, and it also supports google voice.

If you don’t know how to install ROMS, then you have a bit of reading to do.

First, click here to learn what all of this means and do your background reading.

Then, do steps 1-4 on this page.

Downloads

BASE

GAPPS

Installation

Put both of those on your SD Card.

Then, reboot into recovery and BACK IT UP. BACK IT UP. BACK IT UP… STEADY….. BACK IT UP…. STOP! Don’t do this with ROM manager. Why, I don’t know. But apparently bad things happen and black wholes open into other dimensions when you use the ROM manager to install this. O.o

Once you’ve backed up hit Wipe data/factory reset in the recovery.

Done?

Ok.

Now, hit “install zip from sd card”, select “choose zip from sd card”.

And in the list that appears, select fusionbase.zip.

Then hit yes out of the large groups of nos.

(tic toc tic toc)

Done yet?

No?

Ok…

(tictoctictoctictoc)

Done now?

Good.

Now, go through the same screens, but when you select the zip select the gapps zip and install it.

While that’s installing, I’ll explain why there are two separate zips for this ROM.

Android is a base operating system. It doesn’t include the android market. It doesn’t include gmail. It just includes the base operating system.

So the base zip is the 2.3.2 base operating system without the android market or gmail or anything like that.

So you could just install the base and nothing else. But I don’t think you would be too happy when you can’t download any apps.

Done yet?

Ok good.

Now, select “Wipe cache partition.”

Done?

That didn’t take long.

Now, hit reboot, and wait a LONG time. It will probably be 5 minutes or so of the flashing android logo before it actually boots.

But once it does, you’re in business! Enjoy the new market, full app support, and using your Google Voice account, all without sacrificing the magnificent dimension-opening speed (and bragging rights) of Gingerbread 2.3.2.

Rooting, Recovery, and ROMs: What it’s all about.


So you’ve got an android phone.

And you can use the stock operating system with all of the manufacturer’s skinning and apps and versions and keyboard and everything.

Congratulations.

But if you are feeling a bit ballsy, then you can really take your phone to a true mobile computing level.

Here’s the steps to this.

  • Root
  • Install a recovery
  • Find ROMS
  • Make backups
  • Install ROMS
  • Use Wireless Tether

Lets explain what all of this is.

Rooting

Rooting means that you can create a way for apps to get superuser access. This is handy for getting to wifi, modifying files, or installing ROMs.

Recovery

For the Recovery, that will usually be installed when you root the phone. The recovery is where you can make and recover backups of the phone, install ROMs, and a slew of other stuff that might come in handy (but could also kill your phone).

Backup

Once you have the recovery installed (you can’t have the recovery without the root FYI) then the first thing you need to do is make a backup of your phone.

This is pretty easy. Just boot into Recovery (just hold down volume on boot and select recovery when given the option), Select backups, and select make a backup now. Your screen will flash many random things, and no matter how long it takes, don’t force shut it down or take out the battery. It will almost always finish.

ROMs

Once you have a backup of your normal operating system, you can go crazy with other ROMs.

ROM stands for Read Only Memory. In android poweruser terms, it is an operating system that can be installed on the phone using the recovery mode.

You can find many roms on the internet all over the place. XDA-developers is a great place to get ROMs. Sometimes a ROM will even be for the next Android version that htc hasn’t released yet.

When you download a ROM, it will come as an easy to handle zip file. And from here it’s simple.

Plug in your phone to your computer and mount it as a disk drive/USB Mass Storage. Then, just click and drag the ROM from your computer onto the root of the SD card. Eject and unplug the phone, then reboot into recovery.

Select install zip from sdcard and select the name of the file that you moved over. Then, choose the yes among the long list of nos to confirm you really want to install it and whabam, you will be installing a new operating system.

Then, reboot your phone, and you will be with your brand new OS that you yourself downloaded from the internet and installed on your phone.

Unfortunately, this process is different for every android phone. Sometimes there is a one-click root. Sometimes you have to use a command line application to open a port on the phone and install the root like that. But once you have gotten the phone rooted, installing zips is a piece of cake.

Wireless Tether

Aside from installing ROMs, another thing you can do is install and use apps that usually wouldn’t be possible if you weren’t rooted.

The one example I am going to use here is called Wireless Tether. And basically, it’s just that.

You can make your phone into a wi-fi hotspot with no hassle, just using verizon’s mobile hotspot plan. But that will cost you an extra $20 a month and you have a 5 GB limit before you start getting overage fees. Ouch.

With Wireless tether, you can connect unlimited devices, the data comes out of your data plan for your phone, and that also means there’s no overage fees.

Once you are rooted, just search for Wireless Tether in the android market and you will be able to install it on your phone and use it. You can change the SSID of the WiFi network, and you can even enable encryption and a password on your network. In addition, it allows you to use access control, where you can disable a device’s access to the network. Very handy sometimes.

Do it yourself

So that is the whole concept of rooting, recovery, and roms. You can find roms for things using google: Just do a search for “[your phone] 2.3 ROMS” or “[your phone] Cyanogenmod” and you should have plenty of luck. If you want to find out how to root your phone, just do a google search for “[your phone] root” and that should turn up some helpful results.

If you have a rooted droid incredible, click here to learn about the stable and functional gingerbread rom by WeDoDroid.

Hanging restore after Jailbreak fix

Here’s the storyline.

You jailbreak your iPad.

Then, you find an app called Wi-Fi sync, where you can sync your iPad over Wi-Fi with your computer. This includes both an app from Cydia on your iPad AND it requires an app on your PC/Mac.

Then, you want to undo the jailbreak.

So you go into iTunes and click the Restore button.

It restores for the most part, but then, it hangs at the very end.


Uhoh.

Now your iPad is in recovery mode, and you can’t restore it.

Well, as you might have thought, you need to uninstall Wi-Fi Sync!

Just download the file HERE (mac only) and run the uninstaller. After you uninstall, the restore should go perfectly.

The art of continuous shooting

Continuous shooting is great.

For those who don’t know exactly what it means, it is when you use a camera to take shots as fast as possible. Because the shots are so high resolution it can’t be as fast as video, but if you are trying to take a picture of something moving it can help you to increase your chances of getting the right shot.

In general, most cameras can do around 5 frames per second.

My new nNEX-5 can do a burts for a second or two of 7 frames per second, and it also depends on the class and write speed of SD card you have in the camera.

But if you want to take a lot more pictures in a row it does about 5 per second.

Now a cool thing about this is that you can walk around or through a town taking pictures like this and then ut all of the pictures. You obviously can’t tell it’s a video, but it gives it a creative aspect (especially with the right soundtrack).

I was at my friend Gustaf Soderstrom’s house and of course he took my camera and decided to walk around with it. The pictures were kinda uneven, but he inspired me to use the continuous shooting to make a tour  of his house.

Now a tour of a house with standard 30fps video without sound would seem really boring. But if it’s a stop motion video with a cool soundtrack then it ends up looking kinda cool.

Feel free to comment with a link to a video that YOU did with continuous shooting. 🙂

Computer crashed, forgot to backup? Here’s a solution.

Recently, I totally killed Gustaf Soderstrom’s computer.

It’s a mac mini, and on starup it was totally stuck at the apple  loading screen .

He doesn’t backup his data on the Mac Mini, and he had some homework that he needed off of his hard drive.

I have a USB external enclosure so we could take the hard drive out of his computer and get the data off on another computer, but I didn’t have the correct screwdriver to take out the hard drive.

So here’s how I ended up getting the data off.

You will need:

1. No hardware problems! The reason that your computer is dead MUST BE ONLY SOFTWARE RELATED!

2. The original install disk that came with the computer

3. An external hard drive bigger than the estimated amount of data you have on your dead computer.

Lets get to this.


Step 1. boot from the original install CD

Put in the CD and boot up holding the C key. It will take a while to boot but it will boot from the install CD.

Step 2. Plug in the USB hard drive.

Simple enough. USB, Usb. Congratulations.

Step 3. Open Disk utility

At the screen where it asks you to install, go to Utilities>Disk utility.

Wait for it to load, and trust me, it eventually will. 🙂

Step 4. Copy the data.

You should see both your USB drive and your internal hard drive in the list on the left of disk utility. Select the internal hard drive (the one that actually has a name and is grouped under the physical hard drive) and select from the top “Create new disk image.”

Select for it to be read/write and make sure the encryption is set to none. Above where to select that it probably says root with a little home next to it. Click that dropdown and select your usb hard drive. Then, save the disk image.

Step 5. WAIT

This will take forever. for 65 GB, it took about an hour and a half.

Step 6. Eventually the window will close and you will have no idea that you ever started the disk image copy (it doesn’t even tell you that it’s done or anything).

Step 6. 5: Make sure it worked (optional)

If you have another computer, plug in your USB hard drive and open the disk image. Skip the verification process as it’s wasted time. It should open a window and you should see a Users, Library, Applications, etc. folders. If you see these then congratulations, you’re successful!

If you don’t have another computer, you have to skip this step and hope for the best!

Step 7. Install!

Quit disk utility and the installer will reopen. Go through the simple steps (click continue, click install) and it will install a fresh version of your operating system.

Step 8. Put your data back

Plug in your USB drive and mount that disk image. Replace the applications folder already on the fresh installation with the one from your computer and do the same with your whole home folder (especially the library folder as that contains crucial application support).


Congratulations! You just got your stuck computer reformatted and saved your data!

Thanks gustaf for letting me kill your computer and find out how to fix it again! 🙂

Cortex+tumblr+organ=beauty

There’s always that random thing you want to share with your friends.

Pictures, text, a conversation you had, you’ll always come across something.

Now usually for this we use facebook.

But if you want to share with the public, you usually use twitter.

But twitter is only text. I mean, it’s only 140 characters of it. If you want a picture in it, you have to add in a link that people have to click.

That’s why people have blogs.

But blogs can be a pain to post to. You have to login, create a new post, add in the stuff, then post it. It’s really not worth the time.

And blogs tend to look kinda standard. I mean, they can look nice, but they all look the same.

I have a solution for this.


Part 1: The blog

tumblr.

Tumblr is a customizable and free blogging platform that is easy to use.

Unlike others, you can post text, but it gives you separate things for text, links, conversations, audio, quotes, and video. And they all show up in their nice ways (quotes have “s around them to make them look quoty). It’s flexible and postable by mobile, and you can have it post to your twitter, facebook, etc.

tumblr.com

2. Time

Cortex.

I did a review of cortex a little while back and let me just say that it is still beautiful.

Cortex is a chrome extension for sharing things really fast. Here’s a demo video that I made (and that was used in the review of cortex on mashable, let me have you know):

As you can see, there is that magical t for you to post to tumblr, so you could use that to publish things quickly to your blog.

One cool thing about it is that you can use it to yes, share just the link to the webpage, but if you click and hold over an image it will share the image (and it will post it to tumblr like an image too). Select text and click and hold over that it will share the quote from the webpage (and yes, it will post it to tumblr like a quote). Click and hold over a youtube video and it will share the video, not a link (and YES, it will ALSO post it to tumblr like a video). It’s nice to see the cortex is so well integrated.

As I said, cortex is a chrome extension, so if you are desperate for sharing you may have to switch to chrome (which really isn’t such a bad thing let me have you kn0w).

Cortex homepage

Cortex on Chrome Extensions

3. Blog appearance

While it’s nice to have a blog in reverse chronological order with one thing on top of the other, you can spice it up a little but with an amazing theme called organ.

What it does it makes everything in to skinny rounded columns (reverse chronological order from right to left) and does different things depending on what they are.

Every different type of post has differently colored columns.

Pictures it will take a strip of the picture and show it in the column.

Everything text (text quotes links) it will adapt the text to go with the theme and then mumble jumble it in big letters down/across the column.

Now you may say “what the hell, I can’t see any of the text!”. Well, there’s an answer. Hover over a column and it will expand to show you a little bit more.

Hovering over the text will make the beginning of it drop down sideways in a single line. Then, you can click on the arrow that shows up at the top of the column and see the full posting.

It’s nice because at first it shows you a lot of posts in a very small space, then when one looks interesting you can hover over it, and if it’s a dud you can hover over another (without having the page have to reload) and if it’s a good one then you can click on the arrow to expand it (and wait for the page to load but it’s probably worth it).

To get this theme on your tumblr, choose to customize your site, click on theme on the top bar, and scroll WAY DOWN to the free themes and find the one called organ. It will be near fluid. 🙂


Personally I use this system to share EVERYTHING, so my site ends up looking like brain vomit. Because it’s so easy, I post to it ALL THE TIME. It’s nice because it’s constantly updated and there’s no thought put in to it. Oh, I think this looks cool. SHARED.

To check out my site done this way head on over to tumblr.maxswisher.com!

Teleport

Many people I know have multiple Macs. The most standard multi-mac setup would be one desktop (usually a Mac Mini) and a laptop (Macbook, Pro, or Air). This is usually so that one can have power and still be mobile. But when it comes time to sit down and do some work, it might be useful to have two screens (studies show a dramatic increase in productivity with more screen real estate). But one problem faced is that with multiple computers comes multiple mice/keyboards. Well, if you’re all macs, then there’s a solution.

Teleport is a free and easy way so that you can use one keyboard/mouse and have it span across multiple computers (so you don’t have to move your hands to control a different computer). It’s extremely simple to use.

To get it all working, all you have to do is download teleport. Teleport is a Mac Preference pane (.prefpane) so to configure teleport you open system preferences and click on teleport (under other). Here you can configure settings and arrange the screens. NOTE: Make sure that both Enable Teleport and share this computer are both checked.

In the preference pane you can configure things like pasteboard sync and choose if you want to only switch to the other computer when you are holding a specific key down.

the rest is pretty simple. Just move your mouse across the edge of the screen and it should show up on the screen of the other computer. Whichever computer your mouse is on will be the computer that the keyboard affects. However, the volume keys don’t work across Teleport (neither does multitouch except for scrolling).

Teleport is a great free app that works and does what it should quite nicely. There are some problems when your mouse is on a client computer screen and the client computer loses internet connection. It takes quite a while for your mouse to reappear on your main computer. But the convenience of this application overcomes this setback.

Teleport main site

Teleport direct download