Better alternative to OMGB-6! HELLO FUSION!

OMGB-6 is great. It’s a simple, well made Gingerbread build for the droid incredible that worked really well.

But it had a couple problems.

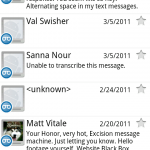
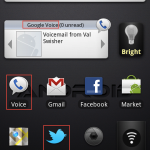
First of all, it didn’t support google voice.

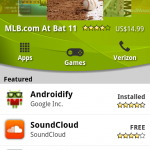
Also, many apps didn’t work. Twitter didn’t work, and the app I am doing testing for didn’t even work. Also, the version of the market was outdated.

Well, if you want a fuller and better and more supported phone, then say hello to the fusion rom.

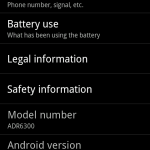
Fusion is built on CM7, and has a base of 2.3.2. This gingerbread is tasting FRESH.

It boasts a newer version of the android market, FULL app support, and it also supports google voice.

If you don’t know how to install ROMS, then you have a bit of reading to do.

First, click here to learn what all of this means and do your background reading.

Then, do steps 1-4 on this page.

Downloads

BASE

GAPPS

Installation

Put both of those on your SD Card.

Then, reboot into recovery and BACK IT UP. BACK IT UP. BACK IT UP… STEADY….. BACK IT UP…. STOP! Don’t do this with ROM manager. Why, I don’t know. But apparently bad things happen and black wholes open into other dimensions when you use the ROM manager to install this. O.o

Once you’ve backed up hit Wipe data/factory reset in the recovery.

Done?

Ok.

Now, hit “install zip from sd card”, select “choose zip from sd card”.

And in the list that appears, select fusionbase.zip.

Then hit yes out of the large groups of nos.

(tic toc tic toc)

Done yet?

No?

Ok…

(tictoctictoctictoc)

Done now?

Good.

Now, go through the same screens, but when you select the zip select the gapps zip and install it.

While that’s installing, I’ll explain why there are two separate zips for this ROM.

Android is a base operating system. It doesn’t include the android market. It doesn’t include gmail. It just includes the base operating system.

So the base zip is the 2.3.2 base operating system without the android market or gmail or anything like that.

So you could just install the base and nothing else. But I don’t think you would be too happy when you can’t download any apps.

Done yet?

Ok good.

Now, select “Wipe cache partition.”

Done?

That didn’t take long.

Now, hit reboot, and wait a LONG time. It will probably be 5 minutes or so of the flashing android logo before it actually boots.

But once it does, you’re in business! Enjoy the new market, full app support, and using your Google Voice account, all without sacrificing the magnificent dimension-opening speed (and bragging rights) of Gingerbread 2.3.2.

Rooting, Recovery, and ROMs: What it’s all about.


So you’ve got an android phone.

And you can use the stock operating system with all of the manufacturer’s skinning and apps and versions and keyboard and everything.

Congratulations.

But if you are feeling a bit ballsy, then you can really take your phone to a true mobile computing level.

Here’s the steps to this.

  • Root
  • Install a recovery
  • Find ROMS
  • Make backups
  • Install ROMS
  • Use Wireless Tether

Lets explain what all of this is.

Rooting

Rooting means that you can create a way for apps to get superuser access. This is handy for getting to wifi, modifying files, or installing ROMs.

Recovery

For the Recovery, that will usually be installed when you root the phone. The recovery is where you can make and recover backups of the phone, install ROMs, and a slew of other stuff that might come in handy (but could also kill your phone).

Backup

Once you have the recovery installed (you can’t have the recovery without the root FYI) then the first thing you need to do is make a backup of your phone.

This is pretty easy. Just boot into Recovery (just hold down volume on boot and select recovery when given the option), Select backups, and select make a backup now. Your screen will flash many random things, and no matter how long it takes, don’t force shut it down or take out the battery. It will almost always finish.

ROMs

Once you have a backup of your normal operating system, you can go crazy with other ROMs.

ROM stands for Read Only Memory. In android poweruser terms, it is an operating system that can be installed on the phone using the recovery mode.

You can find many roms on the internet all over the place. XDA-developers is a great place to get ROMs. Sometimes a ROM will even be for the next Android version that htc hasn’t released yet.

When you download a ROM, it will come as an easy to handle zip file. And from here it’s simple.

Plug in your phone to your computer and mount it as a disk drive/USB Mass Storage. Then, just click and drag the ROM from your computer onto the root of the SD card. Eject and unplug the phone, then reboot into recovery.

Select install zip from sdcard and select the name of the file that you moved over. Then, choose the yes among the long list of nos to confirm you really want to install it and whabam, you will be installing a new operating system.

Then, reboot your phone, and you will be with your brand new OS that you yourself downloaded from the internet and installed on your phone.

Unfortunately, this process is different for every android phone. Sometimes there is a one-click root. Sometimes you have to use a command line application to open a port on the phone and install the root like that. But once you have gotten the phone rooted, installing zips is a piece of cake.

Wireless Tether

Aside from installing ROMs, another thing you can do is install and use apps that usually wouldn’t be possible if you weren’t rooted.

The one example I am going to use here is called Wireless Tether. And basically, it’s just that.

You can make your phone into a wi-fi hotspot with no hassle, just using verizon’s mobile hotspot plan. But that will cost you an extra $20 a month and you have a 5 GB limit before you start getting overage fees. Ouch.

With Wireless tether, you can connect unlimited devices, the data comes out of your data plan for your phone, and that also means there’s no overage fees.

Once you are rooted, just search for Wireless Tether in the android market and you will be able to install it on your phone and use it. You can change the SSID of the WiFi network, and you can even enable encryption and a password on your network. In addition, it allows you to use access control, where you can disable a device’s access to the network. Very handy sometimes.

Do it yourself

So that is the whole concept of rooting, recovery, and roms. You can find roms for things using google: Just do a search for “[your phone] 2.3 ROMS” or “[your phone] Cyanogenmod” and you should have plenty of luck. If you want to find out how to root your phone, just do a google search for “[your phone] root” and that should turn up some helpful results.

If you have a rooted droid incredible, click here to learn about the stable and functional gingerbread rom by WeDoDroid.

Motorola Xoom Tablet: First Impressions

While at the Launch Conference, I got to play with Robert Scoble’s Motorola Xoom. Here’s what I thought.

Software:

Honeycomb was quite a bit mesmerizing. It looked beautiful on that tablet’s screen, and it’s 3D rendering capabilities showed on the home screen. The speed was pretty good, and the browser seemed extremely nice and smooth to use. The software side of this tablet really shined in speed and smoothness of effects, and this tablet would have been terrible with anything but honeycomb.

Also, remember when BumpTop was bought by Google?

Well, turns out they used some of their 3D stuff in Honeycomb. Good to see such an awesome piece of software go to a good cause!

Hardware

Lets start off with this: I hated the widescreen layout. I prefer to use my iPad in horizontal mode because when reading you can see a lot more, therefore you don’t have to scroll as much, and the Xoom sideways resulted in a very overwhelming layout that was like a widescreen monitor turned sideways.

I HATED the location of the power button. It’s in a very odd place in the back. Someone had to literally show me where the power button was. If you can’t immediately turn it on without any doubt of the power button location, you know that there’s a problem with your product.

The two cameras? Absolutely terrible. They don’t even have an auto focus, or a focus at all. I would never even attempt to take a picture with this thing.

Conclusion

Overall, it’s a nice product, but the screen annoyed me, the power button takes getting used to, and the cameras aren’t even worth having. They are worse than nothing, because you get to see what it would be like to have a camera on a tablet, but a terrible implementation of it.

And for $800? Don’t think so.


Otterbox Defender Case for iPhone

Otterbox is known for their high quality cases. They have many series of cases, each with their own level of protection, and here I have the series that boasts highest level of ruggedness, the Defender Series (for iPhone).

This case takes heavy duty to a new level. It features multiple layers of protection, starting with a silicone layer the outside, a hard shell inside, then in that soft felt against the phone itself.

In addition to the shock protection, it has rubber plugs to keep dust out of the ports, and has plastic protection over the screen, camera(s), and apple logo in the back (a stylish touch I guess).

Unlike other cases, the plastic protection over the screen isn’t adhesive. The screen protector is actually part of the case. This is definitely very cool (so if you don’t want the case on it then the screen protector comes off too), but there is a downside. If you have scratched up the screen cover and want a new one, then you have to get a new/different case.

Also, if you get dirt on any of the camera protectors, then you can see a bit of a haze over the camera. Yes, this can be solved by simply wiping off the cover, but this is bittersweet. The camera itself ends up being more protected against dirt and scratches, but when you get the cover dirty/scratched you can see the results in your pictures/video.

So who is this case for? I’d think that this case would be for the people who really handle their device harshly. If you’re a construction worker and drop this off a roof, then whoops! The phone should be fine. This is great if construction workers want to have a fancy expensive smartphone but don’t want to replace it all the time because it’s broken.

This is also good for those clutzes who tend to drop their phone all the time. If you don’t drop your phone that much at all, then you might want to go with the commuter series, which still offers good protection but has a little bit more style. But this case seems to be up for some of the worst conditions someone could throw at it.

But I have a droid! Or a Nokia! and I don’t like black! I want pink! No I want blue! No red!

Calm down internetgoer, there’s hope. Otterbox sells this case for a large range of models in many different colors.

The case sells online for $50, which seems a bit excessive but you’re getting protection that’s worth the price.

Otterbox Defender Homepage

Defender for iPhone

Recent verizon support call: the good and the bad

So my Droid Incredible has been doing some odd things.

First of all, it didn’t update to 2.2 correctly. It tried and failed.

Second of all, it keeps rebooting itself randomly.

So we call up verizon support about both problems. Lets start with the bad:

The Bad:

We called and a nice lady answered who had us go through some simple procedures like a hard reset. We changed some settings to try and help the rebooting. As far as the update goes, she told us to go to our local verizon store because they had “more information”. So the next day we went and waited in line and everything and what does the guy say? There’s nothing we can do. You’ll just have to wait for the update. Now inferring logically, I argued that “The system has the phone marked as upgraded, even though it failed the install.” The guy says “WELL, it takes about a month to roll it out and everything.” He really didn’t get that we HAD gotten the update, it just didn’t install. Once again, “Well, you just have to wait about a month and see.” Thanks for the help. We schlepped all the way over to a verizon store, waited in line, and we get absolutely no valuable information. Great.

The good:

So after that, we call verizon again and someone knowledgeable picks up. We had to wait on hold for 8 minutes but let me say, it was well worth the wait. He asked about the water activation sticker and had us look at the firmware on the device. And he says (finally) “Well, the system has your device marked as upgraded, even though your phone says differently.” THANK YOU. I’M RIGHT. THE TWO OTHER PEOPLE WE TALKED TO WERE WRONG. So he asked if there was any physical damage and hallelujah, a replacement phone is on it’s way.

But the real question is, why did the two other people there have no idea what they were talking about? I mean, come on verizon. Why would you hire them if they aren’t knowledgeable? These are questions that may never be answered, but in the mean time, here comes a device with 2.2 pre-installed. Yay!

Wireless Tether with Droid Incredible

So let’s just say that you are driving somewhere and you have your computer (or iPad or iPod touch for that matter) along with your droid incredible. Well now for free (actually, the expense of battery life) you can use your Droid Incredible as a wifi tether, so you can have an iPad on verizon.

Sadly, the speeds are dramatically reduced to a groping 70 kb/s. But I think it’s better than nothing. Can load pages, not so great for downloads and video/audio streaming such as youtube or pandora.

Step 1. Make sure your phone is rooted. Just do steps 1-4 of the tutorial HERE (continue the steps to install android 2.2, if desired!).

Step 2. On your incredible go to THIS LINK (try using chrometophone, review on that soon!)

Step 3. Once the link is downloaded open it and install the application.

Step 4. Open the application on your phone.

Step 5: Press menu and go into the settings and change around your preferences. change the SSID, and add a passphrase. Enable access control if desired.

Step 6: Press the big tether button.

Step 7: On your wifi enabled device go to the network selection and select the nework name that you had entered in the SSID preferences. Enter your asscode and Voila, you can connect to the internet!

One of the cool benefits of this is that you can be on the internet while in a car. Cool, eh?

Traitor? I think not.

Some people have said some hurtful but understandable things about me, as said in the title of the post.

Well, allow me to say, that I’m not switching over to chrome OS. I’m not switching to windows either, I’m just switching over to android.

What’s the big difference between Mac OS X and iOS? Well, I mean other than one is a mobile operating system. Mac OS X allows development to run in the background. Mac OS X also allows applications to manipulate the core of the operating system (although not preferred).

iOS is completely shut off. For example, people can’t even use their own APIs! It is a closed off system and it is completely CLOSED source.

Android on the other hand seems more like Mac OS X. It is open source, so people can use their own APIs to do whatever they want. Apps still need to be accepted into Android Market, but there is an option to allow other applications that weren’t approved by the app store to be installed. And that’s what makes the difference.

So I’m not exactly a traitor, I’m just supporting what I believe in and personally is best for me. I’m sure I’m not the only one…. Anyone?…….. Comments welcome.

Droid Incredible: First impressions

You may have read the post about me getting a new phone. Well I got it, and after about a day of use I’ve gathered some opinions. First of all, the thing is high off of a 1 ghz snapdragon processor. Even with widgets and widgets running, the thing is still extremely snappy. Another great thing is HTC sense, which allows a cool interface with some added features. HTC also packed in their own keyboard instead of the defaultandroid keyboard and it allows easier typing. Only thing I don’t like is the haptic for the keyboard because if you type really fast you have a buzzer in your hands. Another thing I love is the notification system. It makes a sound and buzzed but unlike the iPhone the notifications are at the top if the screen and you can continue doing what you are doing. Another big plus is the built in gps with turn by turn navigation. Sweet! And that adds geotagging to the 8 megapixel camera with dual led flash. It is now officially my only camera. You can also broadcast live to ustream with it.

Although there us so much good, there is one big bad. Although it’s the Droid incredible, the battery life is not so incredible. I want to get an extended battery but $80? I don’t think so. I’ve never made it a full day even with it off for most of it. The battery life is indeed a failure.

Good phone, camera, gps, and more, but not so good battery life.

Expect more in depth reviews is everything mentioned above!

P.S. I wrote this using the incredible. Sorry for typos!