Oh, How Far Computers Have Come

Computers have come a long way in the past half century. I’m going to compare two computers, one from 1946, the other from 2011.

Lets start out with one of the earliest computers, the ENIAC. ENIAC stands for Electronic Numerical Integrator and Calculator. It was able to do simple equations, like find the circumference of circles. It was able to process at 0.1 Mhz. To put this into perspective, the iPhone can run at 800Mhz, which is 8,000 times faster! The ENIAC weighed 30 tons, used more than 18,000 vacuum tubes, had 3000 switches, and produced the same amount of heat as 3,000 lightbulbs. Yet, it could only hold 20 numbers at a time!

Here’s a picture of this goliath dinosaur.

Now I’d like to introduce the new Habey SOM-6670 E6XX Tunnel Creek QSeven computer module (quite a name, right?).

Check out the size of this little thing:

The orange thing is post-it notes.


That little thing can pump out a bit more than 1GHz, which is 10,000 times faster than that ENIAC. And look at it’s size!

This tiny little computer is capable of decoding two 1080p HD video streams simultaneously to an external monitor. That ENIAC could barely contain 20 numbers!

If you don’t believe me, check out this video.

Pretty awesome, right?

As you can tell, computation has come extremely far in 65 years. Yes, the ENIAC was created in 1946!

And the speed of computer evolution only increases as time goes on. In only a few years, we will have some ridiculous technology. It was only a few years ago that laptops were big, bulky, and not so powerful. And now we have computers like the MacBook!

I’m quite excited for what the future of technology holds for all of us!

MobileNotifier

As Zach Orr mentioned in a post about iOS 5 Notifications, MobileNotifier is pretty nice until iOS 5 comes out. Here’s a more in depth review.

The Basics

MobileNotifier has three main features. In-app notifications, Lockscreen Notifications, and Switcher Notifications.

In-app Notifications

Nothing’s more annoying than having a big blue block-up when you’re trying to navigate an app. If it’s playing a game or replying to an email, having a big blue window that blocks everything else is quite obnoxious. Mobilenotifier solves that issue in an extremely elegant way.

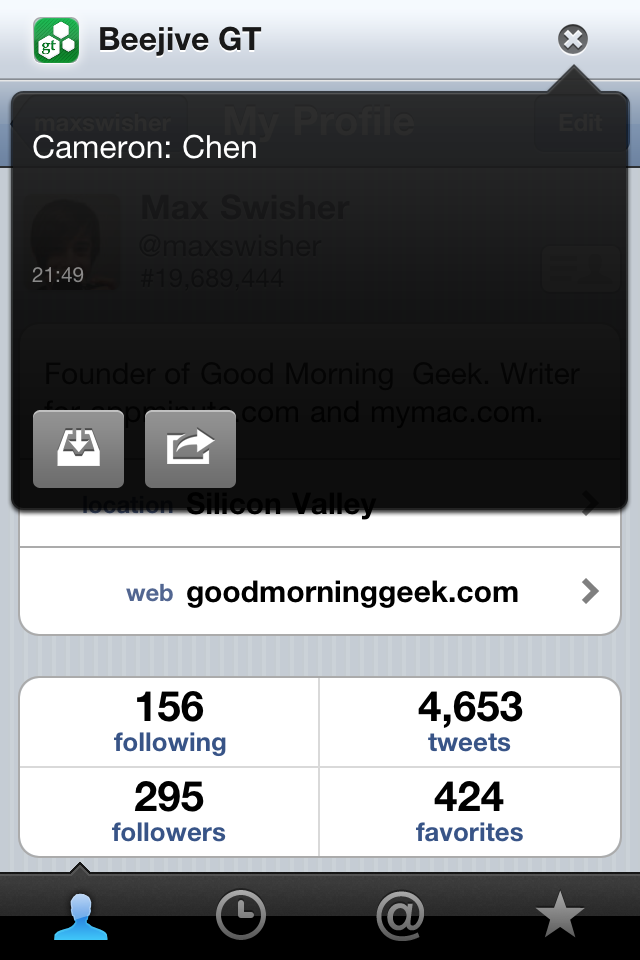
Instead of that annoying blue box, you’ll get a little notification at the top of your window with the icon and name of the app the notification is from.

Unobtrusive notifications

The left button saves it for later. The right opens the appropriate app.


When you tap on the notification, it will tell you the notification text then give you the option to go to the app right now or just ignore it. Or, you can not interact with it at all and the strip will disappear after a little while.

Lockscreen Notifications

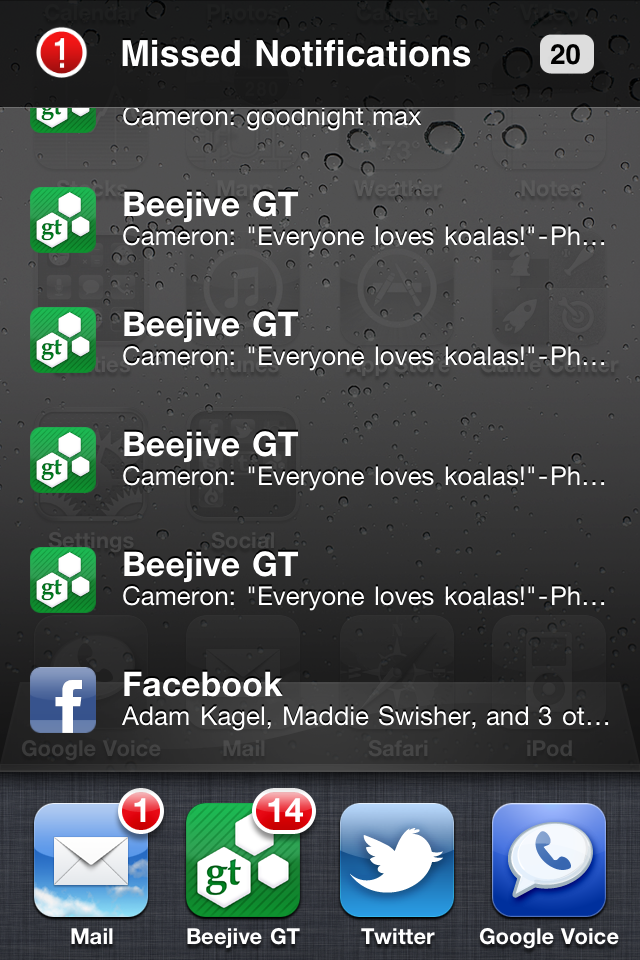
Normally in iOS the lockscreen notifications suck just as much as the in-app notifications. It gives you a blue window with a cute little list of notifications. MobileNofifier gives you a list that you can scroll through of all of your notifications. Much nicer than the normal iOS notifications! Unfortunately, you can’t select the notifications  to open the appropriate app. But it’s still much nicer than usual!

This list is scrollable!


Switcher Notifications

Notifications end up here in one of two ways: either they are ignored in app, or they came in when your screen was locked (that’s how you can get to the appropriate app of the lockscreen notifications). The interface is identical to the lockscreen interface, but you can touch the notifications to open their appropriate apps.

This list is scrollable and interactive!

Installation

As you can tell, this notification is pretty nice.

And luckily, the installation is pretty easy! 🙂

Go into Cydia, tap Manage, tap Sources, tap Edit, and tap Add. When it asks for the URL, enter http://phajas.xen.prgmr.com/repo. Once that’s added, click search. Enter MobileNotifier, and install the result.

That wasn’t too hard, was it?

Conclusion

Until iOS 5 is released, MobileNotifier is quite a nice notification system.

Now, if you aren’t jailbroken, click here to go to a post on how to jailbreak the Verizon iPhone 4.

Enjoy!


Jailbreak iPhone 4 Verizon

Yes, I got an iPhone 4.

Do I support apple’s business ethics?

No.

Do I think the iPhone is pretty and shiny? Yes.

Now, don’t think that I’m immediately jumping on the Apple bandwagon.

The very first thing that I did with this was jailbreak it.

If you have one of these suckers and are looking to jailbreak, I’m about to make it WAY easier for you.

But JUST so you know how much easier I’m making it for you, here’s the traditional way of doing it.

Traditional

You’ll need a few things: PwnageTool 4.2, the original IPSW for the Verizon iPhone 4, and the Pwnage bundle for 4.2.8.

First, download everything mentioned above. Unfortunately, all of the links on every other website are all dead. That means you have to go on a search on the internet looking for all of the above.

Then, open the package contents for PwnageTool 4.2, go into Contents>FirmwareBundles and click and drag the Pwnage bundle for 4.2.8 in.

Next, open up PwnageTool and select advanced. Drop in the IPSW for the Verizon iPhone 4, And hit continue, continue, continue, wait for ten or so minutes. In the end you’ll have an IPSW that you need to use.

In PwnageTool, select Put phone into DFU Mode to put the iPhone 4 into DFU. It gives you step by step instructions on what buttons to press and for how long. Once you’ve put it into DFU, open up iTunes and it will tell you that it detects an iPhone in recovery mode. In iTunes, select your iPhone, then hold down the option key while clicking restore. It will give you a selection window, where you need to browse to find the custom IPSW that you made with pwnagetool. Then, let it work its magic. After the restore is complete, you will have a jailbroken iPhone!

Easier way.

Time to make this much easier!

I am going to give you the custom built IPSW and the download for PwnageTool. That means that all you have to do is the very last paragraph! 🙂

Download the files

Now that link right there will download a ZIP of the Custom built IPSW and a copy of PwnageTool.

Then, just follow these directions:

In PwnageTool, select Put phone into DFU Mode to put the iPhone 4 into DFU. It gives you step by step instructions on what buttons to press and for how long. Once you’ve put it into DFU, open up iTunes and it will tell you that it detects an iPhone in recovery mode. In iTunes, select your iPhone, then hold down the option key while clicking restore. It will give you a selection window, where you need to browse to find the custom IPSW that you made with pwnagetool. Then, let it work its magic. After the restore is complete, you will have a jailbroken

Notification Revamp for iOS 5?

I’m not the only one that says the iOS notification system is in DIRE need of a revamp. Apple’s current notification system is flawed, to say the least. Issues that seem to plague the user range from lack of information, to disruption in the middle of a game or video, to a lack of management. A few users have even gone to the extent to draw up some concepts of systems they would like to see implemented. The rumor mill is spinning up with the addition of widgets and a notification system change. iPhone users everywhere hold their breath for a total redraw of the system. But what are the top things users are looking for?


Home Screen Availability

iOS supports being able to push notifications while the phone is locked, but you can only ever see one at a time. Users have to unlock their phone and scroll through all of the apps that might have sent them at notification in order to find what they were notified about. Many concepts have combated this issue by putting all the user’s notifications right on the home screen as they happen. They’ll offer a just enough information for the user to get a sense of what the notification is about (emails show sender/title, tweets show the mentioner and the beginning of the message, texts show the sender and the beginning of the text). However, these notifications should be hide-able by the user on their home screen, in order to keep a minimalistic feel to the iPhone, and as not to block your cute cat lock screen wallpaper.


Minimalistic Notifications

One of the most annoying parts of Angry Birds, despite missing that last pig, is when your gameplay is interrupted by an annoying text message or notification. These concepts tackle this issue by allowing a customizable list of applications that while that app is running, the user will not have any notifications pushed to them. Concepts of a redesign of the notification message altogether put the messages unobtrusively at the top of the iPhone screen, as opposed to stopping everything and putting them right in the middle. Clicking them will allow a drop down of your usual options.


Management Area

All of these concepts also show a management area for notifications. Users are able to see all of their recent notifications, and clicking on them will result in an appropriate action. This allows a quick and easy way for users to see what notifications they might have missed while watching a video or playing a game. This helps to streamline notifications from a black hole of tones and pop ups to short snippets of information relating to the user.


We’re hoping to see some, or all, of these changes in Apple’s notification system during WWDC. If you can’t stand using the current notifications (or, worse, if we don’t see an update at WWDC) and you don’t mind voiding your warranty, you can jailbreak your phone and download MobileNotifier, which seems to be the front runner in jailbroken notification systems. Ssshhh, but don’t tell Apple!


Plantronics Gamecom 777

I am so confused.

I thought the Beats by Dr. Dre were the best headphones, and they’re $350.

But I’m liking these Gamecom 777s more – and they’re only $100.

Design


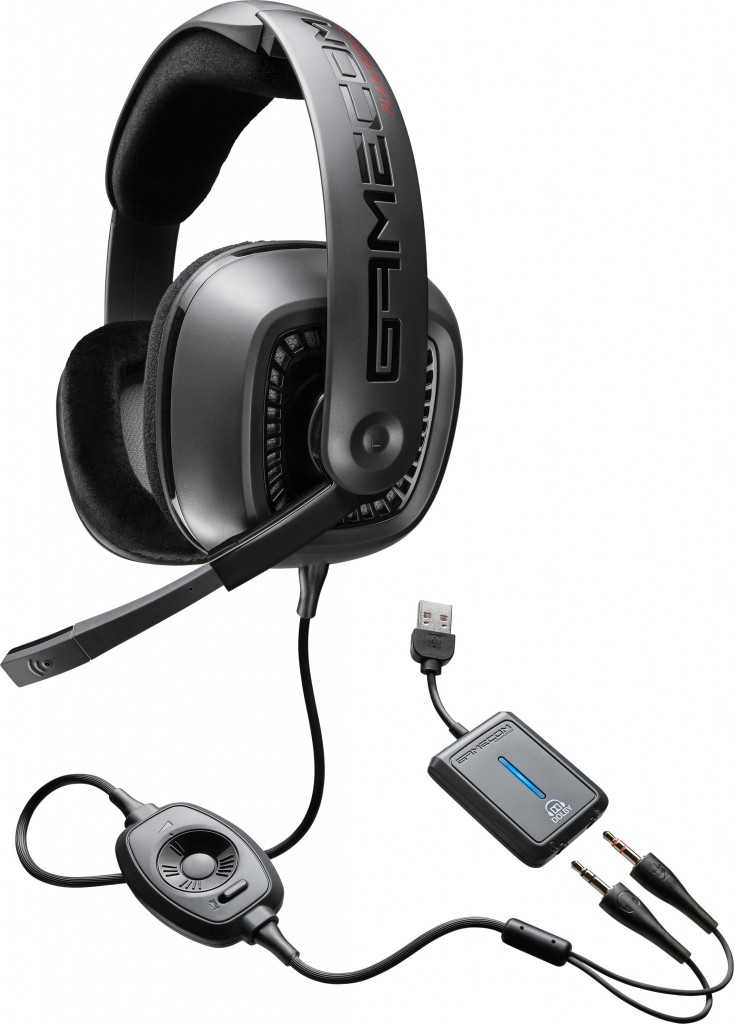
These things are RUGGED. When you use them, they feel more metal then plastic. There’s no squeaking, and I feel like they’re well build and well put together. All of these things I couldn’t feel with the Beats by Dre.

A microphone comes out from the headband of the headphones, which is a genius idea and the perfect way to conceal the microphone when not in use. The inline audio and mute control is very helpful, and can often come in handy.

There’s one thing I don’t like about these headphones – the open-ear design. All sound leaks through a TON, so don’t expect ANY privacy from these. It’s nice because when someone is trying to talk to you, you aren’t totally spaced out. But it’s also a bit annoying to the people around you who might want to listen to their own soundtrack.

Sound Quality

When it comes to headphones, this is really what it boils down to. And my god, I’d choose these any day over Beats. These have dolby surround sound technology, and through USB an included small box will convert standard stereo sound into full on dolby surround sound. If you remember my post about the new dolby technology and how it brings the music out of your ear and puts it around you? You can feel that in these speakers. Thanks to the 7.1 technology, stereo sound turns into extremely immersing rich sound. It’s amazing. Much better than the beats by dre.

Overall, the sound quality is just plain stunning and amazing.

Comfort

With these headphones, you are getting the luxury experience.

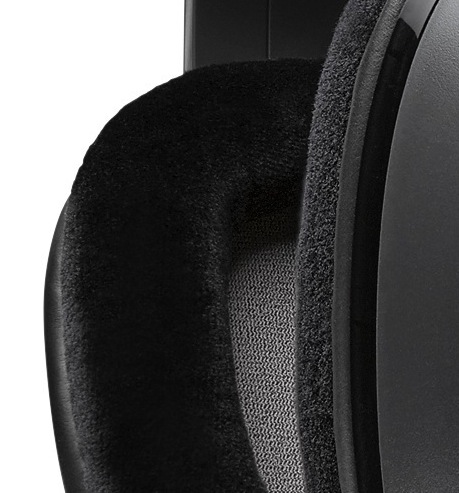
The pads are a soft, smooth fabric, as opposed to the plasticy rubbery earcups on the beats. The earcups distribute pressure really nicely, and you can keep these on without any discomfort for hours on end. The earcups are extremely spacious, which is also a nice addition. Overall, these things are extremely comfortable and don’t give you the same aches that the beats do.

Value

If you’re looking for a nice new pair of headphones, whether it’s for gaming or not, you should DEFINITELY consider the gamecoms. If you are thinking of getting beats, slap yourself and wake up out of the mainstream daze. The gamecom 777s are $250 cheaper than the beats, and give you more sound quality and a higher value of sound technology from Dolby. They also deliver a much better build quality and an extra feature such as a boom microphone extending out from the side. When you are buying beats, you are really paying $300 for fancy marketing a d nice big b on the side.

If you are looking for an extremely high-quality pair of ruggedized headphones, look no further than the Plantronics Gamecom 777s. You can get them here for $100.

Also, thank you Plantronics for sending me these for review!

Disappearing Disk Space?! 10 Step Fix

Today, I left my Mac alone for a few hours. When I come back, I am confronted with messages telling me that I don’t have enough disk space left.

A quick check of my available disk space using Finder reveals that I only have 200mb of free space left on my 115GB SDD.

Wait, WHAT?! I left my computer and it had 50 GB free. How can 49.5GB just magically appear on my hard drive?!

I couldn’t even DOWNLOAD that much during the time I was gone.

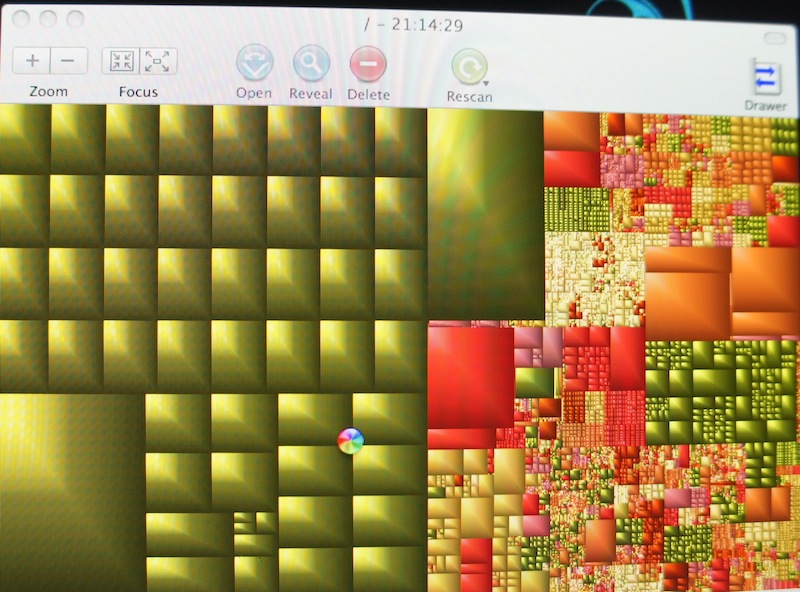
So I decided to find out what was taking up so much space using a wonderful free application called GrandPerspective (review here, what a wonderful app if I may say so myself) and decided to try and find out what was taking up so much space. Here’s what the result looked like:

WHOW THERE! What is all that green that’s taking up half of my hard drive?

A quick hover reveals that these are “swap” files that live in a hidden folder that’s reserved for system use.

Swap files are spaces where application memory/files is held. It’s like a less random access version of RAM. And somehow, my computer had 50GB of it.

Here’s the fix:

  1. Shut down your computer. If necessary, just hold down the power button and force shut it down.
  2. Hold down the shift key.
  3. Press the power button while still holding the shift key.
  4. When the apple logo appears on screen, lift your finger from the shift key.
  5. A loading bar will now appear. Wait a while and it will eventually show the login screen. It will let you know that you are booted into safe mode.
  6. Don’t log in!
  7. press the Back button on the login window, then press Shut Down.
  8. Press the power button without pressing any keys.
  9. Wait for the computer to boot.
  10. Enjoy your spacious computer!

There ya go! It’s a simple fix for a near catastrophic problem.

To prevent this from happening, restart your computer every couple of days. That was probably my problem, as I haven’t restarted in about a week. Oops!

When you restart, you don’t need to do the safe boot, as it will still clear a large amount of the swap files and cache. This is more proof that it’s a good idea to restart now and then, preferrably daily!

A reboot a day keeps the swap files away!

LED Cinema Display (27 inch)

Monitors are quite important when it comes to computer equipment. Besides speed, the only other thing that really matters is what you’re staring at all day. People often want to get a really nice, large monitor, so they have space for all of their windows and applications. Different things matter to different people – some people it may be about size, so they can fit as much as possible. Sometimes it may be color recreation, so you get the most precise experience for editing photos possible. For others it may be response time for gaming.

If you fall into any of these categories, I’d like to introduce you to the LED Cinema Display by Apple.

Wow.

27” of hi-definition, LED-Backlit glory. Sold yet?

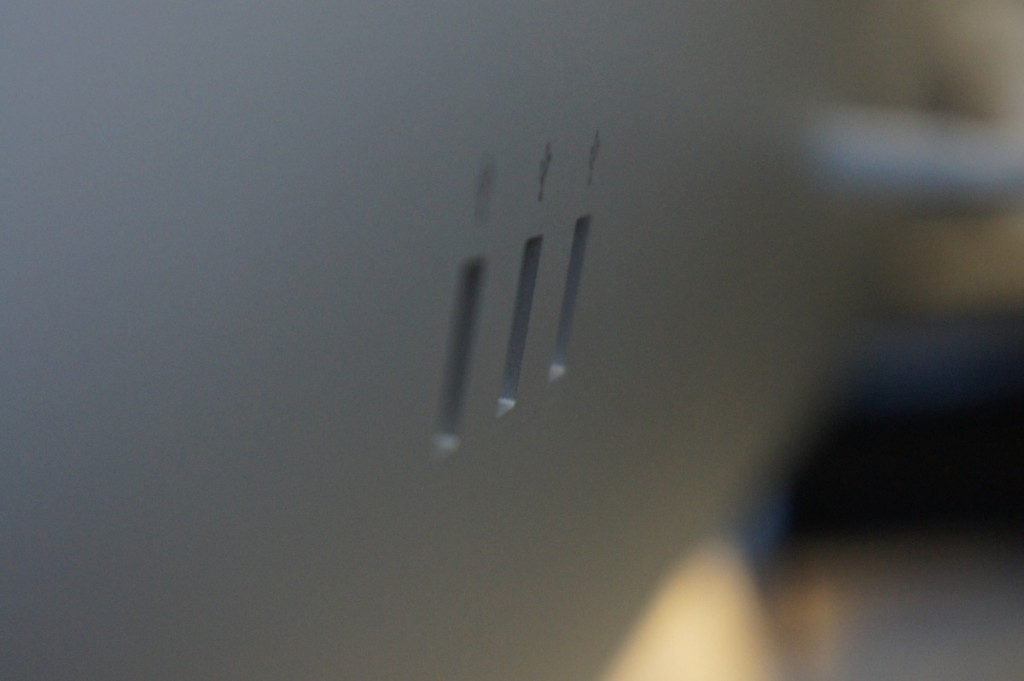
How about a built in iSight camera, microphone, 2.1 speakers, and a 3-port powered USB hub?

That’s what I thought.

Lets take this thing a bit more in detail.

Design

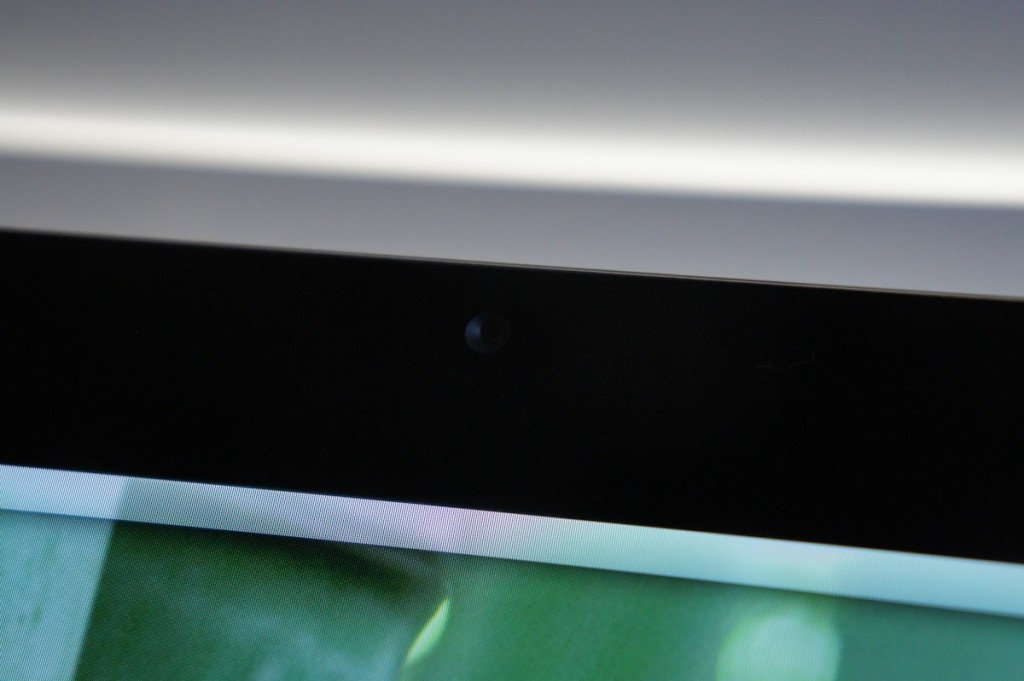
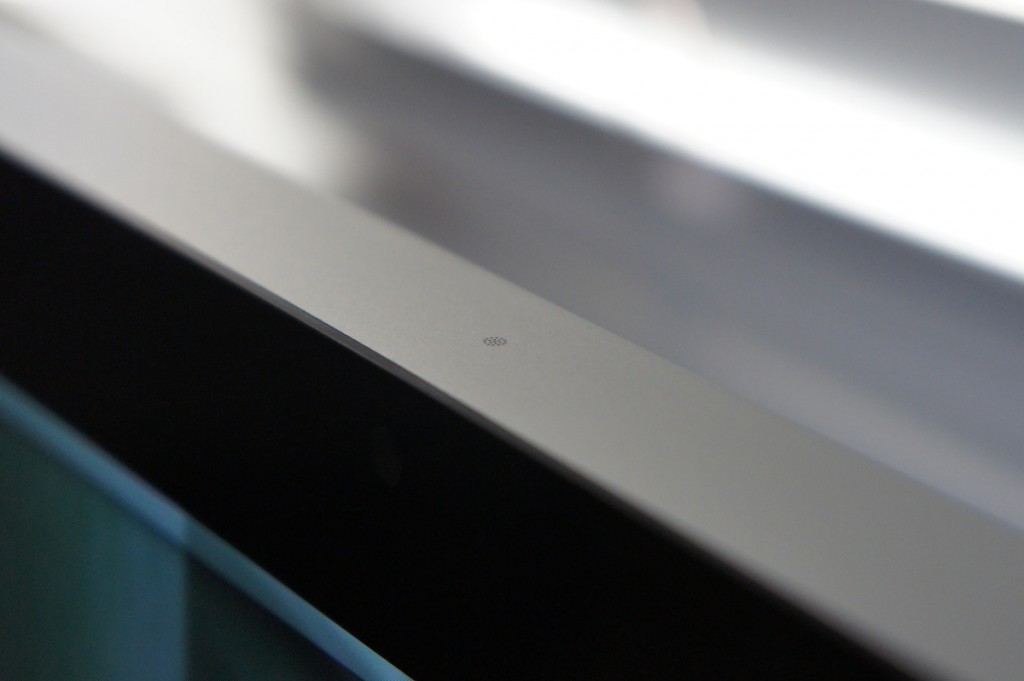
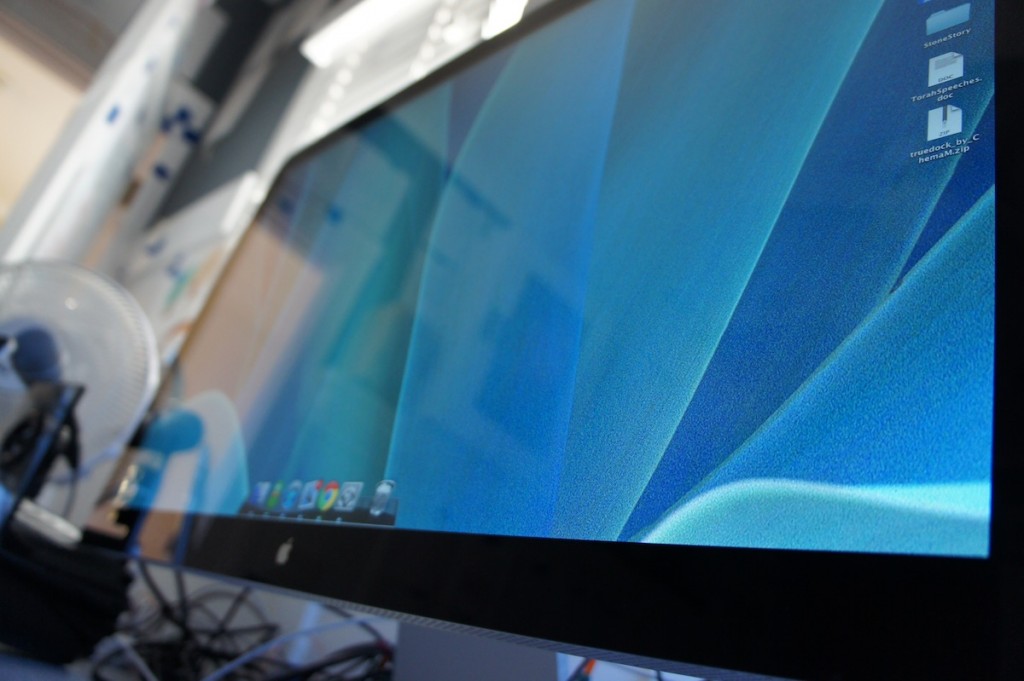
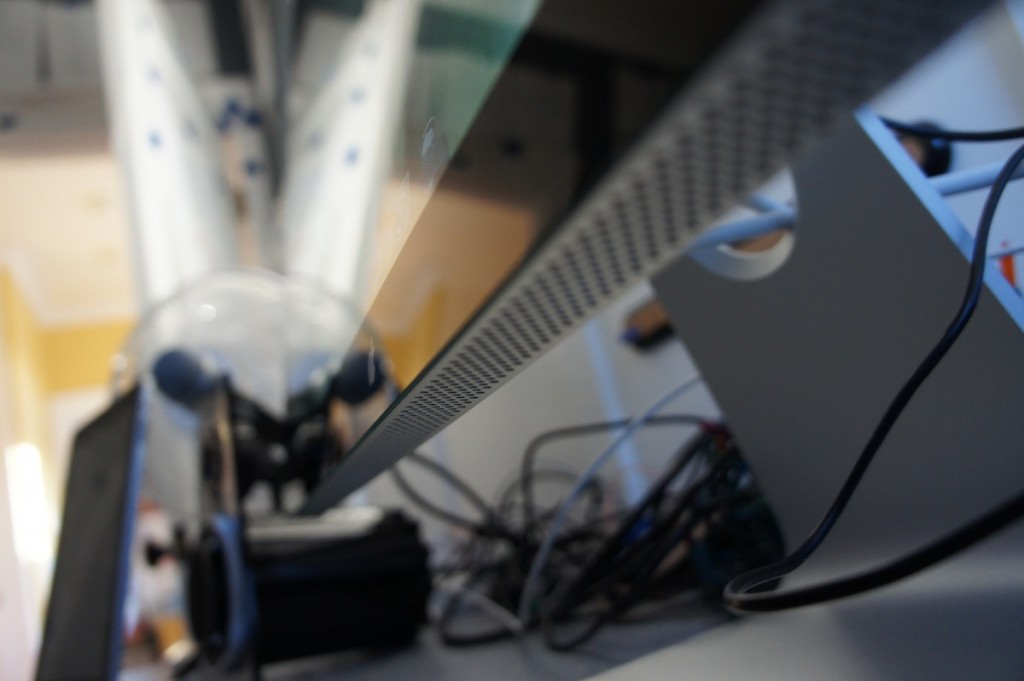
It’s an Apple product. What did you expect? The design of this beauty is simple and seamless (as usual). Looking at the monitor you are greeted with beautiful, edge-to-edge glass with a nice black bezel underneath. The iSight camera is embedded beneath this glass. Look down, and you see a thin, clean, pure aluminum stand. On the top, you find a very small grid where the microphone sits. On the back, you find two cables coming out, and 3 USB ports. The rest is all aluminum. Wow.
Display

As I said, 27 inches of LED-backlit glory. Yes. The display is EXTREMELY bright, and at times hurts my eyes if turned up too high. The colors POP like nothing before, and the 2560×1440 pixels doesn’t do any harm either. The 12ms response time isn’t particularly impressive, but there was absolutely no ghosting in any of my tests. video play-back was clear, and the monitor boasted quite impressive, even blacks. Basically, this screen WOWS.
Extras

This monitor is a bit more than a monitor. The iSight camera works pretty well, and sends a pretty clear image. The microphone on top is a quite welcome addition, and definitely comes in handy when my laptop is closed. The quality is on par with the built in microphones in the MacBook lines. The speakers aren’t worthy of too much notice, but are definitely much better than built-in laptop speakers. They aren’t QUITE as nice as my 1300 watt surround sound system, but they will do the trick for those not so picky about their audio. The USB hub is powered, so your computer doesn’t need to be connected to charge all of your USB devices.
Setup

What kind of GMG review would this be without the setup instructions?

Unfortunately, if you don’t have a Mac built during or after Late 2008, you won’t be able to use this monitor. There are no hopes for PC users, so if you are I’m sorry for making you salivate so much just to disappoint you with the news of the incompatibility.

But if you do meet those requirements, then you’re definitely in luck!

As I said, on the back of the monitor there are two cables coming out. One of them is power, which plugs into a grounded AC outlet. The other sprouts off into three cables: MagSafe, USB, and Mini DisplayPort. The MagSafe is so that you can charge your MacBook, and you can leave your charger where it belongs: in your bag. The USB port allows the USB Hub on the back to function properly, and it also connects the iSight camera and Microphone. The Mini DisplayPort is how the video is transferred to the monitor.

Setup beyond this is pretty simple. Just plug everything in and you’re ready to go. The display automatically has the correct settings, the iSight camera and Microphone simply work, and your computer is charging. Great!

One thing I’d like to note about this display is that it has absolutely NO on screen controls. NONE. It doesn’t even give you any notification when the signal is lost, or anything along those lines. It’s either on, or it’s off. Everything else is software controlled, and you can change your preferences for the monitor in the Displays Preference Pane. The brightness of the display is controlled through the preference pane and can also be controlled using the function keys on the Apple Wireless Keyboard.

Conclusion

Overall, Wow. The monitor is beautiful with any setup, and the design of it is just plain breathtaking. Photos and videos look amazing. The brightness of the display can give me a headache. What’s not to like?

There are two main downsides to this monitor. The first would be the glossy screen. Some people may hate this screen, and if you’re using it in an area of direct sunlight, this is probably a pretty bad choice for you. The second would be the price. Very few people I know are willing to fork out $1000 for a monitor. But if you are, and you don’t have a problem with the glossy display, and you have a compatible Mac, you can stop your salivating and go take a lick (make sure you wipe your display after though).


 

Finally, a good use for an iPod Nano!


You may remember that I wrote this post hating on the new iPod nano because of it’s size and the idiotic idea of a clip. Also, the size of it! You’d lose it in an instant!

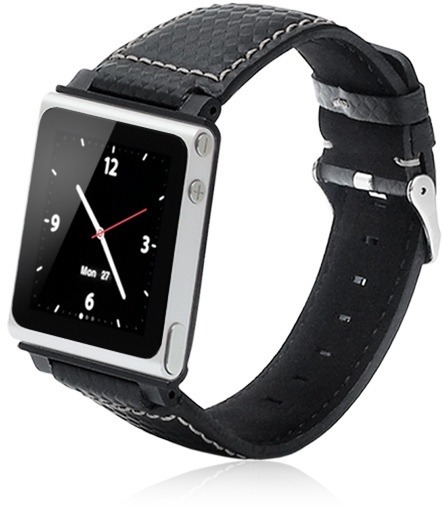
Well, I’m changing my views on this. And it’s all thanks to one accessory called the iWatchz.

Basically, this turns the iPod Nano into a wristband. I thought that sounded stupid, until I tried it. I realized that as a wristband, the iPod nano opens up to a whole other world of possibility. The Nano can act as a stylish watch, which will surely show off your geekyness. But in addition, to have your wristwatch actually be a music player, photo viewer, and FM radio can all come in handy. You don’t have to worry about bringing your iPod with you – you already have all of your music on your wrist. Ha!

Having a wristwatch is something you’re probably already used to. So being able to have all of the iPod features with you EVERYWHERE without having to remember it or lose it? Handy!

The reason I really didn’t like the nano was because they asked you to clip it on to your shirt and proudly display what you’re listening to. You could lose it, it could fall off, and you’d probably forget about it fairly frequently.

Having it as a wristband solves all of the above problems, and allows you to be sure about where your iPod is and not worry about it falling off or losing it.

You can get the iWatchz here, and you can get yourself an iPod nano here. Together, it’ll cost ya about $200. In my opinion, it’s quite a genius combination.

Otterbox Reflex Series for iPhone

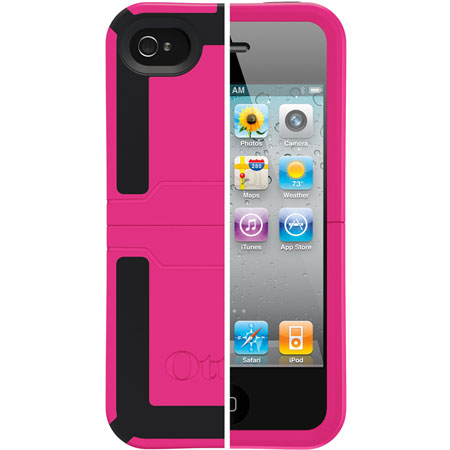
Otterbox is well known for their amazingly stylish yet rugged cases. The Reflex series is a new case from otterbox, and it boasts a whole new design.

Here’s how cases work: When there is a shock in one part of the case, it is absorbed by the rest of the case, usually by a form of flexibility that causes shock absorption. This is sometimes accomplished by rubber, the flexing of plastic, or other various materials.

What the Reflex series does is brings a hard plastic shell, but in places of the shell there is flexible rubber that crumples and flexes to absorb the shock. This design was inspired by the crumple zone of a car, and from the result of shock on the case it works very well.

The other feature that Otterbox is known for is style. The Reflex Series comes in a variety of colors, all of which have nice, even, black rubber highlights where the crumple zone is. Instead of hiding the crumple zone, otterbox has used it to enhance the style of the case. Genius!

A new feature of the case would be that the bottom half slides off for docking access. In the past, you had to completely remove the otterbox cases to accomplish this, but thanks to the innovation in this version full case removal is no longer necessary.

The Reflex Series is available only for the iPhone at the moment, but in the future will be available for the BlackBerry Curve and iPod Touch (4th Generation). You can purchase it by clicking here for about $45.

[Thanks to Otterbox for sending this to me for review! You guys make awesome cases! :D]

Worried about your server? Get warned if it goes down.

Are you worried about the state of your server?

Maybe you have a website, and you’re worried if it’s always up and running, especially when you’re asleep and can’t fix it.

Well, I’ve written an extremely simple script that will solve this issue for you. Just plug your mac into the sound system where you sleep and crank it up to full volume. Whenever there’s a problem, your system default error will start going off every three seconds. That should wake you up! Then, you can go over and check the state of things.

The underlying command here is ping. I am using what you type as a simple variable, $website, and using -A to make it audible and ring, and -i to time the ping out so you don’t accidentally crash your server. In the end, the command is

ping -A -i 3 $website

And when you type in the website, $website is replaced with whatever that is.

It’s not a complicated or amazing script, but it helps to get things done easier and faster.

Download

To use it, download the script and navigate to it’s enclosing folder using Terminal. Then, type:

chmod+x

This will make the script executable. Next, type:

./makesure.sh

You will be greeted and asked to enter the URL (or IP address) of the site you want to keep track of. Type in the URL and press enter. You will see the ping output across your screen updating every three seconds. If ping stops responding, your computer will begin to make the system default error sound every time there is a request timeout. If you have the volume loud enough, that should be able to wake you up.

Enjoy!


How-to: the Ultimate Laptop Upgrade (RAM and SSD)

Your laptop has a few mainly functioning parts. The hard drive, the RAM, and the CPU. The CPU, unfortunately, cannot be replaced, as in Macs they are soldered on to the logic board. however, you can upgrade  the other two things. Lets start with the hard drive.

Ultimate Hard Drive Upgrade: OWC Mercury Extreme Pro SSD

When you write and read data from a computer, you write/read from a hard drive. This is a small metal box with a few spinning disks inside and a needly thing that writes the data across.

An SSD looks (on the outside) just like a hard drive. It has the same connections and the same dimensions. But a peek inside reveals lots of chips, and a lack of moving parts.

That’s because SSD stands for Solid State Drive, because they are just that: Solid state.

But one of the biggest advantages to that would be the speed. I can write/read from this thing at a blazing 3GBps. Also, it holds a world record for fastest internal SATA II Drive. What does this mean for the user?

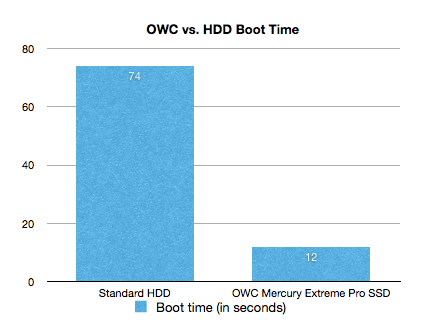
Lets look at some in-house tests.

With a standard hard drive: 1:14 to boot.

With this OWC Mercury Extreme Pro SSD: 00:12.

That’s enough proof for me.

And as far as apps go, they launch FAST. I can launch 6 applications and have them all open and running in less than 4 seconds.

This means that when you open things, they take less time to open. Enough said.

If you’re looking to upgrade your computer, this is probably one of the first things you should upgrade. Even though you might want a faster processor, it won’t speed up how long it takes for something to go from your hard drive to your screen.

The OWC Mercury Extreme Pro SSD comes in many sizes. I purchased the 115GB drive for approximately $230, and you can find this series here.

The ultimate RAM upgrade: Crucial 4GBx2 Kit

When you’re interacting with applications, a buffer of everything is stored in RAM. This is Random Access Memory, and it is made so that you can randomly access it. It’s extremely fast, which is what allows things like pop-up menus to instantly drop down. It’s also what keeps the base operating system going, and if you have so many applications running that your RAM is full, everything becomes hard drive base. Translation: things freeze, slow down, and crash. The easiest solution to this is to get some more RAM.

I ordered crucial’s 8GB RAM kit, as it wasn’t too expensive and seemed like it would work well. Most laptops have two RAM slots, so my 8GB kit came with 2 4GB chips. The amount of RAM that your computer supports varies. If you have an older Aluminum MacBook, then you can fit 8GB in there. However, the current MacBook Pros only support up to 6. Search for your model on crucial.com to find exactly what RAM you need.

Installation is fairly simple. Just take off the bottom of the laptop with a screwdriver, and move out the tabs next to those flashy green RAM chips. Then, smoothly slide out the chips, and replace them with the new and bigger RAM you got. Seal up that wound on the bottom of your computer, and voila, you have more RAM! No drivers necessary. If you have the MacBook 5,1, click here to get 8GB of RAM. If not, click here to go to the crucial site and find what RAM will work in your model of computer.

The result

Your compter will boot faster. Things will open faster. Things will run faster. Things won’t freeze. Things will crash less. In general, things will be faster and more stable. Enjoy!