Fix: ClockwordMod won’t boot after update

***UPDATE: Go into Android Market and update the ROM manager to the latest version. It will fix this problem so you can update straight from 3.0.0.5 to 3.0.0.8.

So I recently went to backup using the ROM Manager on my phone. It notified me that there was a new version of ClockworkMod, and I was currently on 3.0.0.5, and should update to 3.0.0.8. So I update, and when I reboot into recovery nothing happens. It stays frozen at the HTC Incredible boot screen.

Luckily, you can still boot into Android.

Here’s the fix.

Go into ROM Manager and flash 3.0.0.6, one version up.

After it flashes, boot into the recovery and select “Clear cache partition.”

Then, reboot into Android. Open ROM Manager, and flash 3.0.0.7.

Boot into recovery, clear cache, reboot, and continue doing this until you are finally at 3.0.0.8. It should boot into recovery just fine. Enjoy!

INSTALLING ROMS ON YOUR DROID INCREDIBLE: FULL GUIDE

1. Background check and root

If you haven’t yet, click here to read the guide on rooting your droid incredible.

2. Find some ROMs

The first thing you need to install a ROM would be the ROM itself (go figure).

If you have a droid incredible, I highly recommend downloading the fusion ROM from this post. Fusion is an extremely well-done and compatible ROM based off of CyanogenMod7 (another ROM), so you’ll get the dimension-opening power of 2.3.2 gingerbread.

If you don’t want this ROM, you can always do a google search. Not too hard, eh?

2. Download the ROMs

With the example I’m using (fusion), there are two ROMs. It includes first the base gingerbread ROM, but on top of that it also has a ROM for the Android Market, Gmail, YouTube, and Maps applications, as they do not come by default on the Android base operating system.

For now, I am only going to discuss installing the base, but for other ROMs it is sometimes the same situation with the two seperate ROMs. So later on I’ll discuss installing the gapps (dev talk for Google Apps).

There are two ways you can get the ROM to your device.

The first one involves your computer. Download the ZIP file(s) onto your desktop, then plug in your phone and move the zip(s) onto the root of your SD card.

The second way requires an app called Root Explorer (I discussed it in the guide to rooting). On the phone itself, use the web browser to download the ZIP file(s). Then, open up root explorer and navigate to the downloads folder (probably on your sdcard). Then, tap and hold the zip and select move. Navigate to the root of the sd card and tap paste. (Do this with the second ROM if you have one).

3. BACK UP!

This is an extremely important step to this, because if you forget to backup then you will never be able to restore your phone to the condition it was in when you rooted. That means that the HTC sense operating system that came on your phone will be GONE.

So, you’ll need to boot into recovery and backup.

Turn off your phone and turn it back on while holding the down volume button. It will boot into HBOOT, a diagnostics screen. Once it is done checking for update images on the SDcard, use the volume and power buttons to navigate to and select RECOVERY in the menu that you see.

It will show the HTC booting screen, but then boot into recovery (with very small fonts, I might add).

In this screen, scroll down and select backups (you can now use the optical trackball to do this). Then, select create a backup (or something like that).

It might take a while, but eventually a backup should be made of all of your stuff on your phone. So we shall now proceed to the next step.

Install the ROMS

Now is the fun part.

Boot back into the recovery screen by holding the down key and the power button at the same time.

Then, hit Wipe Data/Factory Reset.

This will wipe all of the data off of the phone.

WAIT WAIT WAIT! I STILL WANT MY BACKUPS!

Calm your caps lock keys, wiping the data from the phone doesn’t wipe out the sd card, which is where the backups are.

Now, select install zip from SD card.

Select choose zip from SD card

then, select the zip that you either downloaded or transferred over.

Then, select the yes, and magically, the ROM will install.

Wait a while, and it should be installed and working!

Upon first boot it will take a very long time to load. It has to configure everything and get it working. But every time you reboot the device the reboot time should be less and less until it is less than 30 seconds.

Anything else?

You might have downloaded 2 zip files to your SD card which you downloaded from the site that gives out the ROMs. This is probably because one of them is a Google Apps zip.

Make sure that before you move the two zips on to the sd card, you name them so you can tell which one is the base OS and which is the Gapps. (if you have no idea what I’m talking about, you need to click here and read up on your background info.) Make sure that first you install the Base OS zip, then, after it’s done, select Install zip from sdcard once again and select the gapps zip. Make sure that you don’t hit wipe data/factory reset, because what that will do is wipe out the base OS so you only have gapps and nothing to run it on. Not too functional if I may say so myself.

Where to find these ROMs?

As I said, the best ROM for the Droid Incredible at the moment is the Fusion ROM.

But there’s other ROMS too.

One of the most popular is CyanogenMod. They’ve been releasing ROMs with upgraded features since the dawn of time (or android).

However, after a little mixup with google, they are no longer allowed to have Gapps on their OS. So you’ll have an android phone with…. no android market. Or gmail. Or youtube. Have fun!

One of the easiest ways to find ROMS for your droid incredible is to just google it.

If you google Droid Incredible ROMs, a large amount of different websites will show up. If you are too lazy, here’s a direct link to that google search for ya. You’re welcome.

ROOTING YOUR DROID INCREDIBLE: FULL GUIDE

1. Background Check

Please click here and read up all about what it means to root and install ROMs, then do step 2.

2. YOU NEED AN SD CARD!

Make sure you have an SD card in your phone. If you don’t then all hell will break loose and the universe will be sucked into an unknown dimension beyond the horizon of scientific knowledge. Or something along those lines.

3. Enable USB Debugging

On your Droid Incredible’s home screen, tap menu, select Applications, tap developer, and check the box that says USB Debugging.

4. Download unrEVOked

unrEVOked is the limera1n for all HTC android phones (hence the capital EVO in the middle).

Click here and select which operating system you own. The download will begin.

5. Plug in your device and root

The time has now come.

Plug in your Incredible to your computer over USB. You should see a notification that says USB Debugging is enabled.

Also, pull down the notification bar and select the USB connection (not the debugging, the other one). Then, select to have your phone as a Mass Storage Device or something like that (My phone has been screwed over so much that I no longer have the stock htc operating system installed, so I can only be so specific to my knowledge).

You should see TWO drives mounted on your computer, one for the internal phone storage and one for your SDcard.

Then, hit the reflash button and take cover.

Time will pass into another dimension beyond the human eye’s comprehension of life itself. Portals will contradict all possibilities of universal independence. Our very existence will tremble at the rip in the fabric of space and time.

Oh, and you’re device will be rooted. 🙂

6. Did it work?

After you’re device is rooted it *should* be able to boot into ANOTHER DIMENSION IN SPACE AND TIME…. wait…. into the standard 2.2 htc sense froyo you had before you rooted.

However, if you look in your applications drawer, you should see a new app called Superuser.

Congratulations, you’re rooted!

7. Get root apps

Now, you can run applications that require root access.

A few of my favorites:

Wireless Tether

If you’re on the road and want internet on your computer or iPad, then you’ll have to fork an extra $20 a month to verizon and suffer a 2GB limit.

But not if you have Wireless tether!

With Wireless Tether, you can create an encrypted wireless network with access control and everything, and the bandwidth limit is only that of your phone’s data plan.

You can find Wireless Tether by searching in the android market.

Root Explorer

If you keep getting warnings telling you that your SD card is full, then you’ll love Root Explorer. You can browse your android’s files, and even delete, rename, or move things around from both the SD card and the internal storage. You can delete those huge downloaded zip files, or all of the pictures you don’t want from the DCIM folder. Handy! This is available in the Android Market as well.

screenshot

If you ever do any kind of posting to a blog about android stuff, this application is a MUST. You can easily take a full resolution screenshot by just shaking the device. Then, you can plug it into your computer and transfer the screenshots off of your SD card.

8. Got ROMs?

One of the most amazing parts of having a rooted android phone is that you can install other operating systems. Want gingerbread? HTC hasn’t even released the update. But now that you’re rooted, you can install other operating systems without htc’s permission.

Here’s a full guide on how to install ROMs.

Better alternative to OMGB-6! HELLO FUSION!

OMGB-6 is great. It’s a simple, well made Gingerbread build for the droid incredible that worked really well.

But it had a couple problems.

First of all, it didn’t support google voice.

Also, many apps didn’t work. Twitter didn’t work, and the app I am doing testing for didn’t even work. Also, the version of the market was outdated.

Well, if you want a fuller and better and more supported phone, then say hello to the fusion rom.

Fusion is built on CM7, and has a base of 2.3.2. This gingerbread is tasting FRESH.

It boasts a newer version of the android market, FULL app support, and it also supports google voice.

If you don’t know how to install ROMS, then you have a bit of reading to do.

First, click here to learn what all of this means and do your background reading.

Then, do steps 1-4 on this page.

Downloads

BASE

GAPPS

Installation

Put both of those on your SD Card.

Then, reboot into recovery and BACK IT UP. BACK IT UP. BACK IT UP… STEADY….. BACK IT UP…. STOP! Don’t do this with ROM manager. Why, I don’t know. But apparently bad things happen and black wholes open into other dimensions when you use the ROM manager to install this. O.o

Once you’ve backed up hit Wipe data/factory reset in the recovery.

Done?

Ok.

Now, hit “install zip from sd card”, select “choose zip from sd card”.

And in the list that appears, select fusionbase.zip.

Then hit yes out of the large groups of nos.

(tic toc tic toc)

Done yet?

No?

Ok…

(tictoctictoctictoc)

Done now?

Good.

Now, go through the same screens, but when you select the zip select the gapps zip and install it.

While that’s installing, I’ll explain why there are two separate zips for this ROM.

Android is a base operating system. It doesn’t include the android market. It doesn’t include gmail. It just includes the base operating system.

So the base zip is the 2.3.2 base operating system without the android market or gmail or anything like that.

So you could just install the base and nothing else. But I don’t think you would be too happy when you can’t download any apps.

Done yet?

Ok good.

Now, select “Wipe cache partition.”

Done?

That didn’t take long.

Now, hit reboot, and wait a LONG time. It will probably be 5 minutes or so of the flashing android logo before it actually boots.

But once it does, you’re in business! Enjoy the new market, full app support, and using your Google Voice account, all without sacrificing the magnificent dimension-opening speed (and bragging rights) of Gingerbread 2.3.2.

Rooting, Recovery, and ROMs: What it’s all about.


So you’ve got an android phone.

And you can use the stock operating system with all of the manufacturer’s skinning and apps and versions and keyboard and everything.

Congratulations.

But if you are feeling a bit ballsy, then you can really take your phone to a true mobile computing level.

Here’s the steps to this.

  • Root
  • Install a recovery
  • Find ROMS
  • Make backups
  • Install ROMS
  • Use Wireless Tether

Lets explain what all of this is.

Rooting

Rooting means that you can create a way for apps to get superuser access. This is handy for getting to wifi, modifying files, or installing ROMs.

Recovery

For the Recovery, that will usually be installed when you root the phone. The recovery is where you can make and recover backups of the phone, install ROMs, and a slew of other stuff that might come in handy (but could also kill your phone).

Backup

Once you have the recovery installed (you can’t have the recovery without the root FYI) then the first thing you need to do is make a backup of your phone.

This is pretty easy. Just boot into Recovery (just hold down volume on boot and select recovery when given the option), Select backups, and select make a backup now. Your screen will flash many random things, and no matter how long it takes, don’t force shut it down or take out the battery. It will almost always finish.

ROMs

Once you have a backup of your normal operating system, you can go crazy with other ROMs.

ROM stands for Read Only Memory. In android poweruser terms, it is an operating system that can be installed on the phone using the recovery mode.

You can find many roms on the internet all over the place. XDA-developers is a great place to get ROMs. Sometimes a ROM will even be for the next Android version that htc hasn’t released yet.

When you download a ROM, it will come as an easy to handle zip file. And from here it’s simple.

Plug in your phone to your computer and mount it as a disk drive/USB Mass Storage. Then, just click and drag the ROM from your computer onto the root of the SD card. Eject and unplug the phone, then reboot into recovery.

Select install zip from sdcard and select the name of the file that you moved over. Then, choose the yes among the long list of nos to confirm you really want to install it and whabam, you will be installing a new operating system.

Then, reboot your phone, and you will be with your brand new OS that you yourself downloaded from the internet and installed on your phone.

Unfortunately, this process is different for every android phone. Sometimes there is a one-click root. Sometimes you have to use a command line application to open a port on the phone and install the root like that. But once you have gotten the phone rooted, installing zips is a piece of cake.

Wireless Tether

Aside from installing ROMs, another thing you can do is install and use apps that usually wouldn’t be possible if you weren’t rooted.

The one example I am going to use here is called Wireless Tether. And basically, it’s just that.

You can make your phone into a wi-fi hotspot with no hassle, just using verizon’s mobile hotspot plan. But that will cost you an extra $20 a month and you have a 5 GB limit before you start getting overage fees. Ouch.

With Wireless tether, you can connect unlimited devices, the data comes out of your data plan for your phone, and that also means there’s no overage fees.

Once you are rooted, just search for Wireless Tether in the android market and you will be able to install it on your phone and use it. You can change the SSID of the WiFi network, and you can even enable encryption and a password on your network. In addition, it allows you to use access control, where you can disable a device’s access to the network. Very handy sometimes.

Do it yourself

So that is the whole concept of rooting, recovery, and roms. You can find roms for things using google: Just do a search for “[your phone] 2.3 ROMS” or “[your phone] Cyanogenmod” and you should have plenty of luck. If you want to find out how to root your phone, just do a google search for “[your phone] root” and that should turn up some helpful results.

If you have a rooted droid incredible, click here to learn about the stable and functional gingerbread rom by WeDoDroid.

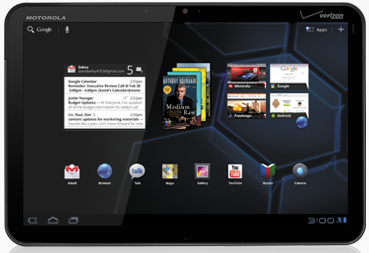
Motorola Xoom Tablet: First Impressions

While at the Launch Conference, I got to play with Robert Scoble’s Motorola Xoom. Here’s what I thought.

Software:

Honeycomb was quite a bit mesmerizing. It looked beautiful on that tablet’s screen, and it’s 3D rendering capabilities showed on the home screen. The speed was pretty good, and the browser seemed extremely nice and smooth to use. The software side of this tablet really shined in speed and smoothness of effects, and this tablet would have been terrible with anything but honeycomb.

Also, remember when BumpTop was bought by Google?

Well, turns out they used some of their 3D stuff in Honeycomb. Good to see such an awesome piece of software go to a good cause!

Hardware

Lets start off with this: I hated the widescreen layout. I prefer to use my iPad in horizontal mode because when reading you can see a lot more, therefore you don’t have to scroll as much, and the Xoom sideways resulted in a very overwhelming layout that was like a widescreen monitor turned sideways.

I HATED the location of the power button. It’s in a very odd place in the back. Someone had to literally show me where the power button was. If you can’t immediately turn it on without any doubt of the power button location, you know that there’s a problem with your product.

The two cameras? Absolutely terrible. They don’t even have an auto focus, or a focus at all. I would never even attempt to take a picture with this thing.

Conclusion

Overall, it’s a nice product, but the screen annoyed me, the power button takes getting used to, and the cameras aren’t even worth having. They are worse than nothing, because you get to see what it would be like to have a camera on a tablet, but a terrible implementation of it.

And for $800? Don’t think so.


Otterbox Commuter Series for Droid Incredible

While the Defender series takes care of the extremely rugged duties for a variety of phones, the commuter takes a more stylish approach and still provides quite the nice amount of protection.

The Commuter Series case for the incredible seems a bit like an inverted defender series case. It has an inner shock absorbing silicone skin and an outer hard shell to protect from initial shock. It has a nice brushed texture with an embossed Otterbox logo at the bottom. It adds a tad bit of bulk to the phone itself but you get used to it after a while.

And this case really works. Giving otterbox even more credit for well-made cases, this is the case that you can trust for the usual, well, commuter.

I must admit, however, that I have had (and used) this case for quite a while now. And I’m giving it such a good review out of experience.

I take pride in having a thick(er) phone.

“I didn’t think that droids were so thick!”

“They’re not. I have a case on it. “

I drop the phone from 3 feet up and I don’t even cringe.

“See?”

Another good example of having a phone would be a new invention in modern sports called droid soccer. This is where you kick the phone around and use it as a soccer ball (but it ends up sliding a bit more like a hockey puck). You can use either sides of a room or yard as a goal. And with otterbox protection, there’s nothing to worry about. They talk about having Sports apps as wherever-you-go fun, but phone soccer redefines that.

Many people accuse me of only having the case so I can drop it all the time and play soccer with it. And although I must admit that it’s fun, there’s always the times when it’s an accident and you drop your phone. One example would be when I was walking downtown with my friend Emma and I was talking on the phone with someone we were going to meet up with. She says to hand the phone to emma, and I do, but somehow at one point neither of us were holding the phone. The phone falls to the ground with a prominent click. Whoops! Good thing I have that case on there or that phone would be toast.

I picked up the phone and handed it to her.

“Here ya go. “

“Thanks.”

If I didn’t have a case, my phone would be cracked, my battery 4 feet away, and thoughts about my current warrantee. Thanks to this case, none of that even came to mind.

The Otterbox Commuter Series for Droid Incredible sells for $35, which is the price of the average case, with abnormal protection. Click here to order one for yourself.

Also, I wanted to thank Otterbox for sending me this case for keeps. Wonderful case, and plenty of “wherever-you-go” fun. 🙂

Swype Beta open again

Swype is amazing. It is a great technology that allows you to slide your finger over the letters for a much faster typing experience. I did write a post and made a video about it a while ago, but there have been new versions and it has MUCH improved in speed and stability.

But the Swype Keyboard is only available for certain devices. The manufacturer has to incorporate it in the stock operating system. But now the Swype beta has opened back up so you can join and get the keyboard.

But sorry iOS users, apple doesn’t like you (I know, I’m probably giving Android too much credit). So this keyboard is only available for android users.

The beta won’t be open for long, so if you have an android phone (or plan on getting one) I recommend clicking here and registering for the swype beta.

Otterbox Defender Case for iPhone

Otterbox is known for their high quality cases. They have many series of cases, each with their own level of protection, and here I have the series that boasts highest level of ruggedness, the Defender Series (for iPhone).

This case takes heavy duty to a new level. It features multiple layers of protection, starting with a silicone layer the outside, a hard shell inside, then in that soft felt against the phone itself.

In addition to the shock protection, it has rubber plugs to keep dust out of the ports, and has plastic protection over the screen, camera(s), and apple logo in the back (a stylish touch I guess).

Unlike other cases, the plastic protection over the screen isn’t adhesive. The screen protector is actually part of the case. This is definitely very cool (so if you don’t want the case on it then the screen protector comes off too), but there is a downside. If you have scratched up the screen cover and want a new one, then you have to get a new/different case.

Also, if you get dirt on any of the camera protectors, then you can see a bit of a haze over the camera. Yes, this can be solved by simply wiping off the cover, but this is bittersweet. The camera itself ends up being more protected against dirt and scratches, but when you get the cover dirty/scratched you can see the results in your pictures/video.

So who is this case for? I’d think that this case would be for the people who really handle their device harshly. If you’re a construction worker and drop this off a roof, then whoops! The phone should be fine. This is great if construction workers want to have a fancy expensive smartphone but don’t want to replace it all the time because it’s broken.

This is also good for those clutzes who tend to drop their phone all the time. If you don’t drop your phone that much at all, then you might want to go with the commuter series, which still offers good protection but has a little bit more style. But this case seems to be up for some of the worst conditions someone could throw at it.

But I have a droid! Or a Nokia! and I don’t like black! I want pink! No I want blue! No red!

Calm down internetgoer, there’s hope. Otterbox sells this case for a large range of models in many different colors.

The case sells online for $50, which seems a bit excessive but you’re getting protection that’s worth the price.

Otterbox Defender Homepage

Defender for iPhone

Android vs. iPhone

Android and iPhone have always been one of the biggest disputes in the technology world ever since Mac vs. PC (which still isn’t decided). There are many factors to which makes one better, and with the iPhone soon on verizon, network coverage and carrier subscriptions are no longer some of them.

Why iPhone is better than Android

Lets start out with the iPhone.

The iPhone is made by one vendor, Apple. Apple does everything that has to do with the device: sells it, supports it, updates it, designs it, authorizes apps, etc.

And this allows for a kind of unity that is not found on android devices.

On iPhones, almost 80% of the users are updated to the latest version. Which means that if you develop and app that requires the latest verson of iOS, then 80% of all iPhone users can download it. Also, the updating system is flawless. All of your media, apps, mail, etc. can be synced over a single app on your Mac or PC that you can download for free. In addition to all that, you can also install software updates with the click of a button when prompted. And because apple all works as one system, when the update is available to one iPhone, it’s available to the rest.

With android, things are different. Very very VERY few are updated to the latest version, mostly because there are so many different android phones on so many different vendors that only some of the vendors update some of the phones some of the time. So if you develop an app for only one of the versions of android, few people are going to be able to use it. Some people are still on android 1.5! And if you develop an app for the newest version, same thing. There’s always going to be many users that aren’t able to use your freshly developed application.

In addition, androids have a much  bigger learning curve. To do advanced things like install new unofficial OSes, you have to root your phone and know how to install roms and things along those lines.

Another thing would be apps. The applications for iPhone are coded in objective C, which has a lot more possibility then Java. Many people say that when coding for android, they feel very confined in what they can allow their applications to do. Also, apple has to approve all apps submitted. These combined result in very high quality apps, which are easy to use and have a lot of functionality.

Why Android is better than iPhone

Android also has some nice benefits. First of all, it’s open source. This means that any developer can legally take the software and customize it and install drivers for different devices and do whatever they want with it, all legally.

This also means that if you do the right things to your android, you can install different versions of the operating system that have been modified by people ranging from people in office buildings to hobos living on the streets that happen to have coding skills and an internet connection. Having the ability to customize even the core operating system on the device is a big benefit with androids. And even though the manufacturers may take a year to come out with the new version of the OS officially for your phone, there is almost always someone porting the OS to the device early so you can get it before any of your friends.

Android is also not restricted to the Android Market. On iPhones, to install apps that aren’t in the app store you have to jailbreak. But with android, it’s as easy as checking a box in your application settings. Once that box is checked, you can download APK files from anywhere online and install them without a problem. This is good if an app maker doesn’t feel like putting their app in the market or just wants to keep a closed beta of it. Either way, having this feature is definitely a big plus for android.

And yet another benfit would be the huge variety. There are hundreds of android phones (all of which you can find on android.com) and as many vendors as you can imagine. This gives you a wide variety of different software, skins, hardware, power, price, coverage, and many different plans with different prices and different speeds and different features. Because of the wide variety of phones available, Android is now taking up a bigger market share than iPhone.

Conclusion

Androids and iPhones both have their ups and downs. But I think that I might admit to getting an iPhone when my upgrade is available. Even though I like the availability of open source on androids, I still feel like there is a wider variety of higher quality apps on the App Store that I could use.

Sphero by Orbotix

While at CES I paid a visit to Sphero.

Sphero, in a nutshell, is a small robotic ball controlled by your smartphone.

The ball itself measures a few inches across and can glow any color across the RGB spectrum.

This thing is pretty cool.
There is a simple (but not too intuitive) driving app on your phone (Android or iPhone) that can control the Sphero as it just rolls around. However because sphero has an open API, the hope is that developers can use the sphero and integrate it into their apps. This means that game developers could create some really cool augmented reality (AR) games. And because it’s open, anybody can integrate the code into their apps.

Because of this I got to be an exhibitor for them. No, not an official exhibitor, but since I was such a good driver I got a t-shirt, and next thing you know all of the people at the booth are asking me questions (which of course I could answer). That was a really cool experience because I got to see both sides of CES.

One of the most popular questions was: Where can I get this thing?

Answer: We’ll see.

These little robots are still in prototype form, and there are less than 17 (maybe more by now) in existence, and the shells are pretty fragile at the moment.

The release of these guys is going to be in late 2011, where they will be available for less than $100. Yes, less than $100.

HOWEVER, you can pre-order one for yourself at http://gosphero.com.

These little things seem to have a lot of potential with one of my favorite associations: OPEN SOURCE!

OMGB-6 WeDoDroid HTC GINGERBREAD UPDATE

You may have read my post on how to install gingerbread on a droid incredible. Well that was with version OMGB-4. OMGB-5 was released and now, OMGB-6 as well.

OMGB-5 brought a lot of needed updates.

EMMC Access For All Apps
MMS on 3g and WIFI
Microbe LWP
Nexus S LWP
Available on Rom Manager *Hopefully, need my pull request to go through Rom Manager OTA Update Capable
Slightly Modified Boot Animation (by Ocelot13)
Nano Added *Here You Go N_I_X 😛
USB Mounting Fixed! No More Gscripts!
Reverted to Kernel #18 to Fix Touchscreen Issues on Some Phones.

OMGB-6 brought a few nice updates as well.

Actual Nexus S LWP
GPS
Right Launcher Button Remapped to SMS
Moved Bootanimation to /system/media

Yes, GPS. Finally, GPS. That includes working navigation and third-party GPS support and the whole shabang. Yay!! It used to be that whenever i really needed GPS Id revert back to the stock froyo.

Now there are still some bugs:
Video Recording
Led Lights

Also, you may notice that some apps don’t work. This isn’t because of gingerbread or your phone, it’s because many apps just aren’t compatible with the brand new operating system.

Thanks xda-developers and tem WeDoDroid for developing this up so quickly and perfectly!!

XDA Incredible Gingerbread Page

OMGB-6 Direct Download

How to install the ZIP on your incredible