GUI Install Gingerbread (Android 2.3) on HTC Droid Incredible

GINGERBREAD!!! AAAAHHH!!!

Gingerbread brings some incredible but simple interface and speed improvements. Here’s a step by step guide on how to get it.

1. Root your phone

This process was described in the post about how to install froyo (Which you should have now gotten the update for) but I’ll go over the basics again.

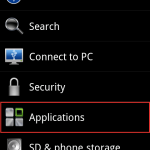
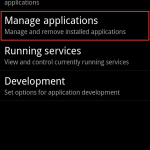
Go to unrevoked.com and click on the droid incredible. Then, download the application and run it on your computer. Plug in your phone with the USB cable and choose to mount the phone as a disk drive. Then, go into settings>Applications>Developer and check the box for USB debugging (if it isn’t checked already). Then, click flash clockworkmod recovery (or something like that) button and let your phone and the computer do the rest.

Rooting allows for a LOT more than just reflashing operating systems (like free wi-fi tethering and other cool apps like that) but I’ll go over those in different post.

2. Download the ROM from xda-developers

A ROM is basically the operating system for an android phone.

Go to THIS SITE and at the bottom click on the OMGB-*** with the HIGHEST NUMBER for the ***. This will ENSURE that you get the LATEST VERSION from xda-developers.

3. Put the ROM on your SD Card

Once again, plug in your phone and select Disk Drive. You should see both your internal storage and your SD card mounted on your computer (to find out right click on the drive and click get info. The internal storage on your phone is about 8GB). Click and drag the zip that you downloaded from xda-developers onto the root of your SD card. Then eject the SD card and phone storage and unplug your phone.

4. BACKUP BACKUP BACKUP!

Open ROM manager and tap backup current rom. It will reboot and create a backup of your phone’s current state. Don’t get scared if it takes a long time on some things or if the progress bar doesn’t move, and NEVER  take out the battery (no matter how worried you are) while it’s in the middle of this process. If you if you skip this step you will never be able to return your phone back to normal.

5. Flash the ROM with ROM Manager

Open ROM manager on your phone and tap Install ROM from SD Card.

Then in the next menu tap on the ZIP file that you moved onto the SD card.

In the screen that appears check Wipe Data and Cache and click OK. The phone will reboot into a screen that looks identical to the one where you did your backup.

6. Wait while it installs

The process should only take a minute or two.

7. Congratulations!

You should see a gingerbread followed by the interface of gingerbread. Congratulations, you have installed Gingerbread on your Droid Incredible!

Cortex+tumblr+organ=beauty

There’s always that random thing you want to share with your friends.

Pictures, text, a conversation you had, you’ll always come across something.

Now usually for this we use facebook.

But if you want to share with the public, you usually use twitter.

But twitter is only text. I mean, it’s only 140 characters of it. If you want a picture in it, you have to add in a link that people have to click.

That’s why people have blogs.

But blogs can be a pain to post to. You have to login, create a new post, add in the stuff, then post it. It’s really not worth the time.

And blogs tend to look kinda standard. I mean, they can look nice, but they all look the same.

I have a solution for this.


Part 1: The blog

tumblr.

Tumblr is a customizable and free blogging platform that is easy to use.

Unlike others, you can post text, but it gives you separate things for text, links, conversations, audio, quotes, and video. And they all show up in their nice ways (quotes have “s around them to make them look quoty). It’s flexible and postable by mobile, and you can have it post to your twitter, facebook, etc.

tumblr.com

2. Time

Cortex.

I did a review of cortex a little while back and let me just say that it is still beautiful.

Cortex is a chrome extension for sharing things really fast. Here’s a demo video that I made (and that was used in the review of cortex on mashable, let me have you know):

As you can see, there is that magical t for you to post to tumblr, so you could use that to publish things quickly to your blog.

One cool thing about it is that you can use it to yes, share just the link to the webpage, but if you click and hold over an image it will share the image (and it will post it to tumblr like an image too). Select text and click and hold over that it will share the quote from the webpage (and yes, it will post it to tumblr like a quote). Click and hold over a youtube video and it will share the video, not a link (and YES, it will ALSO post it to tumblr like a video). It’s nice to see the cortex is so well integrated.

As I said, cortex is a chrome extension, so if you are desperate for sharing you may have to switch to chrome (which really isn’t such a bad thing let me have you kn0w).

Cortex homepage

Cortex on Chrome Extensions

3. Blog appearance

While it’s nice to have a blog in reverse chronological order with one thing on top of the other, you can spice it up a little but with an amazing theme called organ.

What it does it makes everything in to skinny rounded columns (reverse chronological order from right to left) and does different things depending on what they are.

Every different type of post has differently colored columns.

Pictures it will take a strip of the picture and show it in the column.

Everything text (text quotes links) it will adapt the text to go with the theme and then mumble jumble it in big letters down/across the column.

Now you may say “what the hell, I can’t see any of the text!”. Well, there’s an answer. Hover over a column and it will expand to show you a little bit more.

Hovering over the text will make the beginning of it drop down sideways in a single line. Then, you can click on the arrow that shows up at the top of the column and see the full posting.

It’s nice because at first it shows you a lot of posts in a very small space, then when one looks interesting you can hover over it, and if it’s a dud you can hover over another (without having the page have to reload) and if it’s a good one then you can click on the arrow to expand it (and wait for the page to load but it’s probably worth it).

To get this theme on your tumblr, choose to customize your site, click on theme on the top bar, and scroll WAY DOWN to the free themes and find the one called organ. It will be near fluid. 🙂


Personally I use this system to share EVERYTHING, so my site ends up looking like brain vomit. Because it’s so easy, I post to it ALL THE TIME. It’s nice because it’s constantly updated and there’s no thought put in to it. Oh, I think this looks cool. SHARED.

To check out my site done this way head on over to tumblr.maxswisher.com!

3as1ly Charg3 Cr3d1t Card5

You are a babysitter.

You are a bartender.

You are a photographer.

You made a bet with a friend over a football game.

All of these require payments. And while yes, you could take cash, sometimes it’s just easier with a credit card, as the money goes straight from their account to your account and you don’t have to deal with any of this green paper stuff.

Usually, you have to have one of those little thingies that they have at supermarkets with a single-purposed computer just for making a bill and accepting a credit card. But now, you can be on your way to accepting credit cards for a very small amount.

The key to this whole task is Square.

Square is completely free and consists of two parts: An app for your iPhone, android, or iPad, and the physical Square card reader.

Amazingly, the square card reader works with all of these. One model for android AND iPhone AND iPad. How you say? This picture should sum pretty much everything up.

So in case you didn’t figure it all out from that picture, basically the square is a little plastic thing that you plug into the headphone jack that has a slot that you can slide a credit card though. In the app, you can select how much you want to charge.

Now after you have put in an amount and swiped the card, you have to sign to authorize it. Of course that would usually be done with first a pen and paper, but now you can with a stylus on one of those thingamajigs in supermarkets. With square, you are supposed to use your finger on the touchscreen, but that can be hard as we are used to having pens. So that’s why in addition to your app and a reader, you need a pogo sketch to go along with it.

That should pretty much explain it.

Now after you are done with all of this swiping and signing and lolly-gagging, its time to print a receipt. I don’t think so. Instead, you can have the receipt emailed to a specified email address. cool, eh?

So wherever you are, at a wedding or the house of a small child, you can always accept credit cards and let people sign and get their receipts without ever seeing a piece of paper.

Square

Pogo Sketch

Android App Inventor

So many of us have absolutely no idea how to code for Android. Heck, barely half of us know that Android is coded in Java!

But Google decided to be nice and create a graphical interface to create your apps with no knowledge of coding.

The app inventor consists of two main parts: The designer and the blocks editor.

The designer is all about the graphical interface of the app. Unfortunately, it only allows you to create a single front screen, so you can’t go into sub-pages. You can add elements and give them text and make them look how you want them too etc. The designer is actually all in a web browser.

The second part is the Blocks editor. Here is where you edit the functions off all of the components you added in the design view. You put different functions (blocks) together like puzzle pieces to add functionality to things. Unfortunately the documentation isn’t very helpful when trying to figure out how exactly to use these blocks, but I guess it’s possible to learn. The blocks editor is a java application that you can download by clicking a button in the designer.

Once you have the apps downloaded, you can enable USB debugging on the phone and plug it into the computer. Then, in the blocks editor you can connect to the phone with a button. Once you are connected to the phone the changes that you make in the designer and blocks editor will appear on the phone in real-time.

Once you have your app built, you can do a variety of things: You can either download the app directly to your phone, save it to your computer, or use a barcode scanner on a phone and download the app from their servers over the internet.

Unfortunately, the apps you create cannot be put into the App Marketplace, and unfortunately they don’t notify you of this. So when you create an app in the app inventor and you want to put it in the android market so you pay to become a developer and all, you will be disappointed to see that your app will fail upon uploading. This is google’s fault, and at the moment there is no way around it.

Basically, the app inventor is a fun way to create simple apps, but don’t expect to be able to put your app into the Marketplace because GOOGLE HATES YOU.

Google App Inventor is only available as a private beta, so you can request an invite and cross your fingers.

Request an invite here

Screenshots:

Uninstall an Android App

The simpler things are sometimes the hardest to figure out. Especially on a platform like Android.

Unfortunately, removing an app is quite the annoying process. But plenty of people don’t mind it so far.

We want to uninstall the application Bump. Here’s what we do:

1. Go to the home screen and press menu and select settings.

2. Select applications.

3. Select manage applications

4. Tap all applications at the top

5. Find and select the app you want to uninstall (not alphabetical)

6. Tap Uninstall

7. Tap OK

If this was difficult to follow along, click through the gallery with screenshots for every step (in order, or course).

Facebook Places integration for Android!

After months of grueling on the facebook mobile website, places integration is finally here for the facebook android app. It works just the same as the iPhone, and it works perfectly. Now I check in almost everywhere because it’s so easy. 🙂 Screenshots below.

Jailbroken iOS still isn’t good enough

Okay, so by now you have propable figured out that I am an open source supporter,which is why I’m an android user. But I have gotten the question of why I don’t just use a jailbroken iPhone as that allows open development. Well, kind of.

One of the big things is if some random person creates an app and they don’t want to put it in the android market or it isn’t stable enough to release on the android market, they have to put it on some random location online. With an iPhone, you can’t install a random untrusted application. I mean, even when you’re jailbroken you still have to get your apps from cydia. With android, you can’t do this by default but you can by just checking a single checkbox in a settings pane (applications, to be exact). That’s what makes the difference. That is why I am able to run the beta of swype on my phone. Because I downloaded that app off of the swipe website because it wasn’t ready to be released onto the market and was in closed beta.

Another thing that this means is that if you want to have a closed beta and a few lucky testers, you just can’t with an iPhone. they all need the SDK from apple and that whole thing. With android, all you need is to switch a setting and hit the download button.

Another thing is stability. iOS was NOT made to be jailbroken, and it often reduces stability and speed.I recently jailbroke my iPad and after a few days I reverted because the SpringBoard kept crashing and everything was quite slow. Android is open-source without the loss in stability.

Personally, I think it’s inside is what matters. I mean, I can use a computer with a 0.6Ghz faster processor than the last and I can feel the snapy-ness. No one else I know can. I felt the same way when I started using the iPad. But I support open development of the iPhone, and I think it could have a lot more potential if it was open-source (or at least an open-source option was available for people who care more about it).

Phone Compatibility matcher

This is a general question to ask. You need to get a new phone, so you ask “which phone should I get?”

And most people these days go for a smartphone. iPhone or Droid are the only choices. By droid, I mean collectiveley the whole droid incredible 2 and x series. That part is up to you.

So here’s how this goes. Print out the first sheet and put a check next to every feature you are sure you would use very frequently and woule be helpful. No matter what, don’t check every option!!

Some of the options have an OR. This means you can only check one of the two.

Once you have filled out the sheet, print the second sheet. Put a check next to each number that you had checked on the first page. Add up the total number of checks for each column and look below to see which column means which score.

Hope this helps you decide whether to get Android or iPhone!

PAGE 1

PAGE 2

P.S. This was inspired by my science teacher Ms. Nabokov who created a similar sheet that determined if you were a tactile, visual, or auditory learner. Good idea!

Why I am an android user

Android eats apple
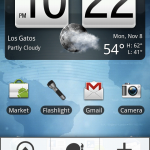
I don’t use the iPhone. I use a Droid Incredible (P.S. A Droid Incredible commercial came on the TV JUST as I wrote that sentence. Wow!). But being the apple lover I am, I get asked why I don’t use the iPhone daily. But here’s why.

I believe that computers in general started as a hobby. People could do whatever they wanted to do with their computers. People wrote code and embedded it into chips however they wanted to. The point behind the computer was that people could create electronic devices that could do things that people never imagined.

But to bring this to more than nerds in a garage, it had to be commercialized.

I have no problem with commercialization, but I have a problem with being selfish with your software. Keeping it to yourself for you to have fun with, and not sharing with others. That’s not how my mom taught me to be.

Android is open-source. This means that anyone (even if you are in a garage) can take what google has created and play with it. Mess it up. Make it better. Google is sharing.

Now Apple on the other hand, starts a lawsuit whenever someone uses their software. Psystar, for example. If you’ve never heard of them it’s not a big surprise. Psystar was a manufacturer of PCs that came with OS X preinstalled. And Apple decided to grab it back out of their hands and would you look at that, Psystar is gone.

And it is the exact same story with the iPhone OS. You will never find customized versions of the OS that you can install. You can tweak your current one with a couple of themes but you will never find a customized version of the OS. And if you do, make sure you don’t tell apple.

There are many many many different twists on the Android OS. One of the most popular ones would be Cyanogen, which is Android with some cool tweaks. It can be installed by rooting your phone, downloading an app from the official Android Market, downloading the ROM, and clicking install. Things will flash, files will move, and time will pass. But in the end, your phone is running a completely overhauled android OS. Now google recently got upset with Cyanogen, but the reason was because Cyanogen was including Google’s apps with it (Market, Maps, Navigation, etc.). Now it is disappointing that I can no longer download apps from the Android Marketplace when using Cyanogen, but at least cyanogen is available to download and install at will (without google’s apps, of course). Even though google is now keeping a little for itself, it is still sharing. And I like to see people share.

Failz to you Verizon, Failz to you.

How I feel. 🙂

So my Droid Incredible started to act up. Things weren’t quite working, and the phone kept rebooting itself. It also wouldn’t update to the 2.2 OTA. So we call Verizon and they tell us to go into the vrizon store because they had “More information.” So we schlep all the way over to a Verizon store and they say the EACT same things that they said over the phone. So we leave with absolutely no help. So the next day we call verizon AGAIN and we finally get a replacement phone shipped. But this hasn’t been the last of your problems. First of all, they tried to ship the phone to some invalid address in South Dakota, wherever THAT is. They were off only by half of a country. So then they send it to the correct address. Nope, it gets BETTER. I open it up and turn it on and activate it and sync it and everything, so it all looks good. Until I make the mistake of opening up the camera app. Low and behold, the camera wouldn’t focus properly. At all. It just didn’t focus. I changed every single setting possible. SD card in, SD card out, hard reset, soft reset, reprogramming. Nope. So I call verizon again and I tell them the problem and they say “Well, we can send you a replacement phone,” and I just say “That would be great. Thanks!”

So here I am with 2 faulty Droid Incredibles, and one of then happens to be a certified like-new replacement. That’s odd, because like new phones aren’t usually faulty like that.

So verizon, FAILz to you. I Hope this one works. It took 3 calls, a trip to the verizon store, and 2 weeks to get a phone that STILL doesn’t work properly. First time in 10 years. Yup, my WHOLE FAMILY have been verizon customers for 10 years. But from the way your customer service is, I’m not sure if it will last to much longer.This is your last chance Verizon, and I HIGHLY RECOMMEND you get it right.

Recent verizon support call: the good and the bad

So my Droid Incredible has been doing some odd things.

First of all, it didn’t update to 2.2 correctly. It tried and failed.

Second of all, it keeps rebooting itself randomly.

So we call up verizon support about both problems. Lets start with the bad:

The Bad:

We called and a nice lady answered who had us go through some simple procedures like a hard reset. We changed some settings to try and help the rebooting. As far as the update goes, she told us to go to our local verizon store because they had “more information”. So the next day we went and waited in line and everything and what does the guy say? There’s nothing we can do. You’ll just have to wait for the update. Now inferring logically, I argued that “The system has the phone marked as upgraded, even though it failed the install.” The guy says “WELL, it takes about a month to roll it out and everything.” He really didn’t get that we HAD gotten the update, it just didn’t install. Once again, “Well, you just have to wait about a month and see.” Thanks for the help. We schlepped all the way over to a verizon store, waited in line, and we get absolutely no valuable information. Great.

The good:

So after that, we call verizon again and someone knowledgeable picks up. We had to wait on hold for 8 minutes but let me say, it was well worth the wait. He asked about the water activation sticker and had us look at the firmware on the device. And he says (finally) “Well, the system has your device marked as upgraded, even though your phone says differently.” THANK YOU. I’M RIGHT. THE TWO OTHER PEOPLE WE TALKED TO WERE WRONG. So he asked if there was any physical damage and hallelujah, a replacement phone is on it’s way.

But the real question is, why did the two other people there have no idea what they were talking about? I mean, come on verizon. Why would you hire them if they aren’t knowledgeable? These are questions that may never be answered, but in the mean time, here comes a device with 2.2 pre-installed. Yay!

Why I’m not upgrading to the official 2.2

So the official OTA 2.2 Droid Incredible Update is finally live.

But I’m not upgrading.

So to install this, I would have to unroot my phone. There is no way to root this version of 2.2, so I won’t be able to use my beloved Wireless Tether.

Now I already have a leaked version of 2.2 so I get everything of 2.2 other than the 720p video recording, but I get my wireless tether. So it really becomes a tradeoff between the wireless tether and 720p recording. Now I know that 2.2 has the built in 3G mobile hotspot, but that holds me at 2GB and costs me another $20/mo. Riiiight.

So I’ve decided to stay how I am with a partial 2.2 update and stick with my Wireless Tether until they find a way to easily root this version of 2.2.

P.S. Sorry for the lack of posts, I have a few more coming soon. 🙂