Search Google – now with your Voice

Google's Voice Search integrated into the web

Since its debut in 1997, Google Search in general has grown in size and strength.

Since then, the keyboard and mouse have always been a primary tool in searches.

In 2008, the Google Mobile App was released to the Android and iOS operating systems, allowing native and mobile searching of the web.

A few months later, they integrated a new feature that they had been working on into the mobile apps called Voice Search. Voice search was a new idea on how to revolutionize searching. But most Google searches were done on the computer, so even if everyone used voice search on their phones, more requests would be made from a keyboard.

Google took a surprising 2½ years to make their next move. Then about a month ago, they released Voice Search online, using the same microphone input as Gmail chat. However, they confined it the Chrome as an experimental search feature.

I think that Google really has enough “innovations” that they’ve given to us and that using a keyboard is just fine for searches. Personally, I talk faster than I type, but I am so used to typing that a switch to talking instead is actually harder, at least for a while. I see where they are going with the user-friendly ideas, but this is one of their kind of unnecessary ones. The recognition accuracy is ok, but as I expected it doesn’t work well with names, even of well-known people.

If you want to try it out, head on over here in Google Chrome and hit Try It Out.

App of the week: Tiny Tower for iOS

Tiny Tower is a simple, 8-bit graphics game. You own a tower in an urban metropolis, and your goal is to make money and build floors.  You start out by making a residential floor and moving people in. Then, you make a store and give the people who live on the residential floor jobs at the store. You make money from the store, and have to constantly keep the items in stock (and pay and even wait to restock it).

Once you have enough money, you can build another floor with another store.

And you just keep going trying to make your tower as high as possible. One of the coolest aspects of the game is that you have to wait; it takes time to restock supplies in your stores, and it can take hours to construct a new floor.

And having gritty, 8-bit graphics just makes the whole thing even more addicting.

Tiny Tower is compatible with the iPhone, iPod Touch, and iPad for a wallet-loving $0.

Click here to view it in iTunes.

CyanogenMod 7

Of all of the ROMs floating around out there, Cyanogen is by far the most established custom after-market ROM available.

CyanogenMod 6 brought froyo features to 2.1, and was later updated to 2.2 It was then very similar to a basic 2.2 ROM, so it became outdated. But CyanogenMod 7 brought us a loaf of gingerbread this time around. This has put it much higher up.

In addition to the new faster and cleaner base operating system, CyanogenMod brought some new interesting features to the table.

Lockscreen Gestures

The name says it all. On the lockscreen, you are able to perform gestures that will do different actions, including enabling the flashlight, unlocking the phone, opening a shortcut, or opening an application.

DSPManager

I have really found no use for this quite yet, but others might. It allows you to modify your sound outputs. You can modify headset, speaker, and bluetooth separately, and in each pane you get options for a bass booster, and you also get a nice equalizer that is quite easy to modify. I don’t exactly know why you might need this, but I guess some audiophiles on a higher degree than me might appreciate it.

Themes Support

The operating system comes with a built in theme chooser and three themes. You can download new themes online on many different forum sites (such as xda-developers) and easily install them. One package includes the theming for the WHOLE operating system, including home screen, highlights, menubar tweaks, etc.

Incognito Mode

This feature is rarely used, but I guess could come in handy. Identical to the incognito mode in Google Chrome, this will prevent your phone from saving cookies, history, cache, or anything.

Installation

Installing this ROM was fairly simple, however it doesn’t come with Google Apps built in.

First, go to http://cyanogenmod.com and select your phone, then download the ZIP for your phone and put it on your SD card. Open up ROM Manager and select “Install zip from SD card.” Select the zip of CyanogenMod, then check the box that says “Wipe Data” and the box that says “Backup current ROM.” Continue with your installation and you will be greeted with CyanogenMod. You may notice, however, that there is no Market, YouTube, Gmail, etc. To install those, download the zip for your phone here and then flash it. To do this, transfer the Gapps zip onto your SD card and boot into recovery by booting while holding the down volume button. In the menu that comes up, select Recovery, and wait for it to boot. In the next menu, select “Install ROM from SD card,” select the Gapps ROM, and let it install. Then, reboot your phone, and you will be greeting with a Gapps enhanced CyanogenMod. Enjoy!

[For more info on installing ROMs and rooting, read my full guide here.]

Fix: ClockwordMod won’t boot after update

***UPDATE: Go into Android Market and update the ROM manager to the latest version. It will fix this problem so you can update straight from 3.0.0.5 to 3.0.0.8.

So I recently went to backup using the ROM Manager on my phone. It notified me that there was a new version of ClockworkMod, and I was currently on 3.0.0.5, and should update to 3.0.0.8. So I update, and when I reboot into recovery nothing happens. It stays frozen at the HTC Incredible boot screen.

Luckily, you can still boot into Android.

Here’s the fix.

Go into ROM Manager and flash 3.0.0.6, one version up.

After it flashes, boot into the recovery and select “Clear cache partition.”

Then, reboot into Android. Open ROM Manager, and flash 3.0.0.7.

Boot into recovery, clear cache, reboot, and continue doing this until you are finally at 3.0.0.8. It should boot into recovery just fine. Enjoy!

Worried about your server? Get warned if it goes down.

Are you worried about the state of your server?

Maybe you have a website, and you’re worried if it’s always up and running, especially when you’re asleep and can’t fix it.

Well, I’ve written an extremely simple script that will solve this issue for you. Just plug your mac into the sound system where you sleep and crank it up to full volume. Whenever there’s a problem, your system default error will start going off every three seconds. That should wake you up! Then, you can go over and check the state of things.

The underlying command here is ping. I am using what you type as a simple variable, $website, and using -A to make it audible and ring, and -i to time the ping out so you don’t accidentally crash your server. In the end, the command is

ping -A -i 3 $website

And when you type in the website, $website is replaced with whatever that is.

It’s not a complicated or amazing script, but it helps to get things done easier and faster.

Download

To use it, download the script and navigate to it’s enclosing folder using Terminal. Then, type:

chmod+x

This will make the script executable. Next, type:

./makesure.sh

You will be greeted and asked to enter the URL (or IP address) of the site you want to keep track of. Type in the URL and press enter. You will see the ping output across your screen updating every three seconds. If ping stops responding, your computer will begin to make the system default error sound every time there is a request timeout. If you have the volume loud enough, that should be able to wake you up.

Enjoy!


Opera 11

Opera features a clean, blended interface

Opera has always been a web browser that kind of lagged behind everyone else. Although it had some interesting features, the speed, interface, and stability put it pretty low on the list (next to internet explorer).

But with Opera 11, this web browser brings some nifty new stuff to the table.

The biggest thing that is new in opera would be tab stacking. With tab stacking, you can

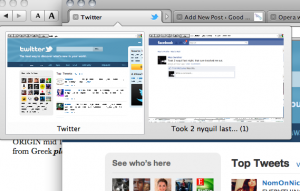
A tab stack with twitter and facebook

drag one tab over another and it will create a “stack.” Then, when you hover over it with your mouse, the page previews of all of the tabs in that stack show up.

I see why this could be useful, as this officially eliminates the need for multiple browser windows. I can have a tab stack for my google docs, a tab stack for my website editing, and a tab stack for all of my email.

In benchmarking tests, Opera rated second slowest next to firefox. So you can’t go for this browser for speed. Also, Opera boasts its “Opera Turbo” addition, which supposedly compresses the webpage on opera’s servers then send the compressed version to the computer. However, with this turned on, nothing ever loads at all. With opera 9, I couldn’t get the browser to load anything even with it turned off. So at least in Opera 11 with Turbo turned off, things load… usually. Sometimes things just plain don’t show up. After a plethora of refreshing, stopping, and re-entering the URL, you can usually get things to load. Note: This only happens once in a while, but can still be annoying.

There are a couple other nifty features I would also like to note. When you save a

Expanded thumbnail view of your tabs

password in the password manager, whenever you go onto that same site just press command-enter and it will fill the login and hit return, all so you don’t have to. This makes the whole logging in thing a bit less tedious. Accidentally hit that X on your tab? No problem, just hit the little closed tab button in the top right and your recently closed tabs will be shown so you can get back to it. And one last tiny little nifty feature: you can expand the tab bar so in addition to showing the page title it also shows a thumbnail view of the page.

Opera 11 is available both for Mac and PC, each fitting in with it’s appropriate interface. Links below.

Opera 11 for Desktops

The best of GMG!

I’ve been blogging over here for a couple years now, and I have 40% more daily visitors nowadays then I did about 4 months ago. So for you new readers, I’ve decided to bring back some of the old posts.

Mindnode
Mindnode is a great free app for mindmaps. It is now available on the Mac App Store.

Wireless tether with Droid Incredible
Tethering wirelessly is extremely convenient and here’s how to do it.

Omniweb
Omniweb is a fast and simple web browser that has a really interesting tabbing interface.

Create a WiFi network with your Mac
Sometimes you are at a hotel and only have one ethernet cable. Here’s how you can use your mac to create a WiFi network so your other devices can also share the love.

Top 5 favorite things about Mac
I personally prefer Macs over PCs. Here’s a few reasons why.

CloudApp
Cloudapp is a great and easy way to share screenshots and other images with your friends.

Bluetooth not available? Here’s a ten step fix!
It has happened to me a few times that when I startup my computer I get the wonderful bluetooth not available symbol in my menubar. In that case, I just come back to this post. It has never failed me!

Air Display
The iPad has a beautiful display. Here’s how you can use it as an extended monitor for your Mac!

Get Facebook chat in iChat
Facebook chat is great because it’s likely that you have a LOT of facebook friends that you can chat with. Here’s how to integrate Facebook chat into iChat using Jabber.

Chat with Phil McKinney
I had an interesting chat with Phil McKinney, the CTO of HP, and his words still stick with me.

swackett

Sometimes weather is just too damn complicated.

There’s the temperature, clouds, chance of precipitation, humidity, pressure, dew point, wind chill, and feels like.

But what’s the main reason you look at the weather? Usually it’s because you’re going somewhere. And why do you need to care about the weather at that somewhere? Because you need to know how to dress to suit the weather conditions.

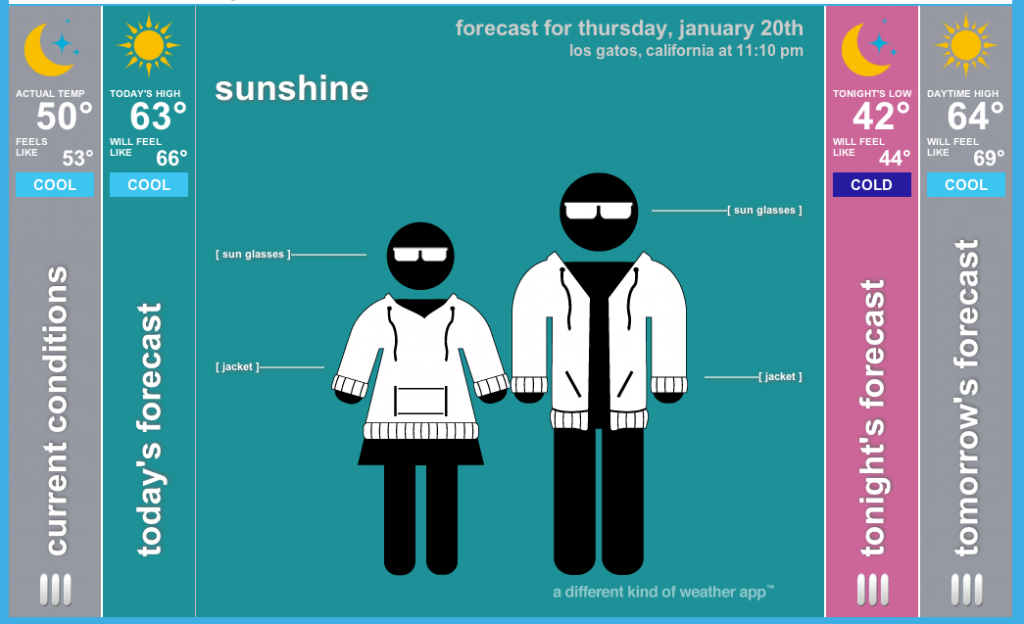
Swackett is an app that gives weather to you straight. It tells you exactly what you need to wear, and even labels it for your convenience.

As you can tell, it does give you some of the weather information so you know what to expect, but the main feature of it all is how it tells you what to wear and labels it all for you.

In addition to todays forecast, you can also see that it has the current conditions, tonight’s forecast, and tomorrow’s forecast, all of which tell you what you should wear.

Long are the days of trying to relate temperature, humidity, and chance of precipitation to what you should wear.

This app is available for FREEE on the Mac App Store. You can also purchase different styles of clothing that the weather models wear, but I don’t find that very necessary if all you need is to know what you should wear that day.

App Store direct link

Twitter for Mac

Tweetie for Mac has always been the preferred twitter client on Macs. However, when the makers of tweetie, atebits, were bought by twitter, we didn’t know what would happen. The tweetie for iPhone was updated and called Twitter for iPhone. We were waiting for Tweetie version 3, but that came to us as an app in the Mac App store called Twitter for Mac.

If you use Tweetie you’ll immediately recognize the interface. The interface of this app is extremely simple and effective. You have a small bar on the left with your timeline, mentions, direct messages, and searches. However with this update we also have lists, which allows you to view your lists that you’ve made, and profile which allows you to view information about your profile.

A couple of small tweaks have also been made, as the window is round and the bar is a bit darker and the dock icon has been modified to have the official twitter bird in it.

But one of the biggest upgrades in this would be speed.

It’s just so fast! You click something and it goes and it loads. Bam.

Also, with DMs, messages come in with a matter of seconds. That makes it extremely useful to use similar to IM, which can be handy (although I don’t use that too often).

You can get Twitter in the Mac App Store for free, and for your convenience here’s a direct link. 😉

Mac App Store

The iOS App Store is the main dealio when it comes to iOS. Everyone goes there for known good, easy to get, (sometimes) effective apps.

At Apple’s Back to the Mac Event, they were trying to bring aspects from iOS over to the Mac. They brought multitouch features, a centralized place for all your apps, but even better, they brought the App Store.

So with Mac OS X 10.6.6, you will find the application App Store in your applications folder.

Upon opening the app, you will find yourself having a flashback to your iPad.

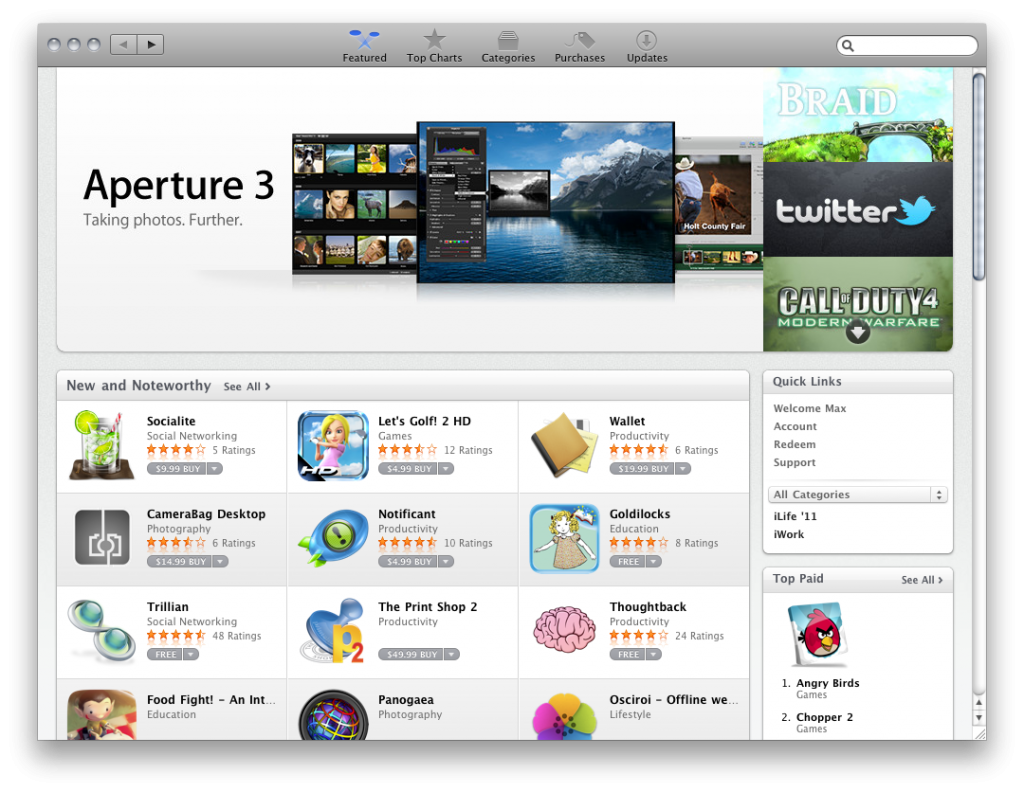
You have Featured, Top Charts, Categories, Purchases, and Updates at the top. Seems pretty similar to iOS, right?

On the featured page you have New and Noteworthy, What’s Hot, and a scrolling feature of featured apps.

But it gets even more iOS like.

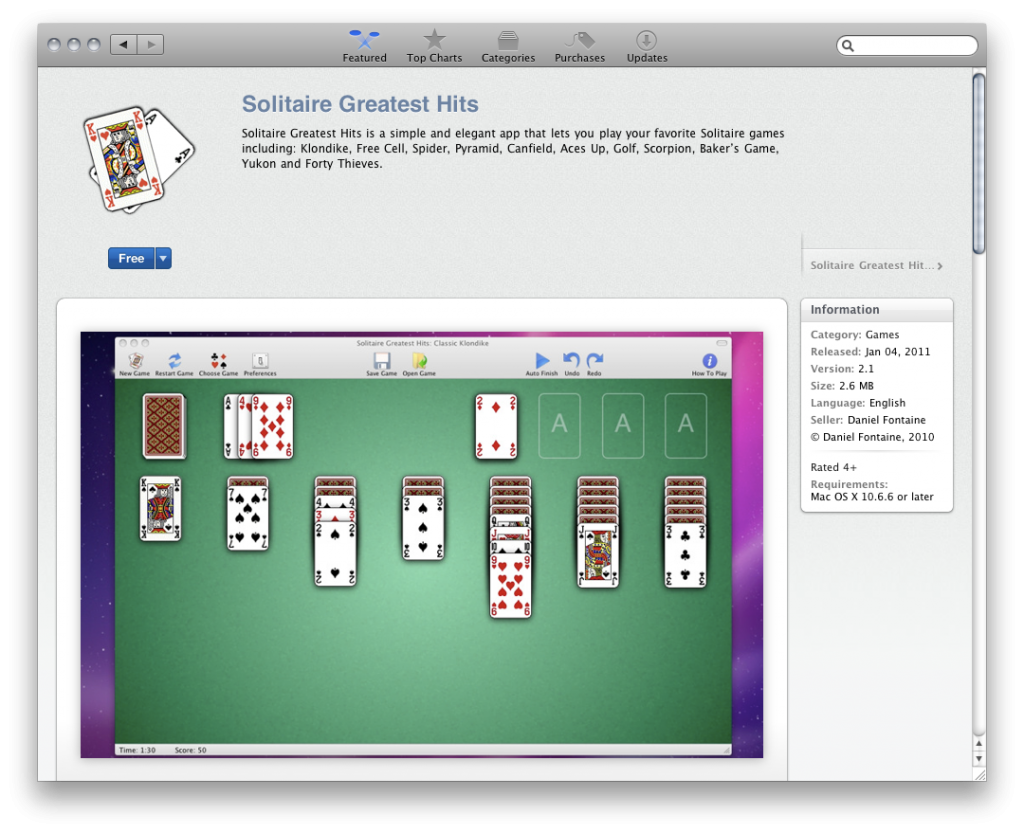
Tap er…. CLICK on an app and you will be brought to a page that looks pretty similar to the app page in iOS.

A description, a link that says the price on it, reviews and ratings, requirements, screenshots, iOS FLASHBACK!

And it only gets worse. CLICK the button with the price on it and you are asked to put in your Apple ID information (iTunes account information).

Once you sign in you will be greeted with a quite familiar process.

The app icon will literally fly from in the app to your dock with a loading bar across it (same one as in iOS, big coincidence). Once that is done, your app is installed and ready to use!

Having an App Store for Mac was probably a great idea. It’s an easy and already established way to get apps for your computer.

Another good thing about it is that you can now buy Apple’s bundled apps separately (like the iLife and iWork suite apps) instead of buying the whole bundle.

But my only worry would be if Apple decides to screw over all of the third party apps. Mac jailbreaking would be hell. if all of the sudden people had to start getting their apps approved by apple for them to go to the computers, I would definitely switch to PC. They’ve already done that with the iOS (which I am a rebel against to a degree) so the last source of freedom.

As the mac is right now, with both the Mac App Store AND the availability of third party apps is PERFECT. I think that a unified app store is a good idea but people still want their apps that aren’t in the app store.

OMGB-6 WeDoDroid HTC GINGERBREAD UPDATE

You may have read my post on how to install gingerbread on a droid incredible. Well that was with version OMGB-4. OMGB-5 was released and now, OMGB-6 as well.

OMGB-5 brought a lot of needed updates.

EMMC Access For All Apps
MMS on 3g and WIFI
Microbe LWP
Nexus S LWP
Available on Rom Manager *Hopefully, need my pull request to go through Rom Manager OTA Update Capable
Slightly Modified Boot Animation (by Ocelot13)
Nano Added *Here You Go N_I_X 😛
USB Mounting Fixed! No More Gscripts!
Reverted to Kernel #18 to Fix Touchscreen Issues on Some Phones.

OMGB-6 brought a few nice updates as well.

Actual Nexus S LWP
GPS
Right Launcher Button Remapped to SMS
Moved Bootanimation to /system/media

Yes, GPS. Finally, GPS. That includes working navigation and third-party GPS support and the whole shabang. Yay!! It used to be that whenever i really needed GPS Id revert back to the stock froyo.

Now there are still some bugs:
Video Recording
Led Lights

Also, you may notice that some apps don’t work. This isn’t because of gingerbread or your phone, it’s because many apps just aren’t compatible with the brand new operating system.

Thanks xda-developers and tem WeDoDroid for developing this up so quickly and perfectly!!

XDA Incredible Gingerbread Page

OMGB-6 Direct Download

How to install the ZIP on your incredible

GUI Install Gingerbread (Android 2.3) on HTC Droid Incredible

GINGERBREAD!!! AAAAHHH!!!

Gingerbread brings some incredible but simple interface and speed improvements. Here’s a step by step guide on how to get it.

1. Root your phone

This process was described in the post about how to install froyo (Which you should have now gotten the update for) but I’ll go over the basics again.

Go to unrevoked.com and click on the droid incredible. Then, download the application and run it on your computer. Plug in your phone with the USB cable and choose to mount the phone as a disk drive. Then, go into settings>Applications>Developer and check the box for USB debugging (if it isn’t checked already). Then, click flash clockworkmod recovery (or something like that) button and let your phone and the computer do the rest.

Rooting allows for a LOT more than just reflashing operating systems (like free wi-fi tethering and other cool apps like that) but I’ll go over those in different post.

2. Download the ROM from xda-developers

A ROM is basically the operating system for an android phone.

Go to THIS SITE and at the bottom click on the OMGB-*** with the HIGHEST NUMBER for the ***. This will ENSURE that you get the LATEST VERSION from xda-developers.

3. Put the ROM on your SD Card

Once again, plug in your phone and select Disk Drive. You should see both your internal storage and your SD card mounted on your computer (to find out right click on the drive and click get info. The internal storage on your phone is about 8GB). Click and drag the zip that you downloaded from xda-developers onto the root of your SD card. Then eject the SD card and phone storage and unplug your phone.

4. BACKUP BACKUP BACKUP!

Open ROM manager and tap backup current rom. It will reboot and create a backup of your phone’s current state. Don’t get scared if it takes a long time on some things or if the progress bar doesn’t move, and NEVER  take out the battery (no matter how worried you are) while it’s in the middle of this process. If you if you skip this step you will never be able to return your phone back to normal.

5. Flash the ROM with ROM Manager

Open ROM manager on your phone and tap Install ROM from SD Card.

Then in the next menu tap on the ZIP file that you moved onto the SD card.

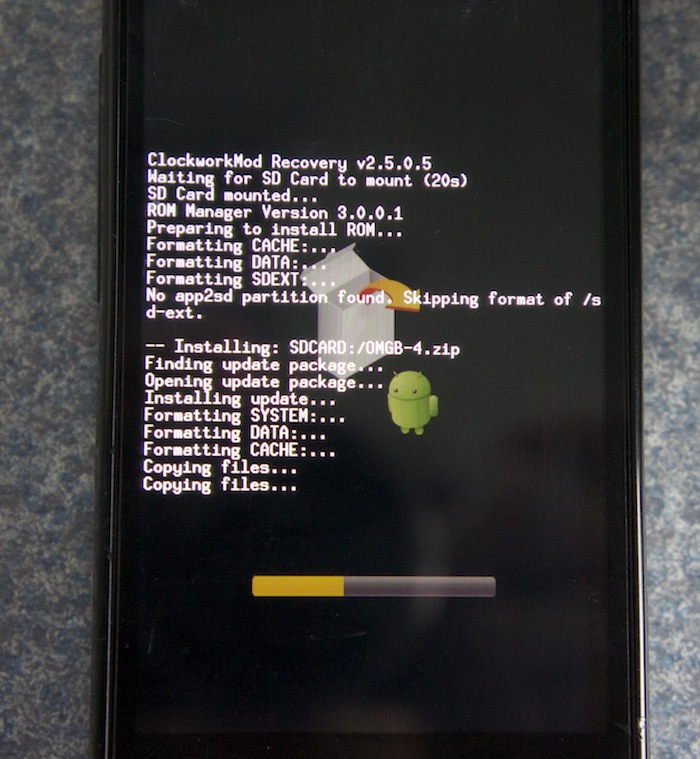
In the screen that appears check Wipe Data and Cache and click OK. The phone will reboot into a screen that looks identical to the one where you did your backup.

6. Wait while it installs

The process should only take a minute or two.

7. Congratulations!

You should see a gingerbread followed by the interface of gingerbread. Congratulations, you have installed Gingerbread on your Droid Incredible!