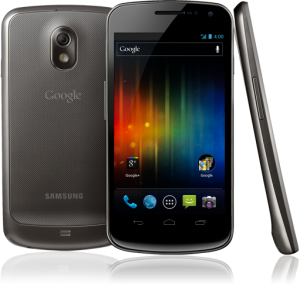
Galaxy Nexus? Lolwut?

You may know about the long lasting line of Google’s special Google Phone called the Nexus. There was originally the Nexus One, then the Nexus S recently. Both of these were manufactured by Samsung, but Samsung’s name wasn’t really placed on it – just on the very bottom of the product pages.

But Samsung has taken a different approach this time – They’ve released a new Nexus phone that they are calling the Galaxy Nexus, following their popular like of Galaxy S phones.

Other than the new name, the Galaxy Nexus follows Google’s standard path of some great upgrades.

As far as hardware goes, it’s just like the Nexus S – but better. The Galaxy Nexus features a slimmer body, more vibrant screen, and a very nice camera – although specific megapixels are not supplied.

But the real upgrades are in the software. The Galaxy Nexus features the purest of pure Android 4.0 – which is a nice relief considering all other phones in the Galaxy S line are skinned by Samsung, causing them to be painfully slow and unresponsive.

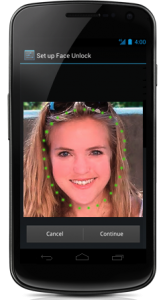
Among Android 4.0’s new features (other than the painfully idiotic name of “Ice Cream Sandwich”) are Face Unlock, which allows you to unlock your phone with face recognition; Android Beam, which uses NFC to send websites, photos, contacts, and more to other phones; and your usual fixing of extra eye candy.

The Galaxy Nexus doesn’t have any pricing or supported networks, however a bit is given away with the following line:

Galaxy Nexus runs at 4G (LTE or HSPA+) speeds

Verizon is the only provider that currently has an LTE network, which means that the Galaxy Nexus will be on Verizon for the first time.

I’m definitely excited for this phone, and anyone in the Android market should definitely look at this phone.

Apple Announces iPhone 4S – Where’s the innovation?

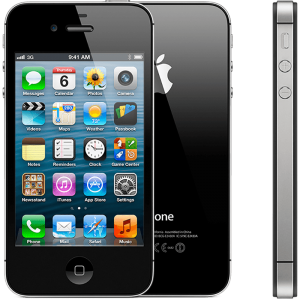
Look familiar?

Today, Apple announced the iPhone 4S. It’s so simple I can say it in a single sentence.

The iPhone 4S features a better camera, A5 processor, Sprint support, another antenna, and a voice assistant.ย 

That’s it.

The better camera is 8 megapixels which is capable of recording 1080p video, and the other aspect of the new camera is an additional lens and a wider aperture.

The A5 processor is dual-core and can run things quite a bit faster.

Apple decided that the iPhone needs two antennas to make calls – one to transmit and one to receive. After all, one antenna just doesn’t seem to do quite well on other phones…?

Last but not least there’s Siri. Apple bought this company a while back to create a fancy digital assistant, and my have they succeeded. Siri can understand what you say and create reminders, events, schedule meetings, move meetings, reply to text messages, find restaurants, and more with just your voice. I think it looks pretty cool – but there’s one question that I can’t seem to find the answer to: will it be available on the iPhone 4? If they only have it on the 4S it will really just be a letdown. After all, the iPhone 4’s hardware is definitely capable of handling that kind of processing pressure, and I don’t think Apple should use its software as an incentive to get the hardware.

This leads me to my next point – where’s the innovation?

With the last iOS announcement being the iPad 2, this leaves me wondering what Apple is thinking. The iPhone 4 was completely revolutionary compared to it’s predecessor. The iPad was completely revolutionary compared to it’s predecessor as well (there was no predecessor). But with the iPhone 4S and the iPad 2, I feel like Apple is having a hard time thinking of something revolutionary to release.


Photojojo Mini Lenses


The iPhone can take some pretty dang good pictures. In fact, many different phones can take mind-blowing shots. But your little phone can do even more if you treat it to these mini-lenses from Photojojo!


Contents/Installation

There are three lenses available from Photojojo: 2X telephoto, 180 Fisheye, and a 0.68x wide/macro lens. I won’t go over individual pricing, but the whole pack is $50.

Installing the lenses is painless. In your package you’ll get a few tiny, metal magnetic rings. Undo the plastic on the adhesive side and stick it around the lens of your device. If you have an iPhone, however, you should probably put the ring on a case; the sleek glass doesn’t play well with their adhesive.

Now to use the lenses, you just attach the lens to the metal ring and it magnetically locks on. Neat!

2x Telephoto

For those times when you want to get closer to your subject, the 2x telephoto lens will do exactly what you’d expect. Unfortunately it will cause a tiny bit of distortion, but not enough to make a big difference.

Without, With

As you can tell by that comparison, the lens does a nice job of zooming in, but has a bit of distortion (visible near the door handle).

Fisheye

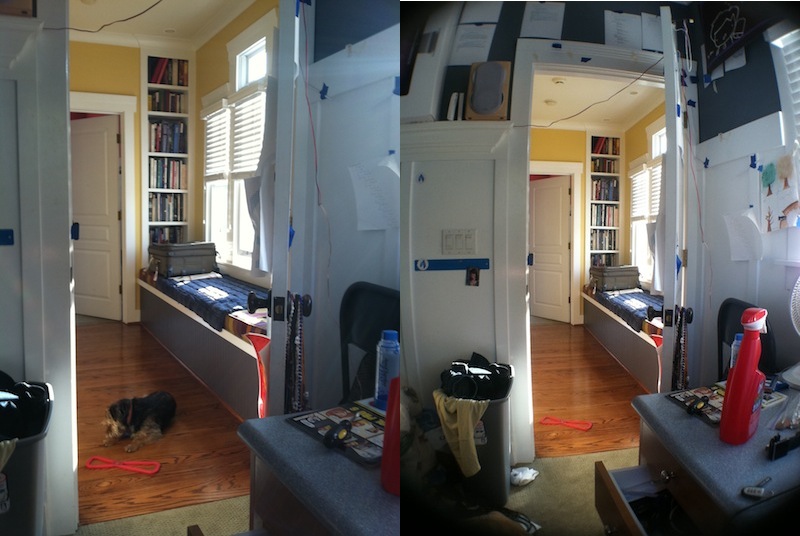
This lens I believe is my favorite. It can capture just about everything you can see without turning your head. If you want to really capture an entire scene, this is exactly what you need.

Without, With

Pretty cool, right? Unfortunately, this lens causes a particularly noticeable amount of vignetting, but I think that it adds a nice effect. If you want to get rid of it, you can always crop it with whatever application you desire, however you’ll end up losing a bit of the image.

Wide Angle / Macro

This lens confuses a lot of people. Is it wide angle or is it macro?!

Alone, the magnetic part of the lens is just Macro. However, there’s an adaptor that screws in to the macro lens to convert it to a wide angle lens.

The macro lens doesn’t zoom in at all. It just allows you to focus WAY closer to objects. Here’s a comparison – remember, I took the first picture as close as I could while staying in focus, then I took the second as close as I could while staying in focus. This lens does NOT zoom.

Without, With


Pretty cool, right? You can get ridiculously close to capture textures that previously went unnoticed. On the second picture, I’m holding my iPhone a tiny bit less than an inch away from the keyboard.

The wide angle addition to this lens isn’t very fancy, it just makes the picture a tiny bit wider. It will cause some straight lines to bend in odd ways, but it still comes in handy when wanting to capture wide shots without going crazy with the fisheye.

Without, With

Doesn’t that doorway look kind of round? As you can tell, it makes the picture a bit wider but can’t capture the amount (and distortion) of the wide angle lens.

Cool uses

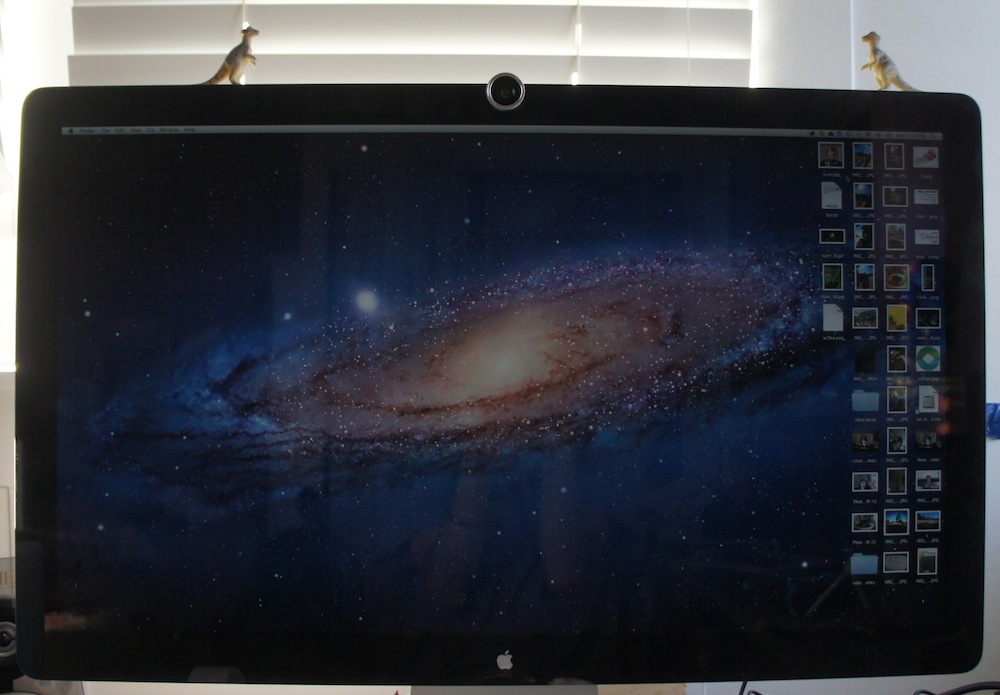
Yup, these work great with a phone camera. But there’s one use that I recently found – your webcam! It’s a small camera, just about as small as the one in an iPhone. Take a metal ring and stick it around, and you can use these lenses while video chatting! I personally have an LED cinema display, and although it makes my screen look a little funny, the results are totally worth it.

Here’s the display:

Ha! By the way, those things on top of my monitor are dinosaurs; you’ll get one with every photojojo order! I’ve ordered two things from Photojojo, so that’s why I have two dinosaurs.

Here’s what it looks like straight on:

Pretty cool, right?

Here’s the results:

Sweet! You can even see my keyboard!

Conclusion

These lenses are quite handy, and because they work with anything you don’t have to worry about compatibility. The whole set of lenses is $50, and if you’re interested click here to be redirected to the photojojo store!

Google+ for iOS released, Welcome to Crash Central

Google+ is Google’s stab at facebook that has some great new features that really puts it in the competition (read more here). The Android app was available immediately; the iOS app was supposed to come a few weeks after.

Well, it’s here. Unfortunately, it’s not worth getting.

You are greeted with a front page where you can view your stream, profile, huddles, circles, etc. Everything works until you hit stream; that’s where it crashes. It will give you a spinner saying that it’s loading… then it will keep spinning… and spinning… and spinning… and when you’re sick and tired of it, you just hit the grid to go back to the home screen. But it doesn’t go. So you hit it again. Same result. So you start frantically hitting buttons, but it’s not going to respond. Then, there’s the crash.

For now, this is all you’ll get. Jailbroken or not, iOS 5 or 4. The app is just a crasher.

Integrate Google Voice into Built-in Apps

So, you’ve been using Google Voice for a while now. Everyone is switched to your new number, and everything works fine. But there’s one drawback: to send messages, you need to open the Google Voice app. Unfortunately, that google voice app is kinda buggy. Then, you have to hide the messages app so you don’t accidentally send messages with it instead of Google Voice.

However, if you’ve jailbroken, there’s a plugin that will allow you to integrate Google Voice into the Messages app.

To download it, Open cydia and search for SMS GV Extension. Install the first result.

You’ll get a trial, but it’s a good idea to get a license as a couple of times a day it will remind you asking you to buy a license. Purchase isn’t as simple as it should be, but you can read the detailed purchase method by clicking here.

Aside from the purchase of a license, setup is unfortunately not as simple as it should be.

Open Settings>SMS GV Extension. Here, put in your Google credentials and turn the send box to on.

That was easy.

For receiving, you’ll actually have to have the official app installed and working – so don’t go uninstalling just yet!

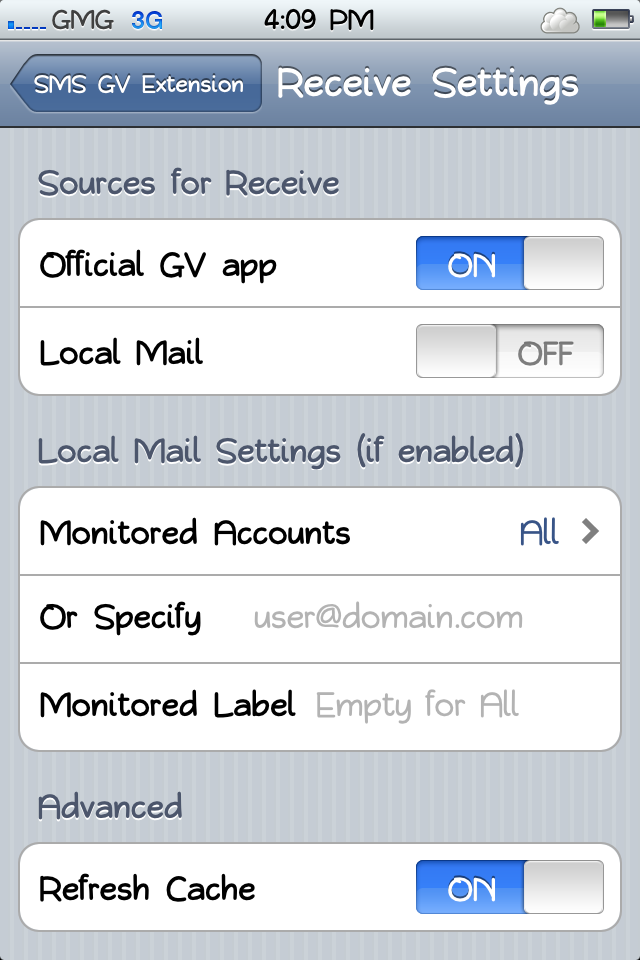
Go into Receive settings and turn on Official GV App.

You should now be able to send and receive texts through the Messages app. Functionality wasn’t too reliable, but after a little while it started working 99% of the time.

Okay, now you have Messages working. But you still want to get rid of the darned Google Voice app!

Instead of moving it to a folder somewhere secret, you can actually use a free app from Cydia to hide it.

The app is called SBsettings. It’s primary use is that you can swipe across the status bar (the bar with the time and battery at the top) and toggle WiFi, 3G, and more. But it can also hide apps.

To download it, just search SBsettings in Cydia and install the first result.

Once that’s installed, swipe across your menubar and click “more.” Here, scroll down and find “Hidden Apps.” Scroll down in the list and turn off Google Voice. You’ll never know it was there!

So now you’ve gotten messages done. But what about phone?

It’s actually much easier to get the phone to work.

Search in Cydia for GV Phone Extension. It’s made by the same creator as the Messages integrator, and it’s also the same registration and price.

Go into Settings>GV Phone Extension and enter your credentials.

That’s all the setup that’s needed!

That’s how to get Google Voice totally integrated into your phone. Your original phone number will still work, but you won’t be able to tell what the difference is between them!

If you have the Verizon iPhone 4, I would usually direct you to my post on easy jailbreaking. However, JailbreakMe.com is back! To jailbreak, just go to jailbreakme.com and you’re set from there. Easy!

The Google voice app is a bit buggy, but you no longer have to suffer. Enjoy! ๐Ÿ™‚

Power Support HD Anti-Glare Screen Protector for iPhone 4

When I first got my iPhone 4, the screen seemed really durable. Through the first couple of weeks I didn’t have a single scratch. I wasn’t worried or careful about it, and that still hasn’t proved a problem.

However I was definitely sick of all the smudges and fingerprints, and how if there was enough fingerprints on the screen it would get difficult to even move my finger across the screen.

I didn’t think I would benefit from any kind of screen protector until I was at a class and tried a friend’s. ย The anti-glare cover made it much easier and smoother to run my finger across the screen. It also didn’t attract fingerprints. Cool!

I got one of these for myself, and I’m quite happy with it. As I said, it doesn’t attract fingerprints, and makes it much easier to move my finger across the screen – two things you will benefit from every time you take the phone out of your pocket.

It all sounds good, right?

Well there’s only one drawback: having the screen protector will make your screen the tiniest bit blurry.

No, it’s not terrible – you can still easily read the text, and it doesn’t make much of a difference. But if you are picky about super sharp edges on everything, this may cause a problem to arise.

Sometimes people have a VERY hard time installing the protectors, usually because of lint and air bubbles.

Well, this screen protector has something new: a sticky, clingy sticker thing that you press against the screen and remove, bringing all of the dirt and dust with it.

However, if you’re buying this at an Apple store, you can usually get around all of that. They will install it for you, and they’re pretty good at it, too. They know all of the tips and tricks, and actually installed my screen protector FLAWLESSLY. Yes, there’s not a SINGLE SPECK of dust under that screen protector, and it lines up perfectly.

If you’re looking for a screen protector, this is the way to go. However, if you’re picky about your sharp lines, you should look into a crystal style screen protector, which, in addition to providing sharper edges, attracts more fingerprints.

The Power Support Anti-Glare Film Set (a pack of two) is available online here and at most Apple Retail Stores for only $15.

Better alternative to OMGB-6! HELLO FUSION!

OMGB-6 is great. It’s a simple, well made Gingerbread build for the droid incredible that worked really well.

But it had a couple problems.

First of all, it didn’t support google voice.

Also, many apps didn’t work. Twitter didn’t work, and the app I am doing testing for didn’t even work. Also, the version of the market was outdated.

Well, if you want a fuller and better and more supported phone, then say hello to the fusion rom.

Fusion is built on CM7, and has a base of 2.3.2. This gingerbread is tasting FRESH.

It boasts a newer version of the android market, FULL app support, and it also supports google voice.

If you don’t know how to install ROMS, then you have a bit of reading to do.

First, click here to learn what all of this means and do your background reading.

Then, do steps 1-4 on this page.

Downloads

BASE

GAPPS

Installation

Put both of those on your SD Card.

Then, reboot into recovery and BACK IT UP. BACK IT UP. BACK IT UP… STEADY….. BACK IT UP…. STOP! Don’t do this with ROM manager. Why, I don’t know. But apparently bad things happen and black wholes open into other dimensions when you use the ROM manager to install this. O.o

Once you’ve backed up hit Wipe data/factory reset in the recovery.

Done?

Ok.

Now, hit “install zip from sd card”, select “choose zip from sd card”.

And in the list that appears, select fusionbase.zip.

Then hit yes out of the large groups of nos.

(tic toc tic toc)

Done yet?

No?

Ok…

(tictoctictoctictoc)

Done now?

Good.

Now, go through the same screens, but when you select the zip select the gapps zip and install it.

While that’s installing, I’ll explain why there are two separate zips for this ROM.

Android is a base operating system. It doesn’t include the android market. It doesn’t include gmail. It just includes the base operating system.

So the base zip is the 2.3.2 base operating system without the android market or gmail or anything like that.

So you could just install the base and nothing else. But I don’t think you would be too happy when you can’t download any apps.

Done yet?

Ok good.

Now, select “Wipe cache partition.”

Done?

That didn’t take long.

Now, hit reboot, and wait a LONG time. It will probably be 5 minutes or so of the flashing android logo before it actually boots.

But once it does, you’re in business! Enjoy the new market, full app support, and using your Google Voice account, all without sacrificing the magnificent dimension-opening speed (and bragging rights) of Gingerbread 2.3.2.

Rooting, Recovery, and ROMs: What it’s all about.


So you’ve got an android phone.

And you can use the stock operating system with all of the manufacturer’s skinning and apps and versions and keyboard and everything.

Congratulations.

But if you are feeling a bit ballsy, then you can really take your phone to a true mobile computing level.

Here’s the steps to this.

  • Root
  • Install a recovery
  • Find ROMS
  • Make backups
  • Install ROMS
  • Use Wireless Tether

Lets explain what all of this is.

Rooting

Rooting means that you can create a way for apps to get superuser access. This is handy for getting to wifi, modifying files, or installing ROMs.

Recovery

For the Recovery, that will usually be installed when you root the phone. The recovery is where you can make and recover backups of the phone, install ROMs, and a slew of other stuff that might come in handy (but could also kill your phone).

Backup

Once you have the recovery installed (you can’t have the recovery without the root FYI) then the first thing you need to do is make a backup of your phone.

This is pretty easy. Just boot into Recovery (just hold down volume on boot and select recovery when given the option), Select backups, and select make a backup now. Your screen will flash many random things, and no matter how long it takes, don’t force shut it down or take out the battery. It will almost always finish.

ROMs

Once you have a backup of your normal operating system, you can go crazy with other ROMs.

ROM stands for Read Only Memory. In android poweruser terms, it is an operating system that can be installed on the phone using the recovery mode.

You can find many roms on the internet all over the place. XDA-developers is a great place to get ROMs. Sometimes a ROM will even be for the next Android version that htc hasn’t released yet.

When you download a ROM, it will come as an easy to handle zip file. And from here it’s simple.

Plug in your phone to your computer and mount it as a disk drive/USB Mass Storage. Then, just click and drag the ROM from your computer onto the root of the SD card. Eject and unplug the phone, then reboot into recovery.

Select install zip from sdcard and select the name of the file that you moved over. Then, choose the yes among the long list of nos to confirm you really want to install it and whabam, you will be installing a new operating system.

Then, reboot your phone, and you will be with your brand new OS that you yourself downloaded from the internet and installed on your phone.

Unfortunately, this process is different for every android phone. Sometimes there is a one-click root. Sometimes you have to use a command line application to open a port on the phone and install the root like that. But once you have gotten the phone rooted, installing zips is a piece of cake.

Wireless Tether

Aside from installing ROMs, another thing you can do is install and use apps that usually wouldn’t be possible if you weren’t rooted.

The one example I am going to use here is called Wireless Tether. And basically, it’s just that.

You can make your phone into a wi-fi hotspot with no hassle, just using verizon’s mobile hotspot plan. But that will cost you an extra $20 a month and you have a 5 GB limit before you start getting overage fees. Ouch.

With Wireless tether, you can connect unlimited devices, the data comes out of your data plan for your phone, and that also means there’s no overage fees.

Once you are rooted, just search for Wireless Tether in the android market and you will be able to install it on your phone and use it. You can change the SSID of the WiFi network, and you can even enable encryption and a password on your network. In addition, it allows you to use access control, where you can disable a device’s access to the network. Very handy sometimes.

Do it yourself

So that is the whole concept of rooting, recovery, and roms. You can find roms for things using google: Just do a search for “[your phone] 2.3 ROMS” or “[your phone] Cyanogenmod” and you should have plenty of luck. If you want to find out how to root your phone, just do a google search for “[your phone] root” and that should turn up some helpful results.

If you have a rooted droid incredible, click here to learn about the stable and functional gingerbread rom by WeDoDroid.
Failz to you Verizon, Failz to you.

How I feel. ๐Ÿ™‚

So my Droid Incredible started to act up. Things weren’t quite working, and the phone kept rebooting itself. It also wouldn’t update to the 2.2 OTA. So we call Verizon and they tell us to go into the vrizon store because they had “More information.” So we schlep all the way over to a Verizon store and they say the EACT same things that they said over the phone. So we leave with absolutely no help. So the next day we call verizon AGAIN and we finally get a replacement phone shipped. But this hasn’t been the last of your problems. First of all, they tried to ship the phone to some invalid address in South Dakota, wherever THAT is. They were off only by half of a country. So then they send it to the correct address. Nope, it gets BETTER. I open it up and turn it on and activate it and sync it and everything, so it all looks good. Until I make the mistake of opening up the camera app. Low and behold, the camera wouldn’t focus properly. At all. It just didn’t focus. I changed every single setting possible. SD card in, SD card out, hard reset, soft reset, reprogramming. Nope. So I call verizon again and I tell them the problem and they say “Well, we can send you a replacement phone,” and I just say “That would be great. Thanks!”

So here I am with 2 faulty Droid Incredibles, and one of then happens to be a certified like-new replacement. That’s odd, because like new phones aren’t usually faulty like that.

So verizon, FAILz to you. I Hope this one works. It took 3 calls, a trip to the verizon store, and 2 weeks to get a phone that STILL doesn’t work properly. First time in 10 years. Yup, my WHOLE FAMILY have been verizon customers for 10 years. But from the way your customer service is, I’m not sure if it will last to much longer.This is your last chance Verizon, and I HIGHLY RECOMMEND you get it right.

Recent verizon support call: the good and the bad

So my Droid Incredible has been doing some odd things.

First of all, it didn’t update to 2.2 correctly. It tried and failed.

Second of all, it keeps rebooting itself randomly.

So we call up verizon support about both problems. Lets start with the bad:

The Bad:

We called and a nice lady answered who had us go through some simple procedures like a hard reset. We changed some settings to try and help the rebooting. As far as the update goes, she told us to go to our local verizon store because they had “more information”. So the next day we went and waited in line and everything and what does the guy say? There’s nothing we can do. You’ll just have to wait for the update. Now inferring logically, I argued that “The system has the phone marked as upgraded, even though it failed the install.” The guy says “WELL, it takes about a month to roll it out and everything.” He really didn’t get that we HAD gotten the update, it just didn’t install. Once again, “Well, you just have to wait about a month and see.” Thanks for the help. We schlepped all the way over to a verizon store, waited in line, and we get absolutely no valuable information. Great.

The good:

So after that, we call verizon again and someone knowledgeable picks up. We had to wait on hold for 8 minutes but let me say, it was well worth the wait. He asked about the water activation sticker and had us look at the firmware on the device. And he says (finally) “Well, the system has your device marked as upgraded, even though your phone says differently.” THANK YOU. I’M RIGHT. THE TWO OTHER PEOPLE WE TALKED TO WERE WRONG. So he asked if there was any physical damage and hallelujah, a replacement phone is on it’s way.

But the real question is, why did the two other people there have no idea what they were talking about? I mean, come on verizon. Why would you hire them if they aren’t knowledgeable? These are questions that may never be answered, but in the mean time, here comes a device with 2.2 pre-installed. Yay!

Wireless Tether with Droid Incredible

So let’s just say that you are driving somewhere and you have your computer (or iPad or iPod touch for that matter) along with your droid incredible. Well now for free (actually, the expense of battery life) you can use your Droid Incredible as a wifi tether, so you can have an iPad on verizon.

Sadly, the speeds are dramatically reduced to a groping 70 kb/s. But I think it’s better than nothing. Can load pages, not so great for downloads and video/audio streaming such as youtube or pandora.

Step 1. Make sure your phone is rooted. Just do steps 1-4 of the tutorial HERE (continue the steps to install android 2.2, if desired!).

Step 2. On your incredible go to THIS LINK (try using chrometophone, review on that soon!)

Step 3. Once the link is downloaded open it and install the application.

Step 4. Open the application on your phone.

Step 5: Press menu and go into the settings and change around your preferences. change the SSID, and add a passphrase. Enable access control if desired.

Step 6: Press the big tether button.

Step 7: On your wifi enabled device go to the network selection and select the nework name that you had entered in the SSID preferences. Enter your asscode and Voila, you can connect to the internet!

One of the cool benefits of this is that you can be on the internet while in a car. Cool, eh?

Well, back to making fun of Microsoft

Unless of course you live under a rock, you have heard about the terrible antenna problems the iPhone 4 has been having. Basically, if you put your hand over the left black line, all of your signal drops. Apple was having a PR disaster, but today Apple held a press conference and it seems that the truths were revealed.

But I must say, Apple wasn’t playing fair here.

First, Steve Jobs ponts out how all of the smartphones antennagate. He showed test videos of many popular phones including the BlackBerry Bold. This is simply putting down the competition and saying “we can’t go against the laws of physics… yet.” [Steve Jobs]. Fine.

So I got curious and asked I wonder if my phone does this…

Well, I gutters its back to making fun of microsoft…