OmniWeb

I’m sorry. I really am. This is, indeed, yet another web browser.

I was recently at a technology summer camp (I’m taking a class about photoshop) and the same instructor that ended up switching me over to macs kept telling me about how mazing omniweb was. I wasn’t convinced until I finally decided to download it.

The first thing you notice is speed. I know that people call chrome fast, and, well, it is. But from tests on Good Morning Geek, it seems as though graphics render either faster or from top to bottom. I’m pretty sure omniweb prioritizes the top of the page for rendering, as the header seems to appear almost instantly, followed by widgets in the sidebar. In chrome, it takes a couple of seconds for the header to appear.

Other than that the big thing is tabbed browsing. So lets say I have a lot of tabs open in Safari. I mean a LOT. In the menubar it shows the tabs as txt, the name of the webpage. But when it gets crowded things get a little harder to make out.

(click to expand) As you can tell, it’s kind of hard to tell which news article that CNN page is about. What if I have ten CNN tabs open but all I see at the top is CNN:…

OmniWeb takes a new approach. Thumbnails.

I don’t even need to figure out what the text is trying to refer to, I can just take a glance at the tabs and click the one I want to look at. And even if I have 20 tabs open, the thumbnails don’t get smaller because you can scroll through all of your thumbnails.

Another cool thing is the ability to load tabs in the background. I know this isn’t new to the field of browsers but I find that the system it uses to tell you that a tab in the background is loading (and when it is finished loading) very unique.

When a tab is loading it is greyed out and has a spinny thing in the top right.

When a tab in the background has finished loading, OmniWeb does a nice job of letting you know.

If you open the tab the check mark wil go away.

Other than that there is one more key feature to this: site-specific browsing options.

On any website you can click a button in the top right and select your options for ads, appearance, security– let’s just show a screenshot.

The button to toggle the pane is shown in the top right.

As you can see there is also a page info pane where it shows you all of the images, scripts, stylesheets, and frames on a webpage. Here’s a gallery with pictures of each and every pane, plus all of the other screenshots from this post:

OmniWeb Homepage

OmniWeb Download Page

Le Trackpad de Mágico! (Magic Trackpad)

I have no idea why but this has been requested by numerous people.

Along with the launch of the new and improved iMac, Apple released the Magic Trackpad. It’s basically a larger bluetooth MacBook Pro trackpad. Their tagline is “why do notebooks have all the fun?”

I find it useful even tough I already have a MacBook Pro, because when I need gestures like exposé It is right there, not a reach across the desk to get to my MacBook.

Setup

The setup is very simple. First step is to update your software. Do that by going to the apple menu and clicking Software Update. This will then download the drivers for the Magic Trackpad.

Once you have downloaded the update and restarted, press and hold the power button on your trackpad until the green light starts flashing.

Once that is working, go into System Preferences and click on Trackpad.

Once in the pane, click on Set Up Bluetooth Trackpad in the bottom right corner.

Make sure the light on the trackpad is still blinking (if it isn’t just press the power button once) and you should see a window appear. After a few seconds it should look like this.

Once it looks like that^^^ click continue and your wireless trackpad will be setup! In the pane that follows you can configure a bunch of cool options.

Review

The Magic Trackpad is a good addition or replacement for a mouse. The large surface is convenient because you will rarely have to pick up your finger, however having it so large does make it feel a little bit awkward.

I think that if you are getting (or have) an iMac or other Mac desktop then you may prefer this over the Magic Mouse for it’s multitouch gestures. For MacBook and PacBook Pro users I find this only useful if you are already using an external keyboard and mouse because you can get the gestures right where you need them without reaching out across your desk to get to your MacBook’s Trackpad. It’s aluminum design fits in perfectly with the Wireless Keyboard and is even the exact same height. I’m thinking that apple should create a Magic Keyboard that has a Magic Trackpad on the side of it.

The Magic Trackpad is currently available at your Local Apple store for $69.

[ad code=1]

Create a WiFi network with your Mac

I am currently in Japan, and in the Hotel we have no wireless in our room. We do have a wired connection, but we have iPads that need WiFi. Here’s how to take your mac and turn it into a WiFi network in a few steps.

1. Plug in ethernet

into your Mac. Make sure the internet connection is working by visiting a few sites. Many hotels have pages where you have to agree to terms. Make sure you agree and/or pay before proceeding.

2. Turn on internet sharing

Open up System Preferences and click on Sharing. In the list, click on Internet Sharing, but don’t click the checkbox. Configure it so it looks like this:

Then, click on AirPort options in the bottom right. Here you can put in the name of your Wifi network and a password if desired.

Click OK, and now you can click the checkbox next to internet sharing.

3. Connect your devices

On your WiFi enabled devices you should be able to see a WiFi network with the name you put in under Airport Options in step 2. Connect to it and enter a password if you configured one.

Tada! Now your devices should be able to browse the internet. Cool! Be aware that you can’t be on a WiFi network on your Mac while sharing your internet.

Use it wisely!

Bluetooth not available? Here’s a 10-step fix!

I’ve had this happen a few times where suddenly for no reason it appears, my bluetoth magic mouse stops working. I go to my bluetooth icon to see if it is connected and it is greyed out with a squiggly on it. Clicking it shows this text:

Bluetooth: Not Available

Usually when this happens I end up wiping out my computer and reinstalling snow leopard. but instead, I tried a little harder this time.

By instinct, I just restart. I go up into the menu and hit restart. The sad truth about this is that it never shuts down the computer, it never stops running. (If it did, how would it know to boot back up again?)

However this didn’t work. So I thought that maybe something on startup was consuming the bluetooth card, making it unavailable for the little menubar to see. To fix this, I just went into System Preferences under Accounts, Login Items, and deleted every single item there. I then shut down, unplugged the power cord, took out the battery, put back in the battery, plugged in the power cord again, turned off bluetooth in every other device I had laying around, and turned it on again. Tada! I had bluetooth again. So here’s an easier guide:

  1. Open System Preferences.
  2. Click on Accounts
  3. Click on Login Items under your username
  4. Select the top item and click the – until there are none left in the box
  5. Go to  in the menubar and click Shut Down…
  6. After it shuts down, remove the power cord
  7. Remove the battery (If possible)
  8. Reinsert the battery
  9. Reinsert the power cord
  10. Turn off bluetooth on all surrounding devices

Start back up and your bluetooth should be available again!

    picplz

    We all have twitter accounts.

    What is twitter for? It’s for sharing what you are doing right then in less than 140 characters.

    picplz is similar, but it uses pictures with tags and captions instead of just text.

    Sorry guys, but the app is only available on android. 🙁

    So here’s how it works:

    Open up the app and you are instantly greeted with the view of your phone’s camera. Tap the camera button to take a picture. If you have foursquare configured, tap the venue that you are at. You can then tap someone/something to tag them in the photo. Then you can click edit details and enter a caption and decide which services you want to post it to (twitter and foursquare). Then click post and your picture will be posted! This is great because you can see which pictures you’ve taken at different foursquare venues. Your profile will be located at picplz.com/user/username. Check mine out here!

    Turn your iPad into display with Air Display

    Well, you got your shiny iPad. It does everything as advertised. But it can do even more. You can turn it into a secondary display for $9.99!

    First, on your iPad, download an app called Air Display for $9.99.

    Next, connect your Mac (sorry PC users, this won’t work for you) and iPad to the same WiFi network (if you don’t have any available create an AdHoc network on your mac). Then, open the Air Display app on your iPad. It will give you detailed instructions on how to download and install the plugin for your Mac (free). I’ll walk you through it anyway:

    First, download the plugin at avatron.com/ad. Then, install the package and restart your computer. Make sure your iPad is awake and Air Display is open. Click on the Air display icon on your mac’s menubar and select your iPad from the list. Your screen will turn blue, then your iPad should be connected. By default, your iPad is configured to be on the left. So drag a window off of the left side of your main screen and it will appear on the iPad. cool! You can also touch on the iPad like a mouse (no right click though).

    Now that you have your Air Display configured, lets personalize it.

    Open System Preferences and click Displays. You will see a window show up on each of the displays. But the one we really want to use is the one on the main display (the main display is the one with the Menubar at the top). You will see that on this display there is a window that has an arrangement tab at the top. Click Arrangement and here you will see two screens: the smaller one is your iPad. You can click and drag you iPad to a different side of the main display depending on the physical position.  You can also drag the menubar to the iPad to make it the main display.

    Now this is cool and stuff, but a really cool use is that you can finally run flash on an iPad! the fps is less then 30, but it will do for the most of us.

    Now if you have a physically plugged in external display, this means that you could have 3 screens without having to buy something like the viBook for $120. Here’s how I set it up with the Air Display:

    System Preferences Arrangement

    As you can tell, I have the Macbook to the left of my monitor. I then put my iPad on top of my monitor and am using my iPad as my main display;. This eliminates desktop clutter, and when working in photoshop all of my tools don’t get in the way so I can work on a pretty big image.

    Here’s how it looks in real life:

    By default the wallpaper won't span

    As you can tell, it looks similar right? All of my icons are on my iPad along with the menubar, allowing more room on the main display. Sadly, the wallpaper doesn’t span across all of the monitors automatically, it just takes a lot of cropping in photoshop so you get three different pictures that eventually come together as one image. Also, cool picture right? It’s a portrait of me drawn by one of my friends. If you look on the iPad, you’ll see a thought bubble with binary.

    Sadly, you need to add the iPad as a display with the menubar icon every time you restart your computer. Also, it’s hard to use it while the iPad is syncing.

    There’s a cool way to impress your friends!

    [ad code=1]

    Apple Time Capsule!

    Sleek!

    As you saw in this post, I wrote the following:

    Time Machine is incredibly specific about the things it is happy about.

    And I’d agree. But when you get the Time Capsule, because it is made for time machine, al of your problems disintegrate.

    Wireless Networking

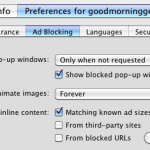
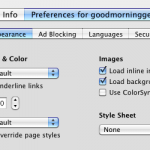
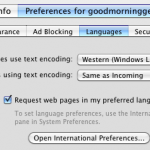
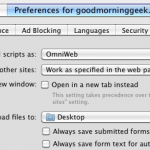
    The Time Capsule is actually an AirPort Extreme and a 1/2TB hard drive built in. The Time Capsule has dual-band connecting 802.11g and 802.11n. On the back, you connect the Time Capsule to [ethernet] WAN and then using the AirPort Utility to configure all of your options. Then, plug in a wireless printer! To configure it, go to the Print & Fax pane in system Preferences. Click the + icon and select your printer from the list that appears. Tada! You can now wirelessly print to your USB printer! Then, in the WiFi menu in your Mac’s Menu bar select yur time capsule’s network name, enter a password and now you are connected to the internet through your Time Capsule!

    Time Machine

    The Time Machine Icon

    Once you have configured your time capsule using the AirPort Utility you can now backup to it with Time Machine. Time Machine comes on very mac and is a functional backup tool. To start using time machine, open the time Machine preference pane in System Preferences and turn the big switch on. If a dialog doesn’t automatically appear click Select Disk…. In the dialog that appears select your Time Capsule (Usually Data on [your Time Capsule’s Name]) and click Use For Backup. It will then backup all of your data in what is called the initial backup. This one first bakup wil usually take about 3-7 hours depending on how much data you have (4-5 for 30GB in my experience). It will backup wirelessly, so feel free to move around the house while it backs up. After the initial backup is done, it will create a backup of new files every hour. DON’T WORRY! It doesn’t replace duplicate files, so the backup’s size shouldn’t change that much over the use of it unless of course you make some huge deletion or addition.

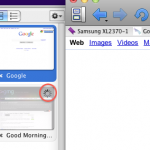
    Uh-oh, you deleted that one special file[/folder]! It’s easy to get it back using using Time Capsule with Time Machine. On your mac, open a finder window where the file you deleted existed (before you deleted it, of course). Then, open the time machine APPLICAtION (NOT System Preference Pane!). The finder window will then slide up to a cool wormhole-like interface with windows going back. Each window going back is hourly into the past. You can quickly navigate using the lines on the right of the interface. You can click a window a ways back to fly over to it. Now browse  found the file you want to restore in one of the windows! Before bringing it back to life (or your hard drive) check to see if it is in any more recent backups: you probably want the latest version of it. Once you’ve found the latest version, click on it once to select it. Then, in the bottom right, click restore. The file will be”magically pulled from the past into the present” with a cool effect. Tada! your file has now been revived (or stored on your local hard drive)!

    In case you have a LOT of data, you an always select particular parts of your hard drive to backup. If you are a system file experimenter (like me) you probably want to keep backups of your whole hard drive, as that will include the configuration of all of your setting etc, which when reformatting you can restore from a backup an hour before the one with the screwed over file (happened many times when messing around with system settings, I screw over one file which gets backed up, so make sure that if you had screwed a file and the hard drive hadn’t crashed you use a backup older than the most recent one!).

    Just in case you have a LOT of data, you can select which folders you want to exclude in the Options… dialog in the Time Machine system preference pane. If you tend to accidentally screw with your system files and you happen to destroy your mac (or part of it) doing so, Then when reformatting you can actually reformat using a backup from your Time Capsule. If I were you, I would use a backup prior to the one that was made when your mac was screwed over (as a result of screwing with a system file) or else it will just be the exact same. OORRR, while in the reformat menu you can select restore from the Time Capsule but DESELECT SETTINGS AND CONFIGUREATION. This will put all of your applications and files back, but leave the system config files (the ones that would screw up your mac) brand new right from the disk. Smart!

    Whoops, I forot to mention: If (and possible when) your Time Capsule runs out of space because of backup, it will delete older backups first instead of giving you a “Out of space, delete everything” kind of error. Once again, smart!

    Network Disk

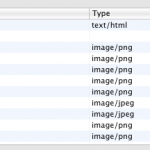
    Your time machine will show up in the Shared section of the left sidebar. Click on it and authenticate using the parameters you setup with the AirPort Utility, and there will be a share called Data by default. Double-click it and if you bacup using Time MAchine, you will see a .sparsebundle there. You can now utilize that HUGE hard drive in there to save stuff on. Just click and drag any file into the Data share of your Time Capsule in finder to store it on the 1-2TB hard drive. Sweet!

    The Time Capsule is available at a 1TB version for only $300 and a 2TB version for $500.

    Homepage

    Store Page

    Plantronics Discovery 925 Headset


    Well, I have actually never had a headset before, but I do say, I like this one. I remember my first phone- old and clunky, as expected for a first phone. But for a first headset, this is recent, comparable, and most importantly stylish. Let’s start with the obvious. It looks like a Tony non-functioning piece of plastic, and I would never guess it was a headset. Just the general shape of it looks so elegant. The headset is available in many different colors, but I have the black one which is shown in the picture above.

    I must say that the quality is great, for a headset with the range it has. The input is great (other people say), and I must say that it is just plain great.
    It has the standard setup and configuration for all other headsets, with a passkey of 0000.
    So, why would you want to get this headset? Let’s count down the reasons.
    3. It’s SOO much sleeker and MORE AWESOME (awesomer?) than those round ones with that thing that flips out, or than the ones that go over your ear.
    2. Super easy bluetooth setup (in fact, I now use it with Skype on my Mac. Sorry PC users!), default config for most all phones.
    1. Great battery life–kinda hard to believe when the battery is probably a tiny bit bigger than a hearing aid battery. But this has a feature that many bluetooth headsets don’t include: A charger in the case. The case is nice and leather, and has a plastic fitting inside that is molded to the shape of the headset. But inside the part that fits the bigger part is the same plug that is used to charge it. It’s a little hard to explain, but pictures can explain anything.

    As you can tell, there is a mini USB port on the side, which when you plug it into the case the plug inside the case is inserted into. The big plastic thing hat fills the space where the headset doesn’t is actually a battery that charges the headset. On the bottom of the case is another mini-USB port that you can plug in the headset’s charger to. You can also charge the headset directly. But this provides a full charge that i almost guaranteed to last through the busy businessman or businesswoman’s day.

    So in the end,

    Pros: Sleek, wireless, good battery life
    Cons: Umm…Not made by Apple?

    ***** Outstanding!!!


    Review: Wireless Keyboard


    “The best wireless keyboard out there”–Me.
    Yup, I love this thing. There is an amazing responsiveness to the keys, and it is TINY, but the keys themselves are the same size as huger keyboards. The new wireless keyboard is a huge leap from older apple keyboards. Only one thing, that isn’t actually a bad thing: I hope I don’t crack it in half!
    The first setup is REALLY easy, and actually kind of enjoyable. First, you take it out of the box and of course, put it on your desk to see how it looks. Wow. now that’s an improvement of desk space. But it wireless, so it’s a little different from just plugging it in. So of course, you take out the rest of the stuff. Hey, look! there are 3 Energizer batteries that are AA. So the first step is to take them out of the packaging and untwist the left knob of the keyboard
    and put in the three AA batteries, like shown in the picture below.
    Then press the on button on the right of the keyboard, it should look like the picture below

    Then you will see a small green light appear.


    Now it is time to hook it up with your computer. Easy. Now what you have to do is go up to the bluetooth icon in the top right and click Setup Bluetooth Device like shown in the picture below.
    Select Keyboard in the window that appears.
    It will look for keyboards that are there. I have already paired and named mine before, and I unpaired it to do this demo. So this is why it has the actual name of my keyboard there. Select the keyboard and click continue.
    It will connect and tell you a passkey to put in followed by the return key to confirm that you are actually pairing it with your own keyboard, not someone Else’s somewhere else.
    Tada!
    Now in the Keyboard and Mouse preferences you can name your keyboard and change other settings for your new keyboard!
    So there’s the setup. Using the keyboard is great. It has the perfect angle for typing. And it is SO much thinner than the older keyboards, as demonstrated in the pictures below.
    And look at the size of it. The exact same size as my MacBook, and way way way smaller than those older keyboards!!!
    And with the Wireless Mighty Mouse it makes the ultimate wireless workstation, way better compared to the old ones, as compared below.
    BEFORE:
    AFTER:

    And I’m sure that it looks great on your desk. Interested? Go get one for yourself.
    Get a Mighty Mouse Here
    EDIT: The above link is no longer active, because the new mouse is the Magic Mouse. The review on that Can be found HERE.

    Review: Wireless Mighty Mouse


    I have always been interested in Apple’s buttonless mouse. But I used to be so aggravated by the lack of scroll capabilities and right-click. That was an an Apple Pro Mouse, which was the standard for the old tinted dome iMac. But now, all of that has changed.

    Pros: Sleek buttonless feeling, wireless, right and left click, 360º scrolling, amazing laser precision, side buttons, and every one is completely customizable.
    Cons: Side buttons a little hard to squeeze.
    It is amazing how responsive the click is. It’s actually a, click!, loud, but you barely have to press on the mouse itself. It is also an amazing shape to the hand, for all sizes. It can run on 1 AA battery, but for longer life put in two. Also, If you have a mac, the Mighty Mouse works riot out of the box. It even comes with 2 Energizer Lithium Non-rechargeable batteries! All you need to do is pair it with your mac, and then you can start using it! I think that the default tracking speed is too slow, and I have it one notch away from fast. I also turned up the scrolling speed. The default is a little different from what you hear it is. Even the scroll ball isn’t set to 360º scrolling. I think that the best configuration is this:
    Also, the precision of the mouse is amazing. I have never seen the kind of laser technology they use before. The light from the laser is completely invisible. The only indicator is a small green light above the laser. Also, the mouse turns off, by moving a slider over the laser. Reverse that to turn it on. But it doesn’t auto-connect, so to connect it, I need to use my trackpad and go to the little bluetooth symbol in the menu bar, hover over my mouse, and click connect, like below. The keyboard shortcut I assigned myself in system preferences, and that is not by default.
    Also under the mouse preferences, you can rename the mouse, and see the battery level. If you have a bluetooth keyboard, you can do the same, but as you can see, I don’t have one (yet).

    Cover Flow + Remote App + iTunes DJ= Awesome wireless listening experience

    Sometimes I like to do nothing but listen to music. My computer on my desk playing music, me sitting on the other side of the room on a pile of stuffed animals. But what do I look at when I listen to my music???? And how do I change the music, request a song in iTunes DJ (itunes 8.1 only), or change the volume??

    Well, all of that is now solved.
    I always use iTunes DJ for my needs now. It plays my higher rated ones more often, I can request songs, and I can remove songs from the DJ playlist. I have a great set of speakers, and I can turn them up to a very high volume. I must say, the iTunes DJ is very good at thinking what music you want to listen to. And the request feature makes it a very realistic “DJ”. Too bad it doesn’t have a voice… but Apple could definitely put that in there. I mean, they put it in that ipod.. Hey, where is it?, aka, the iPod shuffle.
    Question 1: What do I look at when I’m listening to my music?
    Answer 1: The awesome cover flow look. I can see what song just played, and what song is coming up. I can put it fullscreen, so that’s all I see- My album artwork of what song is playing, and a few before and after the song that is currently playing.
    Question 2: How do I change the music, request a song in iTunes DJ, and control the volume from across the room?
    Answer 2: Simple. I have an iPod touch as you may know, and I have a cool app that is made by apple and is called remote. You can hook it up to your iTunes library, and over wifi, you are able to control the music. It also puts your iTunes library as the Music app’s interface, but sadly you can’t rotate to view cover flow. but I can do all that: request a song in iTunes DJ, go to the next song, and even control the iTunes volume.
    VIDEO!!!!!!!!!!!