[BUGGED] Favorite→RT

You may not know this, but it is possible to favorite a tweet. It’s supported in all twitter clients and the website.

Unfortunately, it is difficult to see what tweets a user has favorited (I haven’t been able to). But this service from my friend Spencer Schoeben makes it so a [yourtwitternamehere]favs account will retweet every tweet you favorite.

For this example, I will be using the TeenTechie twitter account.

Step 1

The account that will have the favorites is considered the “Primary account”. For this example, that would be TeenTechie. We need to create the favorites account that will retweet the tweets that TeenTechie (the primary account) favorites. That account should be [primaryusername]favs (TeenTechiefavs). Go to twitter and create the account.

Step 2

Go to http://spncr.me/favrt and click Sign in to Twitter at the bottom of the page.

Step 2

Frown in disappointment about the errors that occur.

🙁

Don’t worry, the problem should be fixed in a little bit. Once it is fixed, I’ll write a post that shows you how to create the account SUCCESSFULLY!.

In the meanwhile, save that [primaryusername]favs account, and while you wait, you might want to create a picture by taking the Primary account’s photo and putting a star in the bottom right (to denote the favorites account).

Thanks! I’m sure it will be fixed soon, Spencer says he’s ON IT and fixing it ASAP. Now smile in happiness for what is to come. 😀

Cooliris

We all have media we want to look at. These days, video and images are quite the hubbub. Cooliris is a way to “immerse yourself” into your content using a 3D wall.

Using it is very simple. Go to a google image or youtube search and click the cooliris wall button in the top right (in Safari). Your google image search will be displayed on a 3d wall. To go across the wall, you can

  • Click and dragx
  • Click the arrows at the bottom of the screen
  • Click and drag the blue doohickey to the left of right
  • Horizontally scroll with your mouse

If you find an image you like, you can click on it to view it and get more information about it.

This process works on many different media sites including flickr, YouTube, and more.

When you are in the cooliris wall you can search these sites instantly with the search bar on the top. You can also use the sidebar on the left to navigate through different sources like news, entertainment, featured, etc. You can even view pictures on your computer!

Here’s a video showing cooliris in action:

Sorry, the video isn’t in good quality.

Currently, I am an intern at Cooliris doing bug testing a brainstorming. I did in fact do a review of Cooliris a long time ago, but many new features have been added (and more are on the way).

Cooliris homepage

Cooliris download page

MindNode

We all have thoughts to organize. Mind maps are a great way of doing so, but a lot of software can be clunky, expensive, or hard to figure out. MindNode is a free, functional, and simple way of creating mind maps.

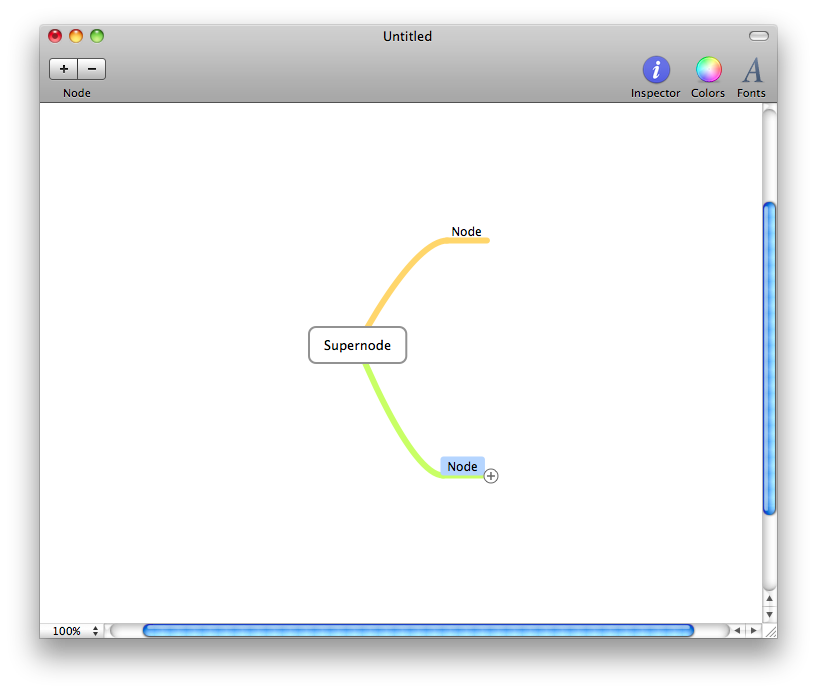
Upon opening the app, you will be greeted with what is called the “supernode”. Every different branch coming off of the supernode is called a node.  Click and drag the plus off of the supernode to create a node, and then you can type to name the node. When hovering over a node there will be a plus so you can create nodes off of other nodes.

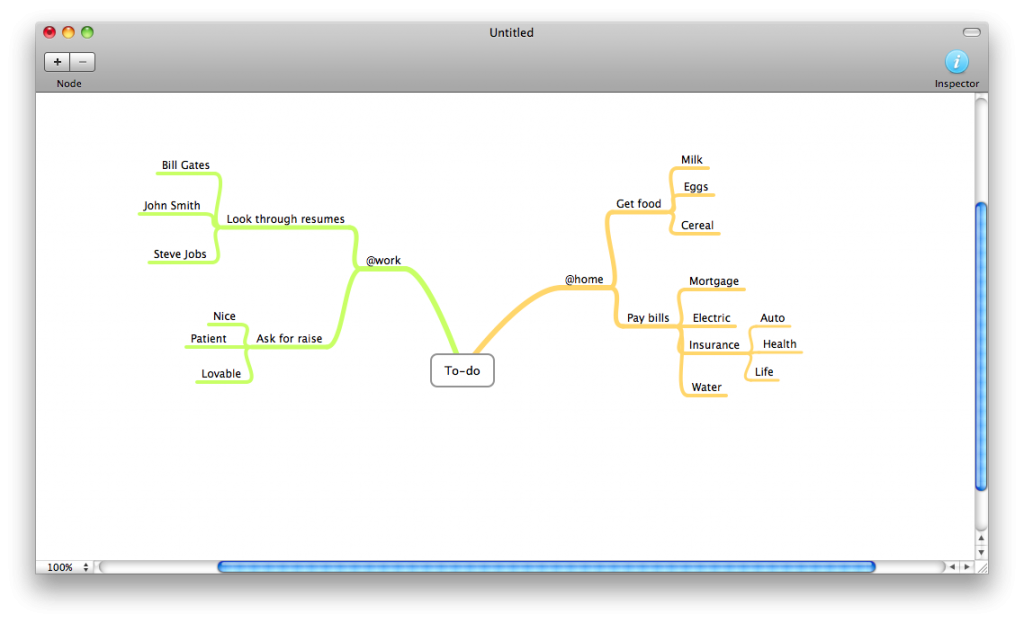
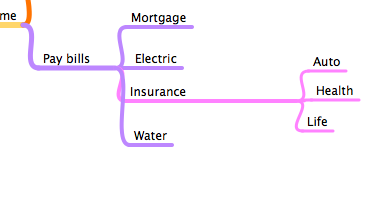
So you can organiza thoughts and ideas for things like to-do lists, projects, and more. Here’s an example for a to-do list:

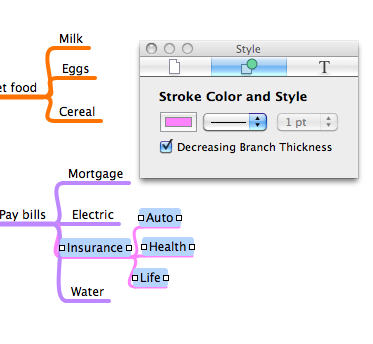
You can also configure the color of the nodes using the inspector (the i in the top right), which makes it easier to visualize.

As you can tell, the inspector only applies to items that are highlighted. And to highlight an item, you guessed itL you CLICK on it. :O

If you look closely, there are white squares to the left and right of every highlighted node (when you highlight a node that has nodes coming off of it, all of the “sub-nodes” are also highlighted). Click and drag one of the squares to resize the node to change text wrapping.

It can also be used to separate sub-nodes from other nodes so you don’t get them confused. If you use both this and the ability to change the color, you can easily distinguish the sub-nodes.

In addition to being simple, powerful, and free, MindNode can export a document to

Click Here to download an example of the PDF.

Here is what the text outline looks like:

Thanks to it’s simplicity and flexibility, MindNode can be used for many different purposes.

MindNode Homepage

MindNode Download

CloudApp

Who here tweets, IMs (or “Chats”), or emails?

Yah, that’s what I thought.

Sometimes I know I like to send people files. But if you are on IM it can take a long time and isn’t very compatible between different clients.

So instead, how about you put the photo in the cloud and send them a link?

Usually this would take a server and FTP access. But CloudApp makes it much easier.

Once you open cloudapp, you’ll notice this in your menubar:

This is what I like to call “The cloud” (I think you understand why…).

To upload a file, just drag and drop it over the cloud:

You will then see it change to this icon to indicate uploading progress:

Once it has uploaded, you will see this icon indicating it is finding the URL and pasting it to your clipboard:

And once the file is done uploading, you will see this icon:

Depending on the size of the file, that shouldn’t take long.

But where’s the file?

The answer is on your clipboard. Literally.

Now you can just paste into the chat window and a link to the file will be sent. Cool! Opening the link will have different results: If it is an image, it will just be displayed in the window. If it is another file, there will be a download link so they can download the file.

And that’s all there is too it. Just drag and drop, wait a few seconds, and paste the link. Now it’s easy to share files over twitter!

Also, I know that some of you may just want to take a screenshot and upload that. I know I like to do that alot because I can show anybody what is on my screen without any confusing file conversions or prints.

CloudApp makes this particularly easy by adding a Autoupload screenshots feature in the menu:
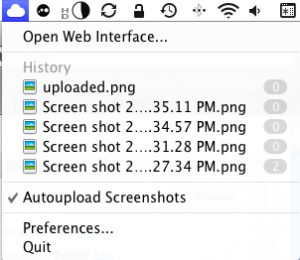
This means that it will automatically upload a screenshot right after it is taken. Cool!

So you take a screenshot, wait a few seconds, and paste into the tweet or chat window.

Now if you look up at that screenshot you will notice numbers next to the different files.

Those files are my recently uploaded files, and those numbers indicate how many time each on has been viewed.

Clicking Open Web Interface… will… well… open the web interface. There, you can delete uploaded files and more.

Now let me warn you, getting the app is also a process.

First, go to http://getcloudapp.com and click sign up. Then enter your email and desired password. Check your email and open the activation link. At the screen that appears, click on tools in the top left and the first item there will be CloudApp. Click Download to download the application. Once you’ve downloaded the app and moved it to your applications folder, open it up. You will see that cloud in your menubar. However, you need to activate it first. Just click on it and click Preferences. Then, click the accounts tab, and enter the email and password you used on your CloudApp account. Close the window and you are ready for uploading!

Once you have downloaded the app and moved it to your applications folder, open up the app.

Safari 5

While Steve Jobs took the stage to announce the new iPhone, something else was happening on the apple website. It wasn’t on the front page, nobody had any idea whatsoever. Except for my friend Spencer Schoeben (CEO of Teens In Tech Networks, he ROCKS!) who tweeted that he was stickin to Safari 5 for now. I looked at is and said to myself “Wait a second… safari 5?” And here’s what’s new:

Speed

In many tests, it beat Chrome or was equivalent for speed. This is one of the main reasons to switch!

HTML5 Compatability

The new safari has a lot more support for HTML5, still expanding Apple’s belief in no flash. Of course Safari still has flash, because if it didn’t we would have… well… a small issue. And a mob in front of Apple headquarters…

Safari Reader

Safari Reader makes it easier to read posts and stories on the web. It isolates the content of a page and displays it in a clean, maginifiable interface. Just go to an article and click Reader in the URL bar.

A little more eyecandy

The Top Sites page got a facelift, and now features an easy link to get to your history in cover flow view. Also, there’s that blue loading bar in the top again, just like good ‘ol safari 3.

Improved URL bar

You can now enter the name of a webpage you’ve visited in the past and it will automatically find the URL from your history. Cool, but I still like the omnibar approach of Google Chrome.

Extensions

Exact same as Google Extensions. Developers can create toolbars and other goodies to work with Safari, just like chrome extensions. Cool, but a little behind, don’t you think?

Other than that, safari is the same browser you used to know.

Safari 5 Homepage

Safari 5 Download Page

picplz

We all have twitter accounts.

What is twitter for? It’s for sharing what you are doing right then in less than 140 characters.

picplz is similar, but it uses pictures with tags and captions instead of just text.

Sorry guys, but the app is only available on android. 🙁

So here’s how it works:

Open up the app and you are instantly greeted with the view of your phone’s camera. Tap the camera button to take a picture. If you have foursquare configured, tap the venue that you are at. You can then tap someone/something to tag them in the photo. Then you can click edit details and enter a caption and decide which services you want to post it to (twitter and foursquare). Then click post and your picture will be posted! This is great because you can see which pictures you’ve taken at different foursquare venues. Your profile will be located at picplz.com/user/username. Check mine out here!

WeatherBug for iPad

If you just got that new shiny iPad, it may be a great tool for checking the weather, in fact, there’s an app for that!

So I have tried the weather channel, but similar to their iPhone app it is quite buggy. But luckily i found weatherbug which has a very nice interface and is very functional.

When you open the app, you are greeted with a radar map and a bar on the top.

The bar on the top has multiple squares with current conditions, live cameras, a forecast, and if you slide the bar left it acts like a page. You a then shows hourly forecast, active alerts, and a video thingy. You can tap the different boxes to see a more detailed view.

On the map, you can click on map settings to change the view to temperature, pressure, humidity, wind speed, infrared satellite, visible satellite, and radar. Cool!

You can also press the play button in the bottom left to see a time-lapse of the radar images.

The app is free from the app store as well. Yay!

Pictures of some of the features are shown here.

[ad code=1 align=left]

Are you a typist?

I know you can type.

In fact, pretty much everybody can. But are you a typist?

A typist is someone who is a skilled typer. Basically, it means you can type really fast.

Pretty much everybody in my family is!

But are you?

Here’s something you can have a little fun with. It’s called typeracer.

Typeracer is a site where you have to type a paragraph perfectly as fast as you can against your friends, yourself, or even other people on typeracer. Don’t worry, you all have to type the same paragraph. If you mess up, you have to correct the mistake before moving on!

Another cool thing is that it will tell you your words per minute (5 characters/word) and rank you on their own scale depending on your speed.

Depending on how tired I am, I can hit up to 77. I call above 65 a typist.

Don’t worry, typeracer is free online and really fun. Only problem is if you look at your keyboard while typing and make a mistake, you won’t realize it until you look up to see the typing box red and you have to start over!

Also, typing speed can depend on if you are tired.

If you just drank three caffeinated pepsis and a jittery, it is likely that you will make a lot of mistakes and get a low score.

If you are tired, you will be less aware and type slower just because your reflexes are slowed down. But if you are just fine and had a good night’s sleep, then you have no excuses!

To play typeracer, just go to play.typeracer.com. You can create an account to keep track of your speeds and levels as well (free of course).

Once you’ve started typing and you have made your account, comment and tell me what your level is. Im a typemaster. You can find this out by looking in the top right to the left of your words per minute. If it is really low, then do a few more races! Your WPM up there is the average of your last ten races, and your skill level is based off of that average.

But don’t try to typerace on an iPad! Every time you hit the space bar it turns on the shift key, which will make a mistake unless you press the shift key to disable it. That means slower typing, which means slower average, which means lower skill level!

Have fun and comment your skill level! 😀

Play Typeracer!

[ad code=1 align=left]

BumpTop

Do you own a computer? Does it run something other than MS-DOS or another code based system?

Then you have a desktop. The desktop is supposed to be what it is… a desktop. But desktops arent flat. Desktops have depth. You can put stuff on top of other stuff to sort it, you haave sticky notes…Turn your desktop into a desktop with BumpTop.

Here’s your usual Desktop.

Old Desktop...

But open the BumpTop application and turn your desktop into a desktop!

That's a real desktop!

As you can see, BumpTop changes my desktop into a true desktop, giving it a room kind of feel.

That’s truly the whole point of BumpTop. It really Goes even farther than that b y allowing you to make files bigger or smaller, depending on their importance. To do this, just click on an item once to select it, hover over the selected item, and click either grow or shrink. If you get the pro version, this can simply by done with the pinch of your fingers (only with a multi-touch trackpad). I would show you a screenshot of this, but when modifier keys to press for the screenshot make the small box with the options disappear.

Want something to be on a wall? Just click and drag it there. Pretty simple. Want to see one of the three available walls? Just double click it. Still on a wall you can make things bigger or smaller.

One of my favorite features is called piles.

Folders are overrated.

Just select a few items (A great new kind of selecting tool, as squares are just too hard to use), hover over one, and a menu will appear; you can click clean up to make the files into a neat grid, you can grow or shrink the multiple selected items, but there is another option:Make Pile. This will put all of the files into a neat little pile, which you can select, press “Return” and name the Pile. You can also make the pile bigger or smaller. Due to the basics of physics, you can’t have a pile on the wall. Yet do you want to see what’s in a pile?

Luckily, BumpTop integrates almost perfectly with QuickLook. You can select a pile and press spacebar to see the QuickLook of the files inside like you had selected all of the items. To open a file in the pile, you can double-click the file which will popup a little box with all of the files of the pile in it. Click a file to open it. Piles is really convenient for organizing things other than using folders.

Try taking a file and setting it kind of to the side but on top of a pile. This works with the sticky notes (you can click the new note button to create one, and move it around like a file), which is what is shown below:

Talk about physics!

This can be done with all files on your desktop.

Als

o just an FYI, If you want to change the backgrounds of the walls and floor, that can be configured in the preferences located in the menubar icon.

Overall, BumpTop is a great cross-platform way to expand your desktop 3X, and give you a great fun experience.

Plus…. IT’S FREE!!!!!

You CAN in fact get the pro version with a few more features, but If you are looking for an AWESOME and FREE way t have some fun with your desktop, it’s called BumpTop

BumpTop Mac Homepage

BumpTop Windows Homepage

BumpTop Mac Download

BumpTop Windows Download (compatible with Windows 7!)

Google Chrome

As many PC users know, Google Chrome is by far the fastest most stable most simple and most versatile web browser in existence. It’s lean and makes sense. But many Mac users are stuck with Firefox, which is bulky. And even worse some PC users still use internet explorer: The bulkiest, fattest, slowest, most insecure, and overall worst web browser.

So all of those Mac users wanted Google Chrome. And right then what did they get? They got a buggy, unstable, feature barren dev-release alpha of the web browser. I had it, an I was not happy. No flash! Back to firefox I went.

The Google Chrome omepage always had a sign-up button for the developer emails, but no browser.

UNTIL NOW!

On 11/8/2009 Google released the official beta of Google Chrome for Mac.

And it’s everything you expected.

Speed

Google Chrome got its reputation for speed. It’s fast, fast, and literally seems to suck down all of the information and coding and stick it right in front of you in the form of a web page.

I decided to test the speed of it against the other most popular web browsers.Here’s a countdown from slowest to fastest.

Safari: Believe it or not, but Safari was the slowest of them all. It took a painstaking 11.488 seconds to load Good Morning Geek! [Yawn in anticipation of the page loading]

Internet Explorer: Yes, Safari was slower than internet explorer. Internet explorer was able to get the text fast, but not the images. It took a total of 9.62 seconds to load Good Morning Geek. [Yawn in anticipation for the page to load]

Firefox: Just as predicted, Firefox came in second place for the web browser race. It took Firefox 5.607 seconds to load Good Morning Geek. [Small Yawn]

Google Chrome: is the winner (after all that was the whole point of the testing)! It got a remarkable 2.49 seconds to load Good Morning geek with images and all. Google chrome is FAST…


Stability

Yup, it’s stable. This is because Google Chrome has a new process for each tab. If one tab crashes, that oe process crasher, and the rest of the processes (tabs) are left intact.

I tested this using the Activity Monitor and just deleted one of the processes called Google Chrome Helper; the title for the process of each tab.

An the result I got was the tab looking like this:

Crashed Tab

But the other tab:

The other tab survives!

Yet, there is in fact a downside to this. It sucks up all of your CPU! But the results always vary.

I’m writing this post in Google Chrome. I have the post edit open in one tab, and Pandora [link] in the other. I am using very little CPU, but at points depending on what you’re doing it can max out a 2 core intel processor.

But yesterday when I was doing the same thing but had another tab open, my CPU was in fact maxed out.

Google chrome is fast and stable but because of its stabilization techniques it tends to take up memory and CPU.

Features

These features work on PC Mac and Linux, so first download the app (bottom of the page) and try them yourself.

  • Rearrange tabs by clicking and dragging them.
  • Make a new window from a tab br dragging the tab out of the window.
  • Drag a tab back into a different window by dragging it from one window and dropping it in the desired window.
  • In the OmniBar type in the name of a search engine like google.com or ask.com and press tab. What you then type will be searched by the search engine without loading the search engine’s homepage.

And many more!

So go get your copy of the fastest cleanest and stablest browser ever!

Google’s write-up and videos of Chrome’s Features

Mac

PC

Linux

How-to: Create huge posters and cool entryways

You like that picture on your computer. but you want to put it on your wall. Wait. You want it to COVER the wall. But, it’s too expansive to print on big paper at kinkos, etc., etc. So what do you do? You use an online tool called the rasterbator.This great tool will simply take your image and make the pixels big dots. The size of the dot will depend on brightness of the poto and how big you want it to be.

To use to this online tool, just click HERE, upload your image, crop if desired, size to the number of pages you want it to be, SELECT MULTI-COLOR ON THE NEXT PAGE, and download and print the PDF. Well, then of course there’s cutting it and putting it together, etc.

So originally I had a big picture of the aple logo that was screddd and hanging from my door, shown below.

Old Entry...

But I was getting very bored of it.

So I had just made my new logo, and I decided that I should create an entry thing with my logo. I was having some problems with the software I had previously used, so I used the rasterbator this time. Below is the image I uploaded to the rasterbator.

Original Image

As you can see, it’s simply two of my logos on top of each other.

So after downloading the PDF I printed it out (turned out to be about 30 pages) and put it together… with nothing but scissors and Scotch tape. This is quite the challenge as with a normal printer there will be a border, which you have to find a way to fold over.

After piecing it I did what needed to be done: I cut the whole thing in to strips EXCEPT FOR THE TOP. Then, I simply hung it above my door and this is what I got.

New Entry

As you can tell, this one hangs much mower than the old entry, and in a cose-up, you an see how this tool really fit it to this big of a size.

Pixels to dots

The rasterbator did just what I said it would do – pixels to dots. The brightr, the smaller the dot (as more white will appear). And of course, the bigger you want the picture, the bigger the dot.

But some people go REALLY far with this thing.

Whow...

smcFanControl

Doodoodoo, workin on my Mac, Lalala iStat Menus Running..Lalala GAH @#$%%@#$!@ 95º F enclosure base!!! GAH!!!! Even though I’m on a flat surface with great air flow…

What now?

smcFanControl!

This is a simple little menubar app that allows you to control the speed of your computer’s fan. You can make presets, tell it to use different presets for charging, battery power, and plugged in. I can also just use the slider and select RPM. So the below video demonstrates the proper thing to do.

That is really it.

But the real fun is when you listen.

It’s really coll how hardare ties into software. By moving this ound thind and pressing down, I can make a motor spin faster.

It’s amazing how these things tie in.

But so far, it has not failed me!

I must say that is does ware down your battery life a bit, and may reduce the life of your fan (after all, you are literally puching the limits), but if you need a wuick and easy remedy to get that fan speed going, just click the links below or the download and the homepage of smcFanControl!!!

Direct Download
Homepage